Heycollab is a powerful productivity management tool that allows teams of all sizes plan their work, communicate, share files and collaborate, all in one place.
In this section you will find everything you need to get started right away and get productive.
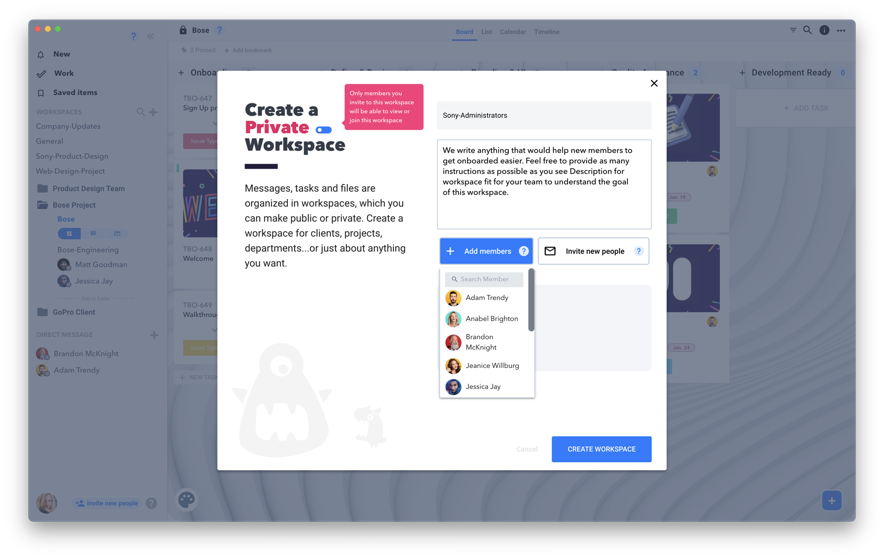
Your Heycollab workspace is where people can work together, connect all their tasks, and send the information they need to do their best work. Use the specific steps below to create your workspace and get started with Heycollab.
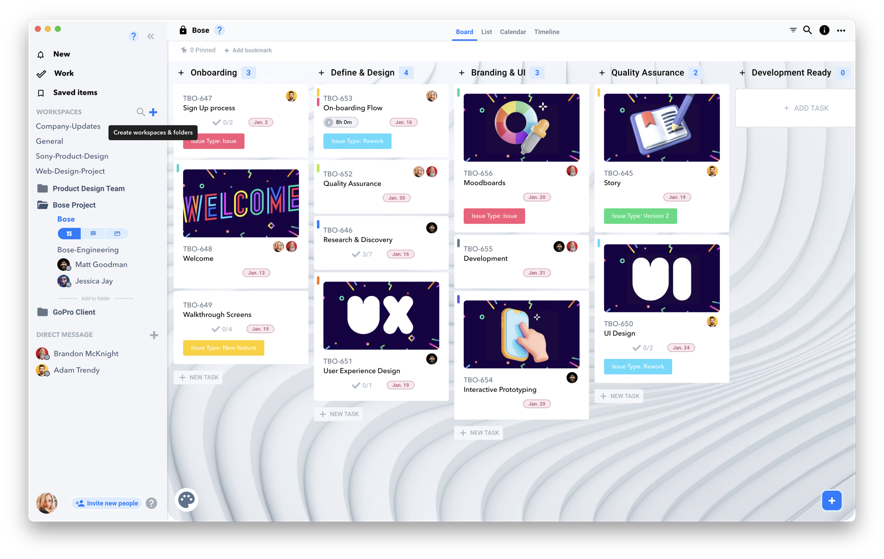
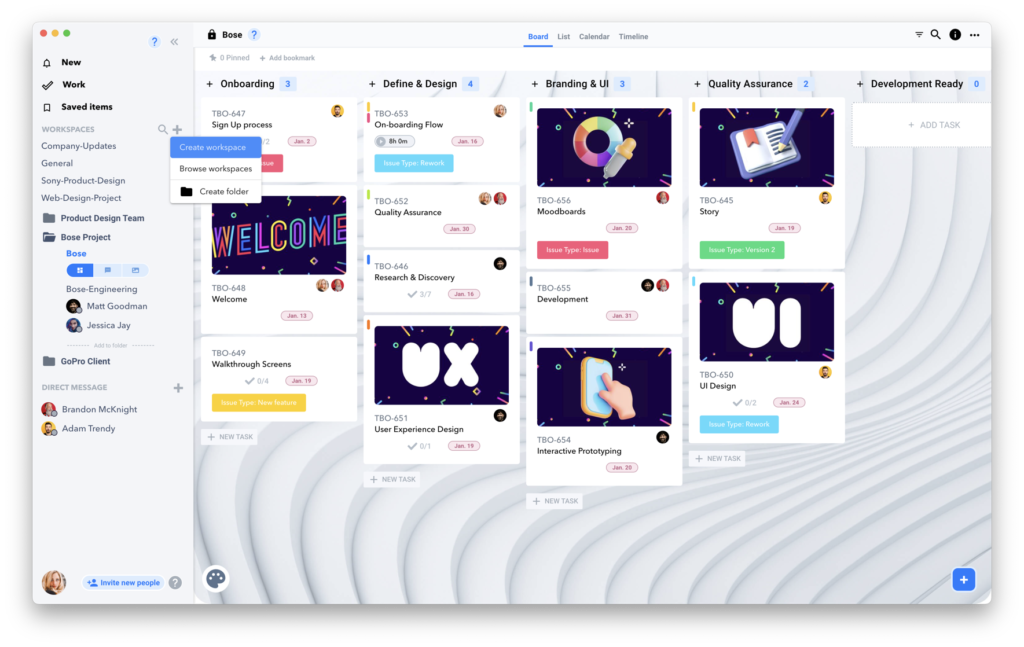
1. Click the Add Button on the Workspace title.
Click to allow you to name your Workspace.
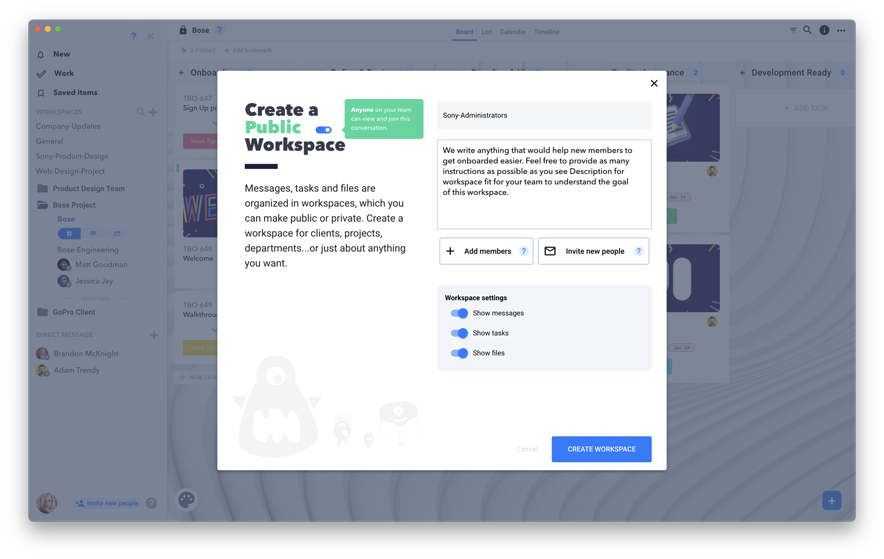
Follow the instructions on naming the workspace by adding team members, or inviting new team members to this workspace. Settings provide selections to allow your team members to see messages, tasks, and files.
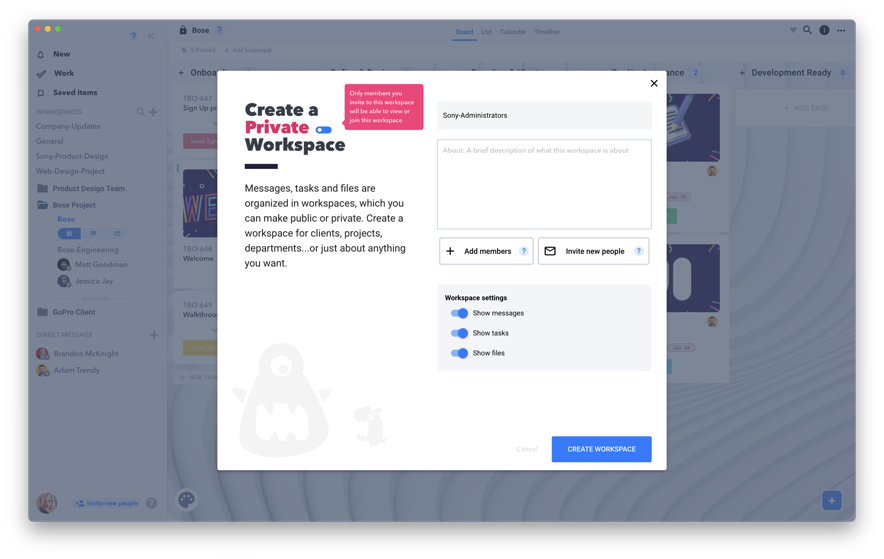
2. Add a Workspace Name.
Name your workspace so that you and your team can easily determine what type of work will be completed here.
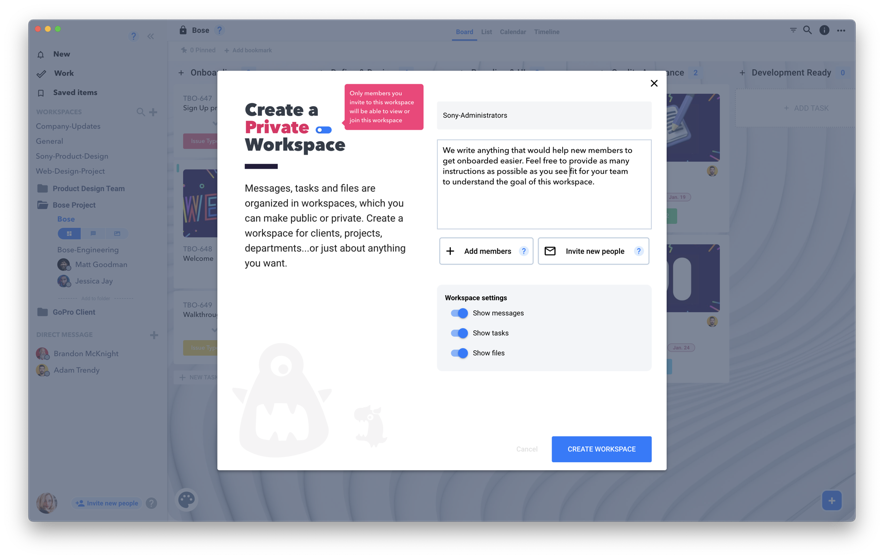
3. Add a description.
Include any important details needed or special instructions like login information that the team might be regularly using to complete their work.
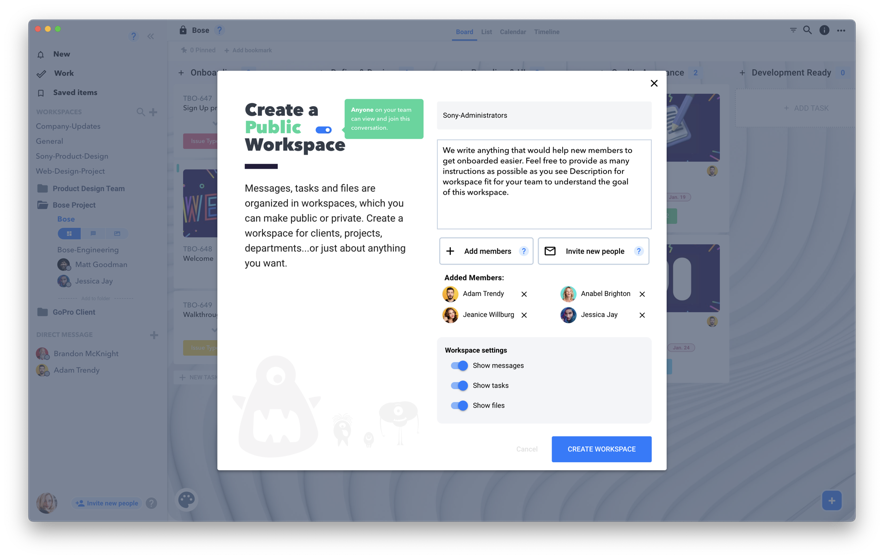
4. Select to make the Workspace "Public" or "Private" and add members or invite new users to the workspace.
This governs who is able to see and join into the Workspace. If this step is skipped- later the administrator of this workspace can add members or invite new users.
5. Ready to Create Workspace!
You are now ready to start adding Tasks and inviting your team to the Workspace. If you created a workspace by mistake or decided to delete it later- right-click on the workspace you desire to delete and select “Delete Workspace”.
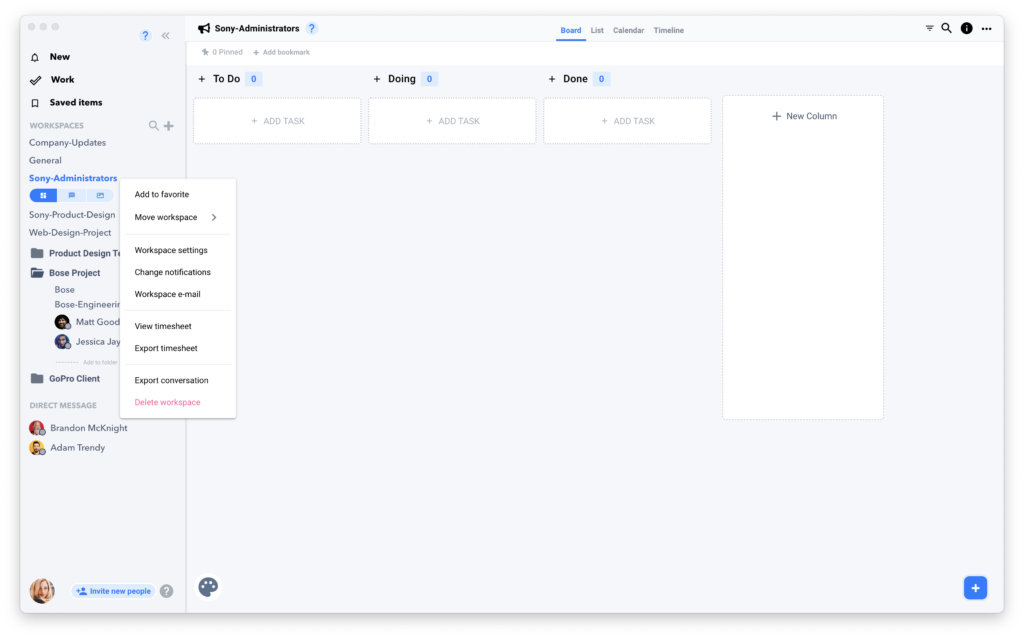
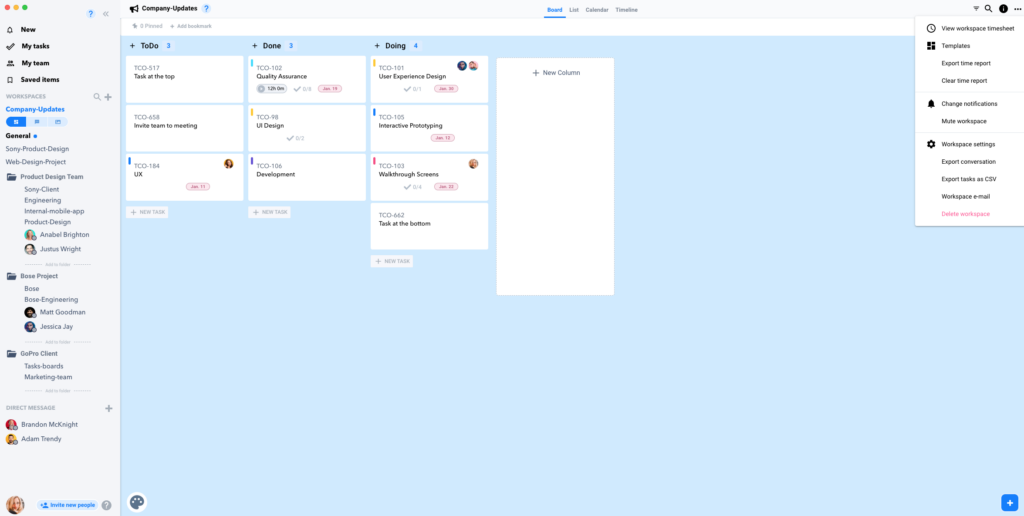
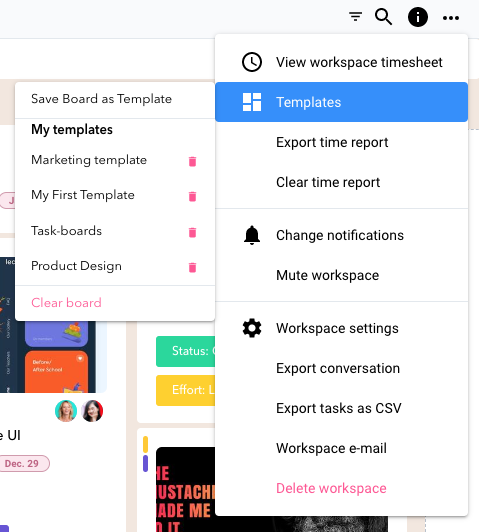
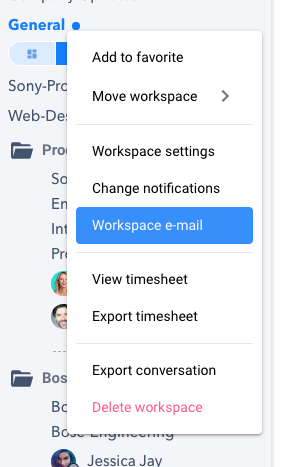
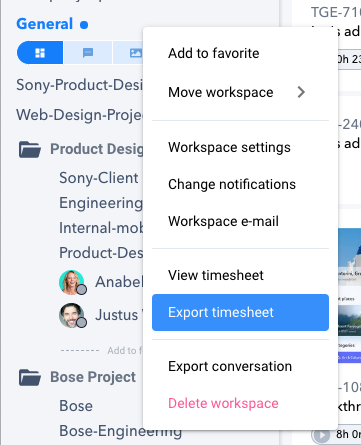
Once again there are a few things you can do with a workspace: 1. Add to Favorite 2. Move the workspace 3. Workspace Settings- change the settings of the workspace 4. Change notifications 5. Workspace E-mail 6. View the Timesheet 7. Export Timesheet 8. Export Conversation 9. Delete Workspace
In order to delete a workspace, there are 2 ways to do so, one is from the dropdown as you hover over the workspace and right click; the second is from the far right side on top, selecting the more icon- 3 dots and that will also give the user the ability to delete a workspace.
Hope this helped you learn more about how to become an efficient team!
Invite your team
Invite Your Team to Your Workspace
Maximizing the power of your Workspace begins with adding in your team members.
This will allow you to send them direct messages and assign them Tasks specifically.
Follow the steps below to add in your team!
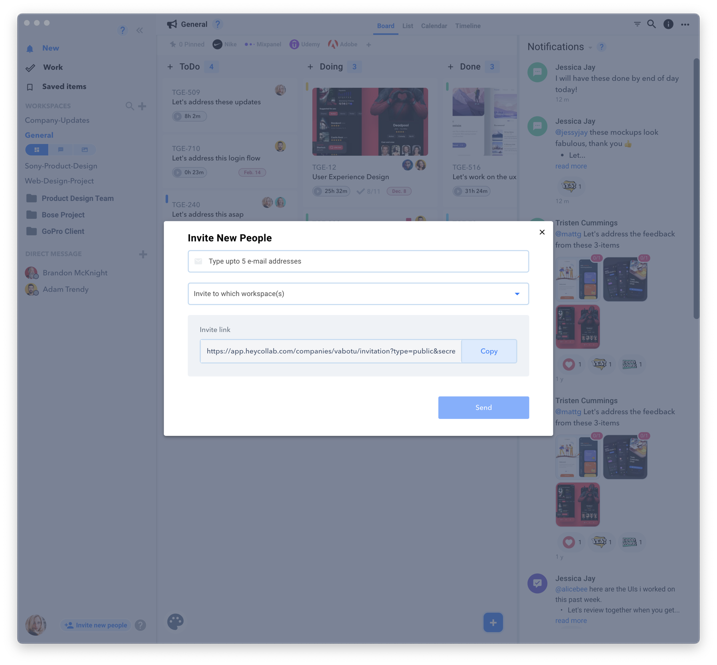
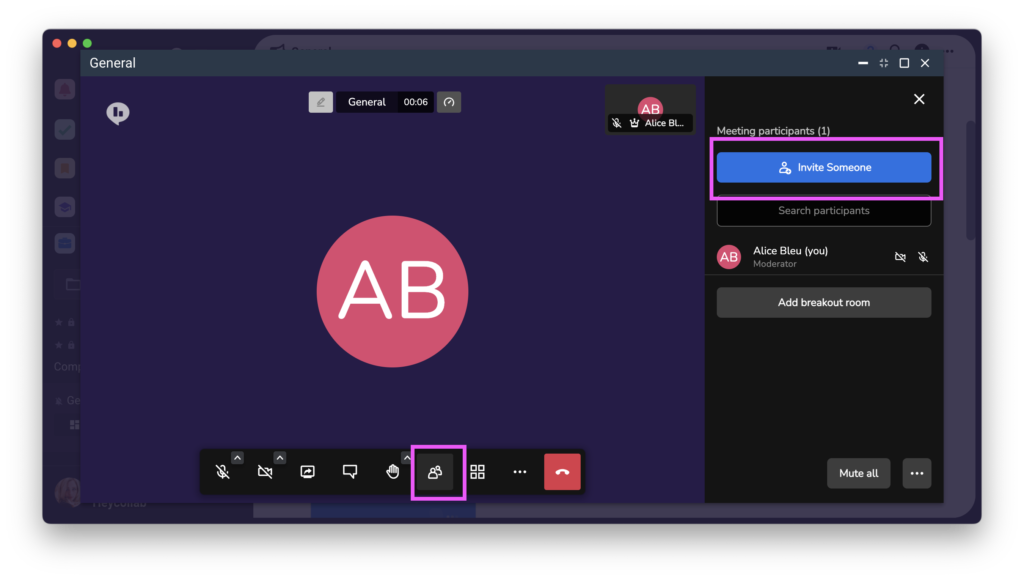
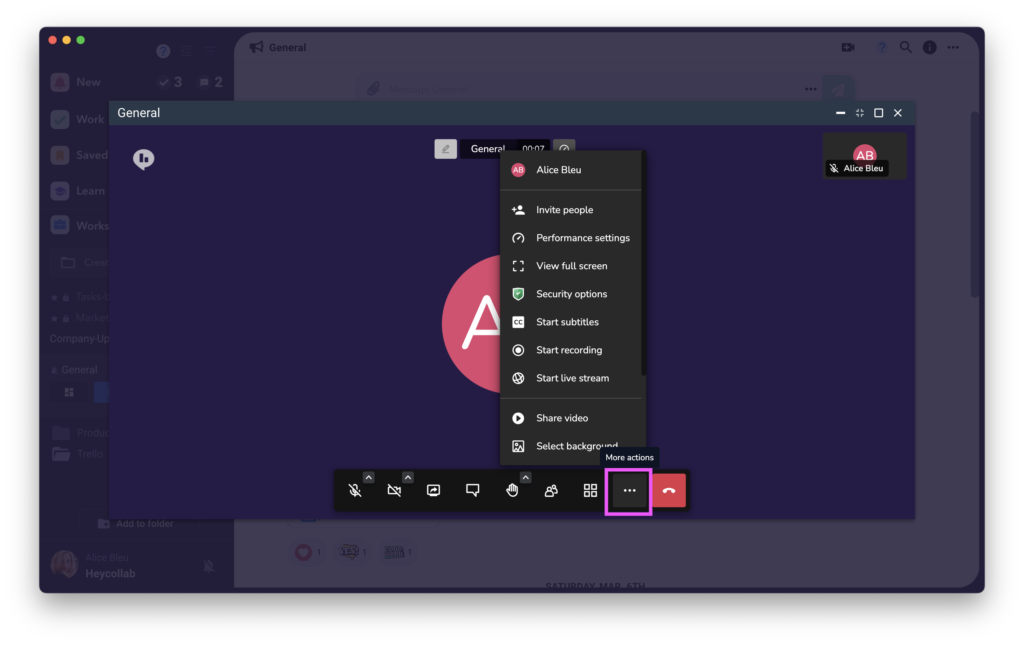
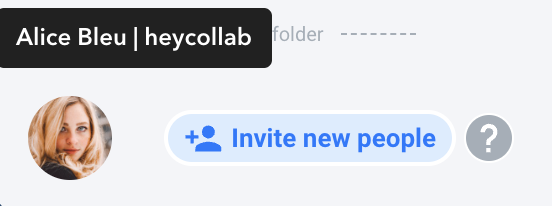
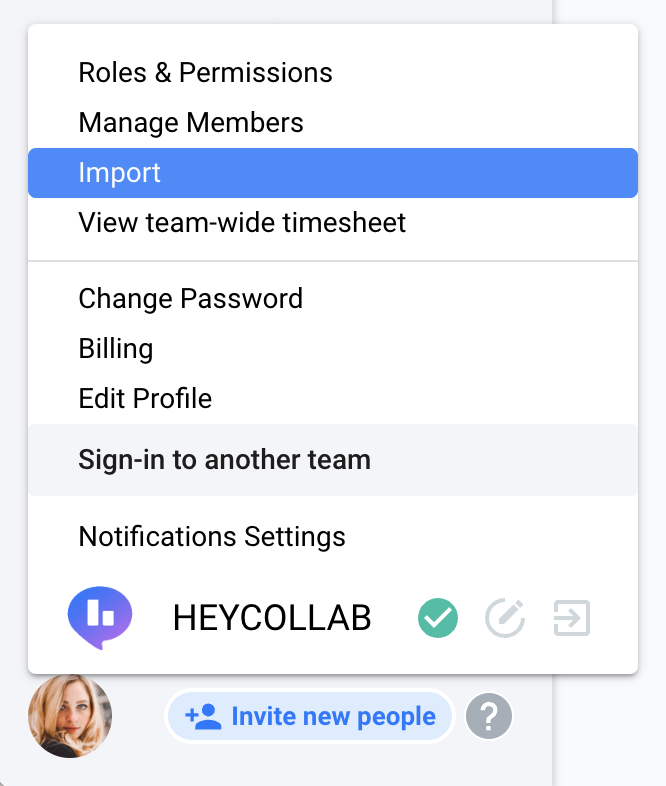
1. Click “Invite new people”.
In the left hand column click the “Invite new people” button below by the Profile image.
2. Enter the User’s email address.
Type in the user’s email address and select the Workspace you want them to join. You can add up to 5 e-mail addresses and copy the link for the invite as well.
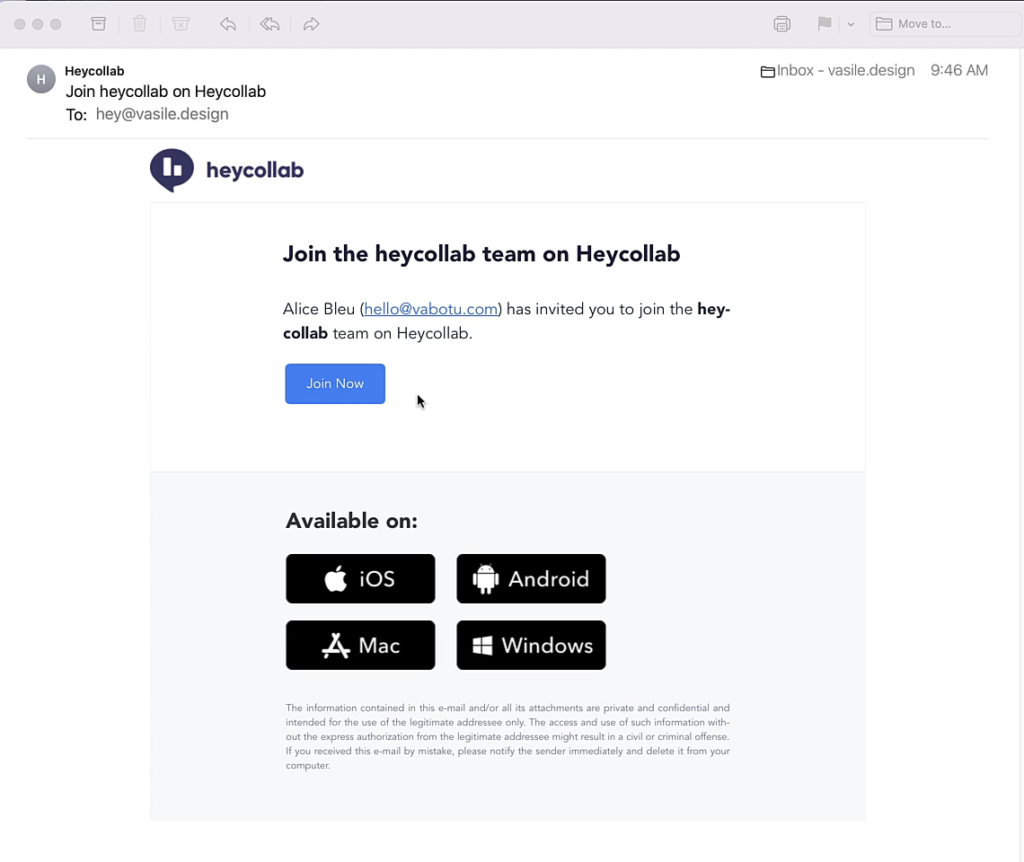
If you’ve been invited to a team in Heycollab, follow these simple steps to join:
Step 1:
Open the e-mail invite and click the Join Now button (if you have not received an invite, check your junk-mail folder)
Step 2:
Clicking on the Join now button should bring up this page, if it does not, make sure you are not logged in to Heycollab. If you are, simply log out, open this e-mail and click the “Join Now” button.
Step 3:
Once you filled out the form and submitted, you should be directed to heycollab. Now you can start collaborating with your team.
Intro for members
From creating workspaces and tasks to managing your team’s time and more.
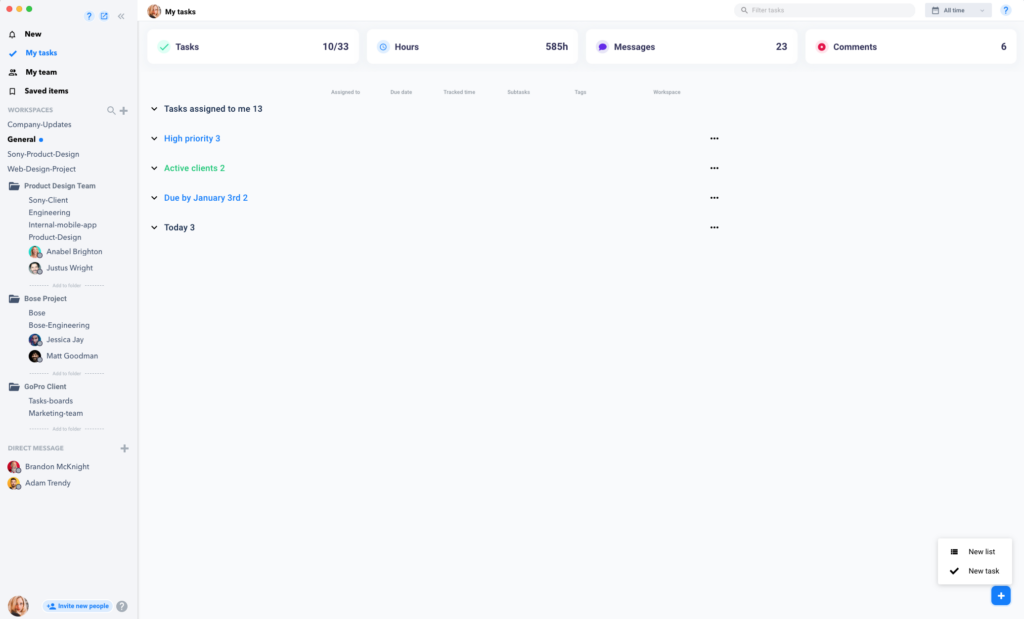
Overview of My Work
How to See My Work
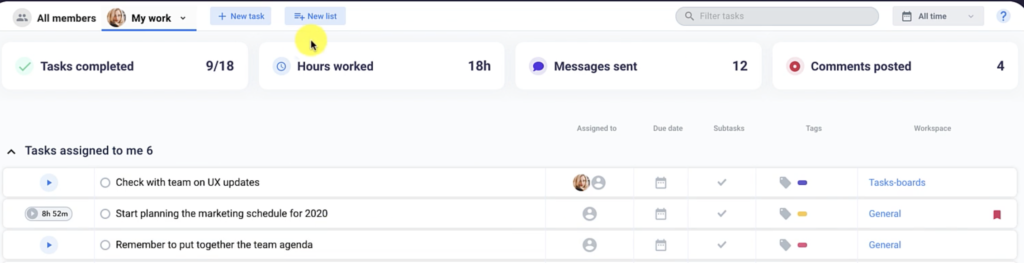
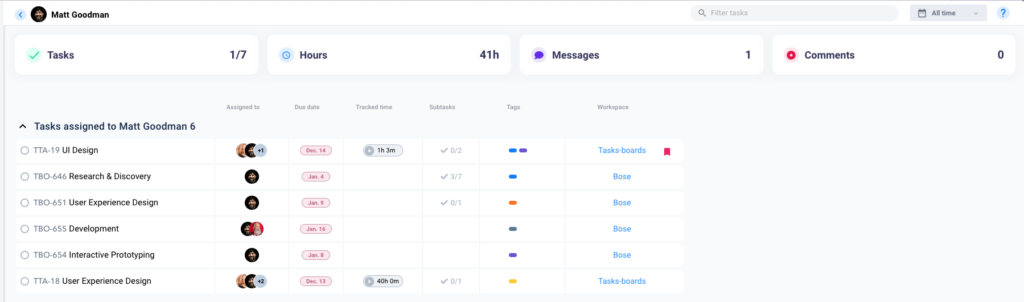
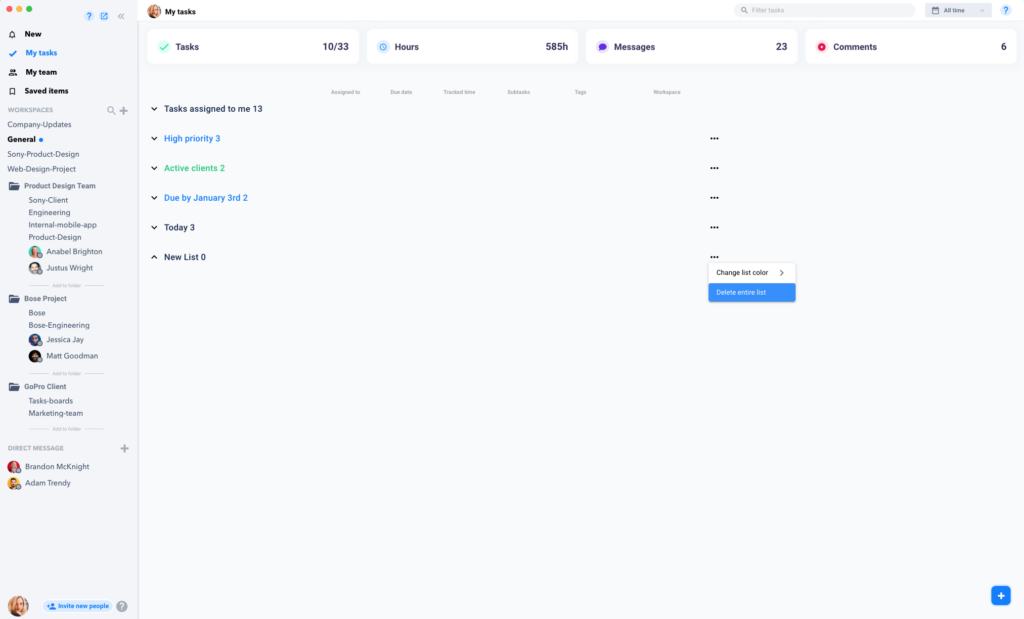
The My Work window allows you to see an overall summary of your activity in the Workspace.
When your work is shown, there will be four summary icons at the top: Tasks Completed, Hours Worked, Messages Sent, and Comments Posted.
The top section is “Tasks Assigned to Me” and is a collection of your work.
This previews important details like: due dates, tracked time, labels, and Workspace. Click on the Workspace on the far right to jump directly into that Task board.
A helpful quick tip is to organize your window by creating a List!
Creating a Custom List:
Step 1:
Click the “New List” button at the top row of the window, and the list will be added to the bottom of the display window.
Step 2:
Click on the name to edit and type your own name for the list.
Step 3:
To re-order a list you can click and drag it in any order under the “Tasks Assigned to Me” list.
Step 4:
Simply drag any Task in the window into any list you create to organize your work.
Notifications overview
Overview of Notifications
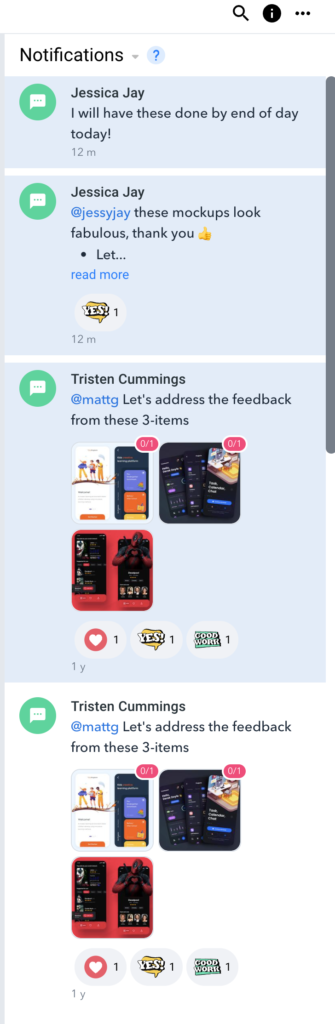
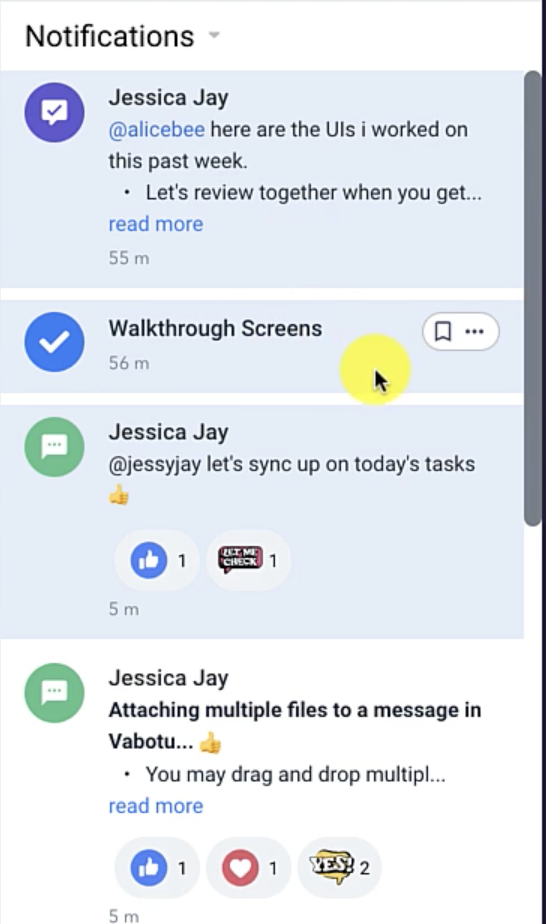
HeyCollab uses notifications as a central way to keep you updated on any new messages, task assignments or comments. You can see all your Notifications in the top left corner of the window.
Notice that there is a separate count for task and message notifications.
Click on the “New” panel name to preview all your Notifications in the About Sidebar on the right of your screen.
By default the most recent notifications received will be at the top.
You can click the drop down arrow to filter other options
Click the “…” icon in the top right of the panel to mark all notifications read or delete them.
And use the same “…” icon on individual notifications to just make those changes to that notification.
Note: All Notifications that are unread will have a blue background, and one’s you’ve seen will have a white background.
There are three icons used to visually identify: Messages, Task Comments, and Tasks.
Click on the icon in individual notifications to open the specific window related to that notification directly.
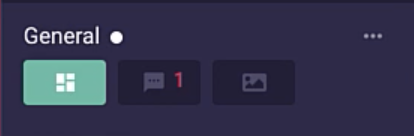
Another visual cue that displays is a white dot next to the name of any Workspace that has a pending Notification.
A number will also appear in the icon for Messages or Tasks in the Workspace to show how many notifications are waiting for your review.
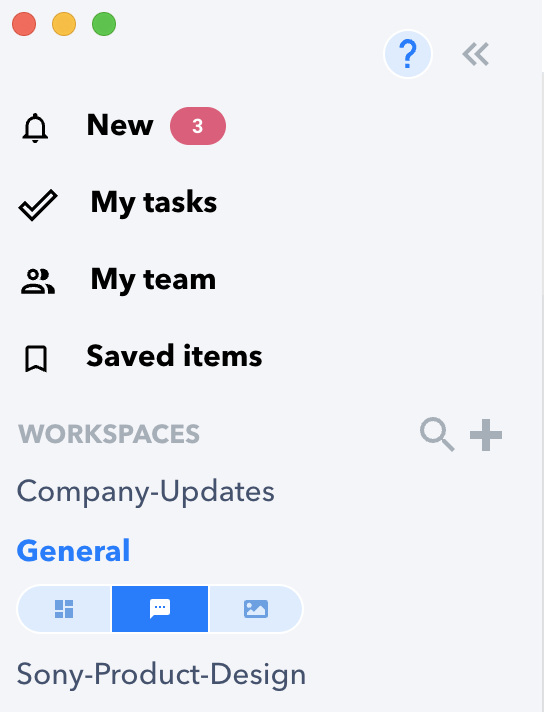
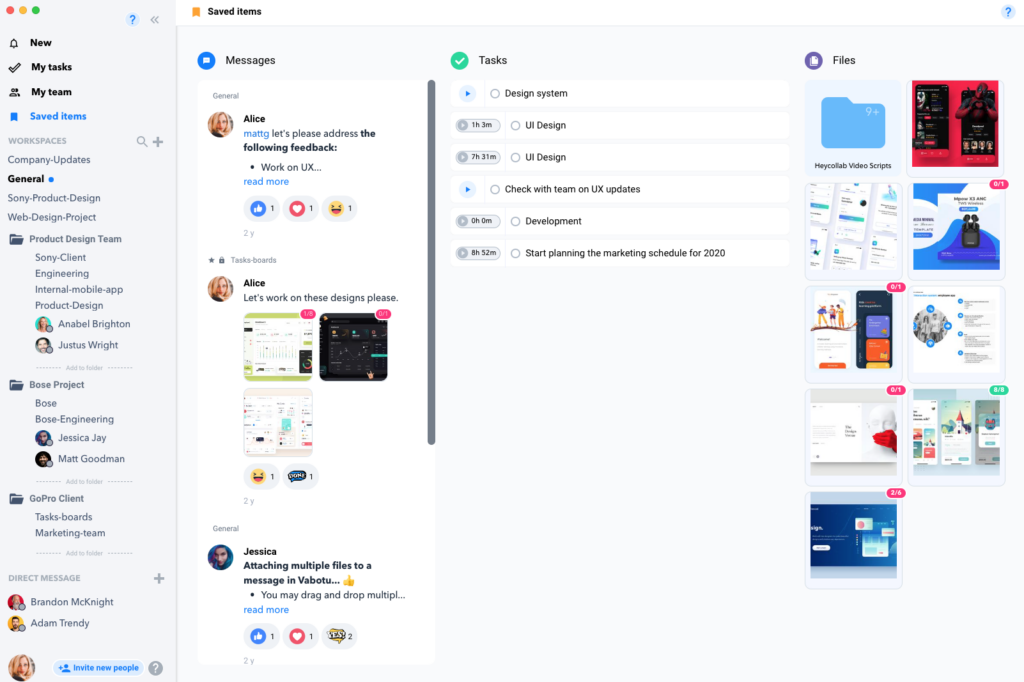
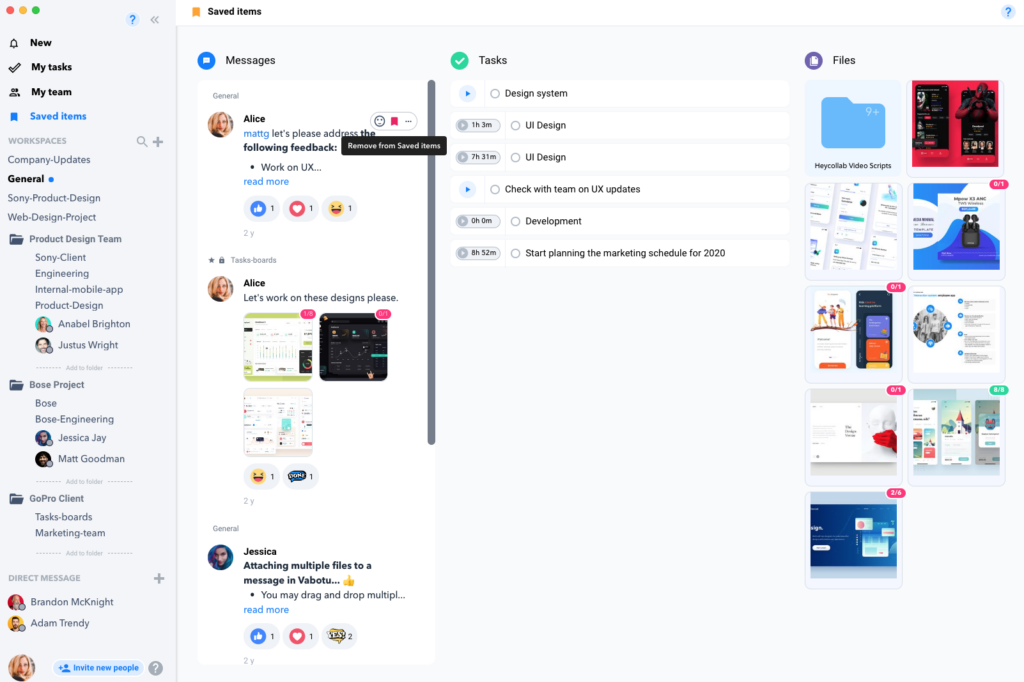
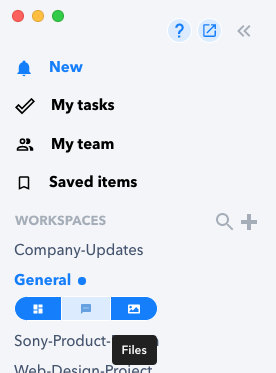
Saved items overview
Saved Items Overview
Heycollab allows you to gather and save all your important Files, Messages, and Tasks in one place. This allows for a quick way to get to the information that matters to you most when you are trying to complete your work related goals.
To access your Saved Items, look in the left hand column of the Workspace and select “Saved Items” from the top List.
You can add three types of items to Saved Items. They are: Messages, Tasks, and Files.
How Can You Add Items to Saved Items?
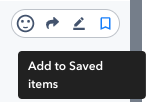
To add a Message go to any message and hover over it to reveal the Bookmark icon to the right.
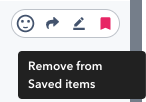
If you click the Bookmark icon again it will unselect and remove it from the Saved Items area.
In the same way when you hover over a Task in either the Board or List view it will show you the Bookmark icon you can click to add the Task to the Saved Items area.
Files can be added to Saved Items by going to the Files section in the Workspace or by looking at the Files in the About Sidebar. Hover over the file name and select the Bookmark icon.
BONUS TIP: Even your Private Tasks in the About Sidebar can also be added to your Saved Items and will display in the Task column of your Saved Items window.
Tracking my time
Tracking Your Time Overview
In Heycollab, wherever you have a Task you will be able to track the time spent on that work.
This timer is available no matter which view you use to access your Tasks.
Start Tracking your Time:
Simply hover over any Task or Subtask and click the “Play” icon.
This will start the timer which can be viewed directly on the Task or in the bottom left of the Workspace window.
The Timer will stay visible no matter which Workplace view you move into.
The title of the Task you are tracking will display below that Timer, or you can also click the Timer to bring up the Task window directly.
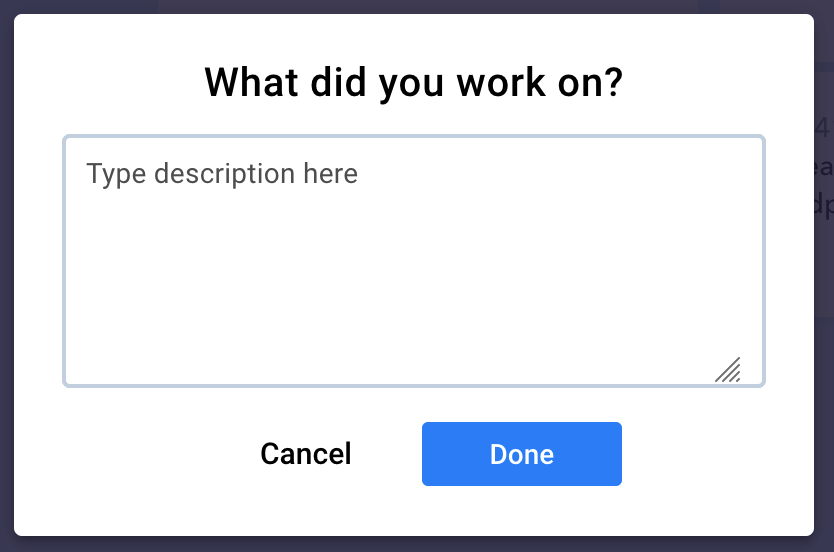
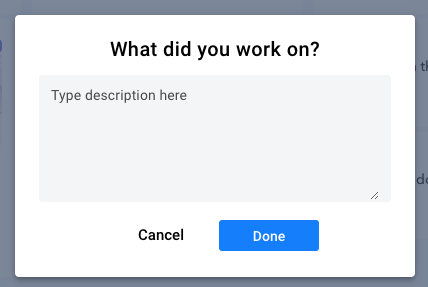
When you are finished simply click the “Stop” icon on either Timer interface.
A pop up window will automatically reveal an area to add a description of what you worked on during that period.
You can edit your descriptions by clicking the “Pencil” icon or by viewing the Time Report Log.
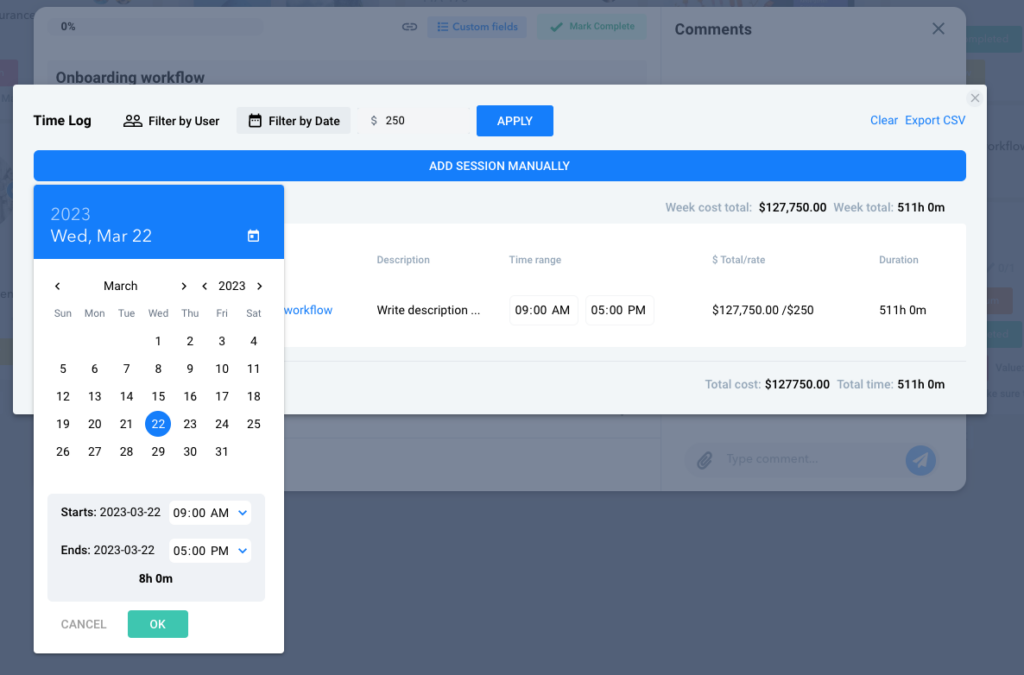
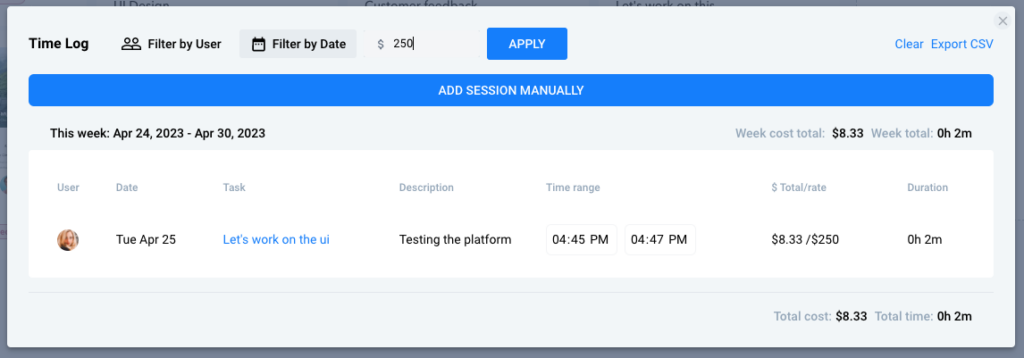
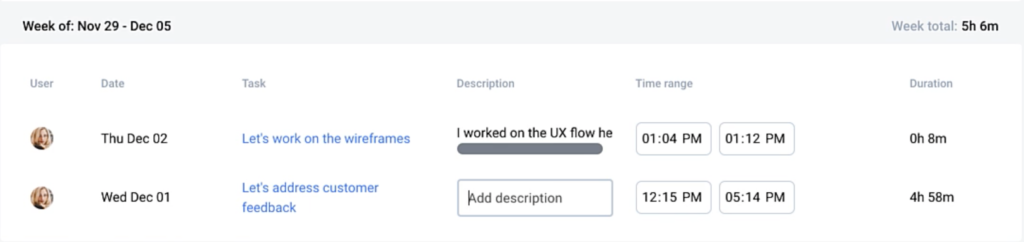
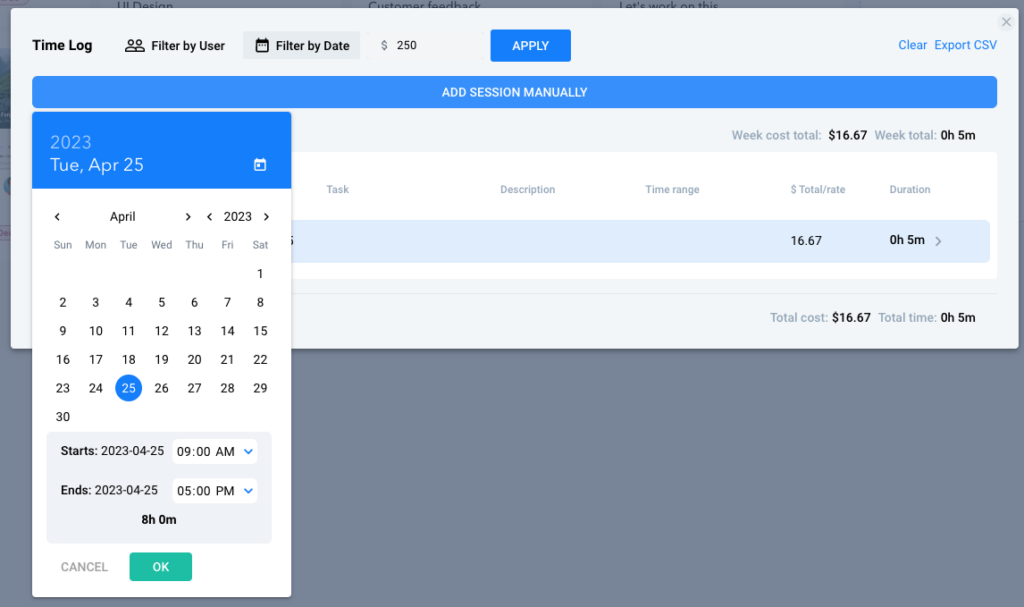
How to Use the Time Report Log
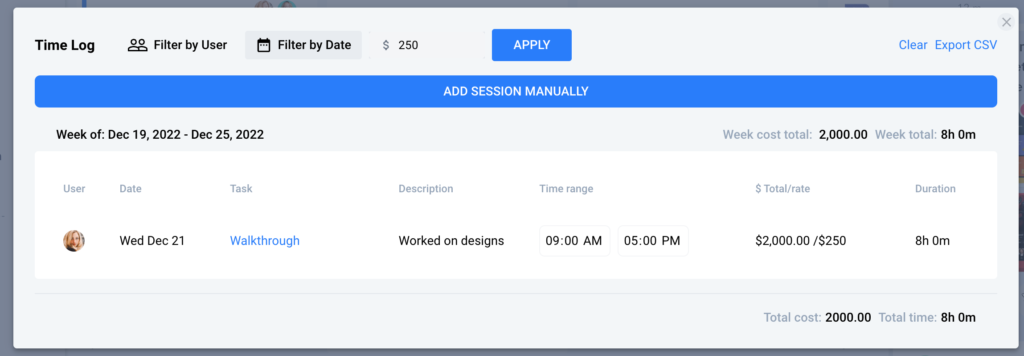
The Time Log Report window shows you who has worked on this specific Task.
It details which team member did the work, what date and time range they worked, and the description of the work they completed.
You can also manually enter a time range by adjusting the time range.
View the Time Report Log by clicking the “…” icon to the right of the Task Name.
Click the “Add Session Manually” button at the top of the Time Log Report window to enter any work that was not timed yet.
Choose the date or date range that was worked.
Then select the time range that was worked.
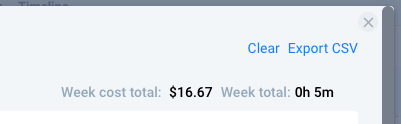
As you add more timed work the Time Log Report will section out the display in week long increments, providing a total for each week.
Export any Time Log Report into a .csv file by clicking “Export Time Report” in the top right corner of the window.
In a similar way you can view the tracked time you’ve spent working across multiple Workspaces.
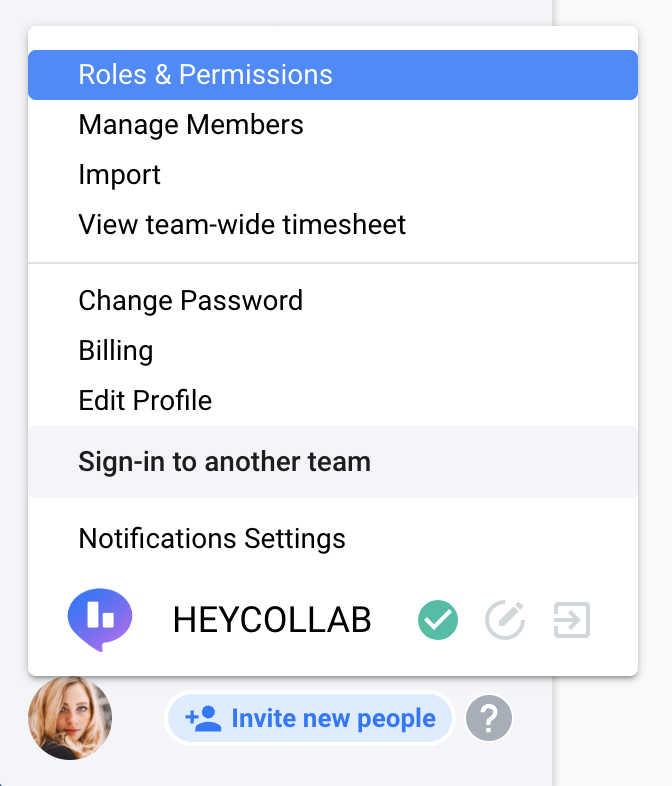
Click your Profile picture in the bottom left hand corner of the Workspace window.
Select “View Company Timesheet”
Then a Time Log Report window will open revealing all of the work that has been recorded across each of the Workspaces for the company.
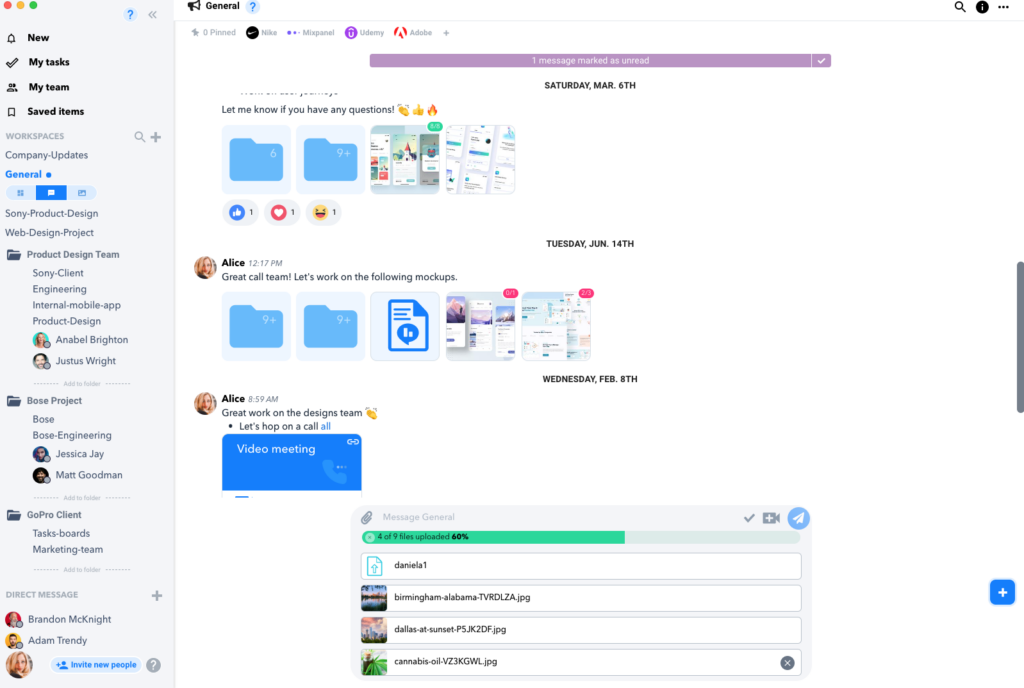
Sending messages overview
Sending Messages Overview
Communication is key to collaboration, and Messages are a great way to reach out.
Heycollab’s focus is making messages an easy and direct part of the interface workflow experience.
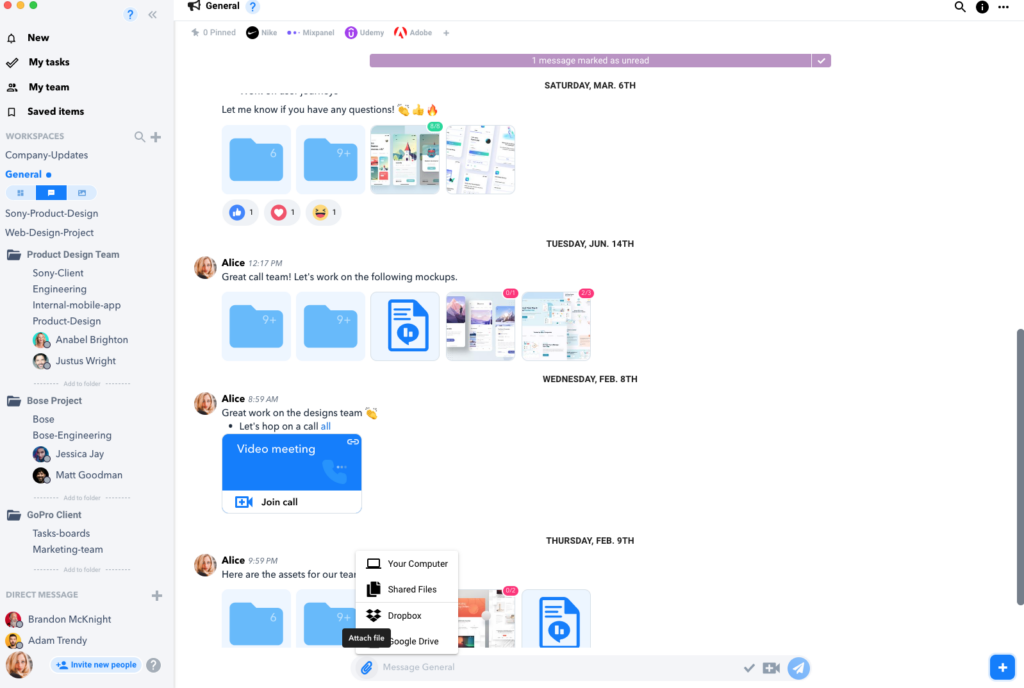
How to Write and Send a Message:
1. Find your Workspace in the left hand column and click the center Chat icon.
2. In the below grey window type your message.
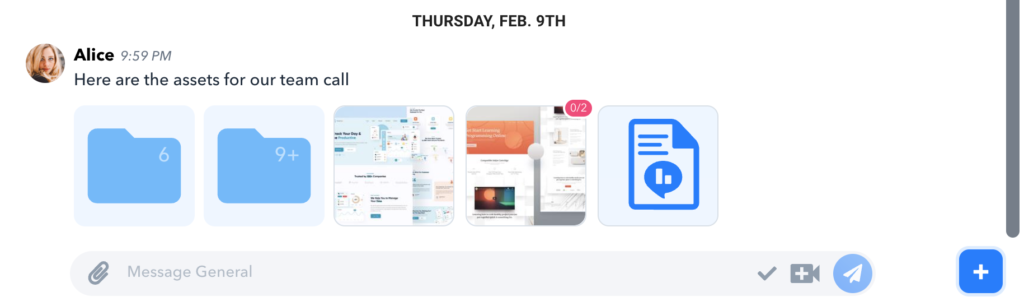
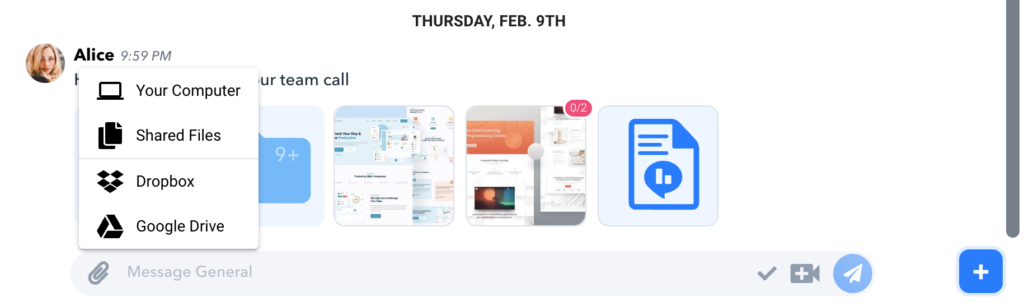
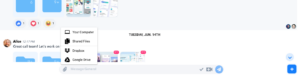
3. Attach any files by clicking the “paper clip” icon on the left. You can select from Dropbox, Google Drive or files uploaded from your computer. (Or you can drag and drop a file directly to attach it too.)
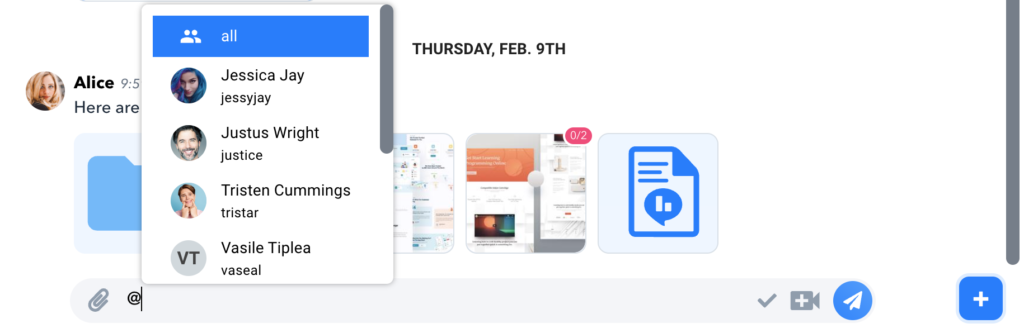
4. Directly mention a team member by clicking the “…” on the right and then select the “@” icon from the dropdown. (you can add some simple formatting or insert an emoji here too.)
5. Click the blue paper airplane icon when you are finished and ready to send.
Intro for admins
Learn how to manage your team’s workload, export time-sheet reports, customize roles & permissions and more.
Workspace Overview
Your Workspace Overview
The Heycollab workspace is a central place for your team and your work. Here is more information about creating or managing your new workspace. This guide is for you, and we’re glad you’re here!
1. Create a Workspace.
First, head to the Create a Workspace page we’ll walk you through the process through the step by step instructions.
Once you’ve created your workspace, you’ll be the Admin for that space to manage your team and add Tasks.
2. Add a Task.
Choose the column of work on your Task board and add a Task. Follow the instructions on the Add a Task page to make sure you understand all of the important features available to you and your team.
3. Invite your Team.
Get your teammates into your new Workspace so they can start collaborating and can receive all Tasks that are assigned to them. You can make sure they are up to speed with all Heycollab can do by sending them to the Heycollab overview for users page.
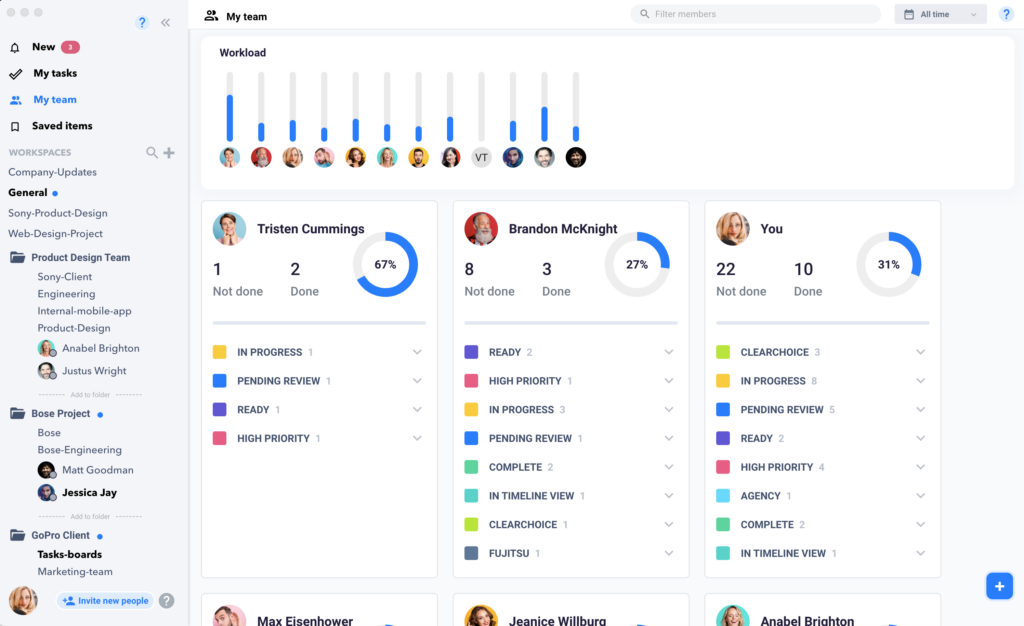
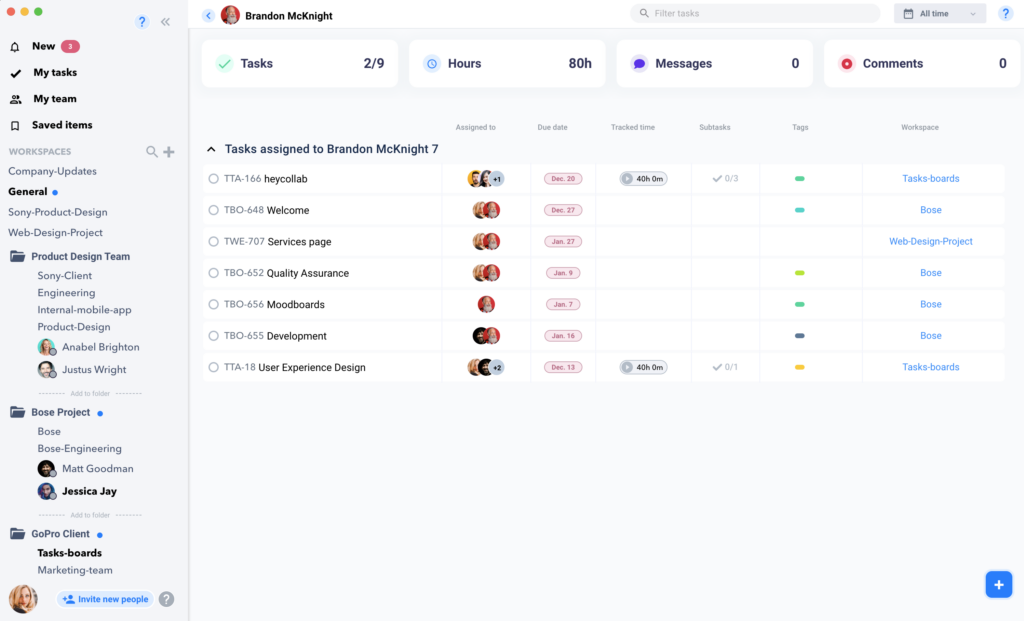
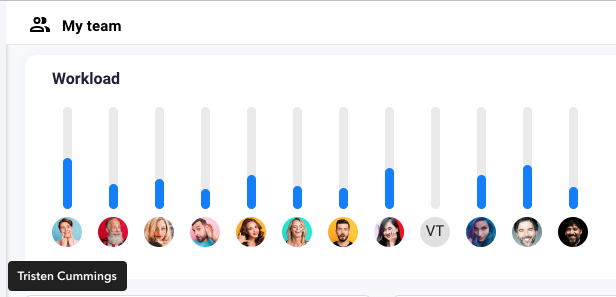
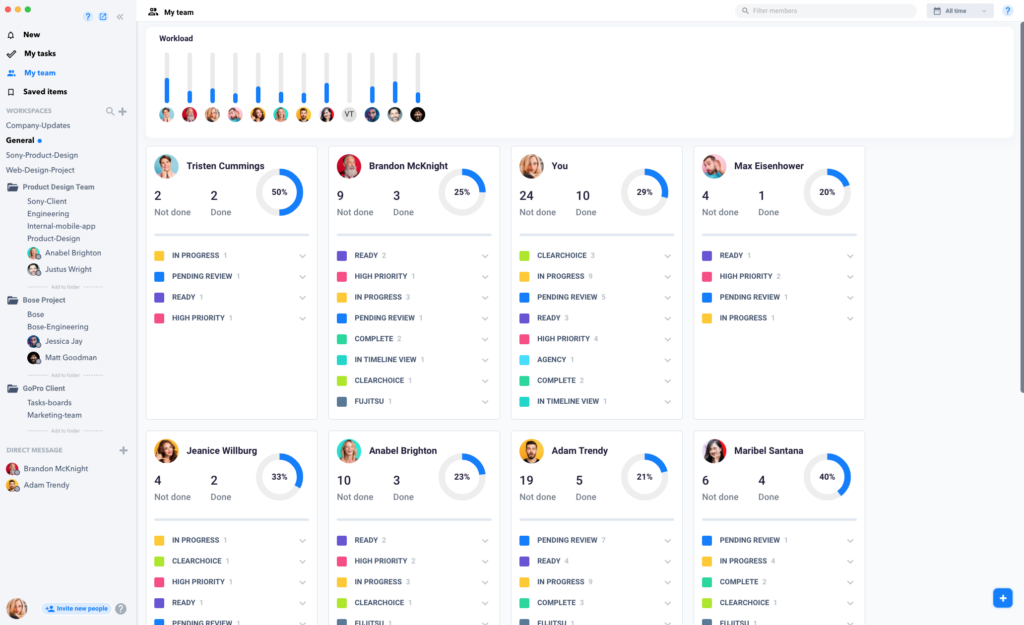
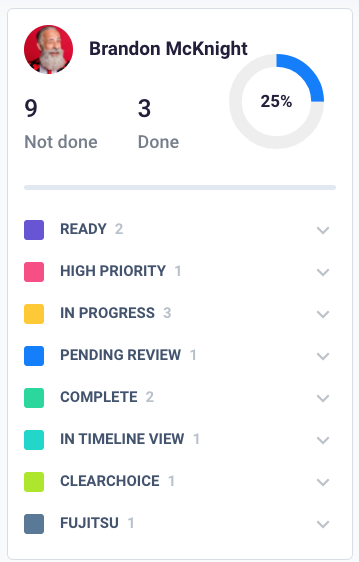
View and Manage Your Team
View and Manage Your Team.
An Administrator in a Workspace has access to the My Team window.
The Dashboard on this window shows a summary of all team members in the Workspace.
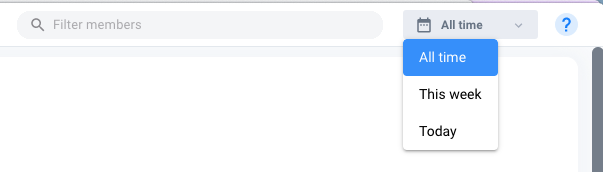
You can Filter this entire section by searching for a specific team member in the search bar in the top right corner. Or choose a specific time frame in the drop down menu on the top far right of the window.
The Workload graph gives a helpful visual graph of activity for your team members.
You can hover over a profile picture to reveal the teammate’s name, or hover over the bar graph to see specific task counts they are working on.
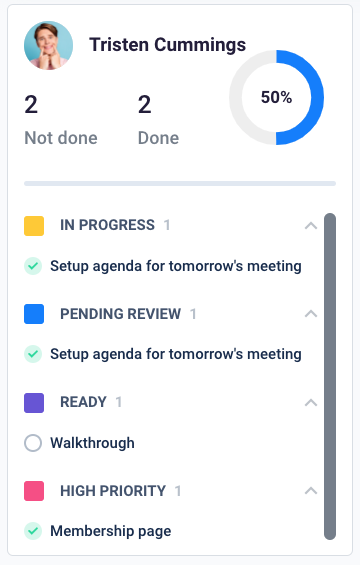
Each teammate has a profile card with even more of their work details in one location.
You can utilize labels on Tasks to help group types of work and see which team members are working on which Tasks.
Specific reports can help you see how your team members are working and what they have been working on.
When a team members work is shown, there will be four summary icons at the top: Tasks, Hours, Messages, and Comments.
Setup & Administration
Learn how to set up heycollab. From signing up, to setting up your team, resetting your password, and more.
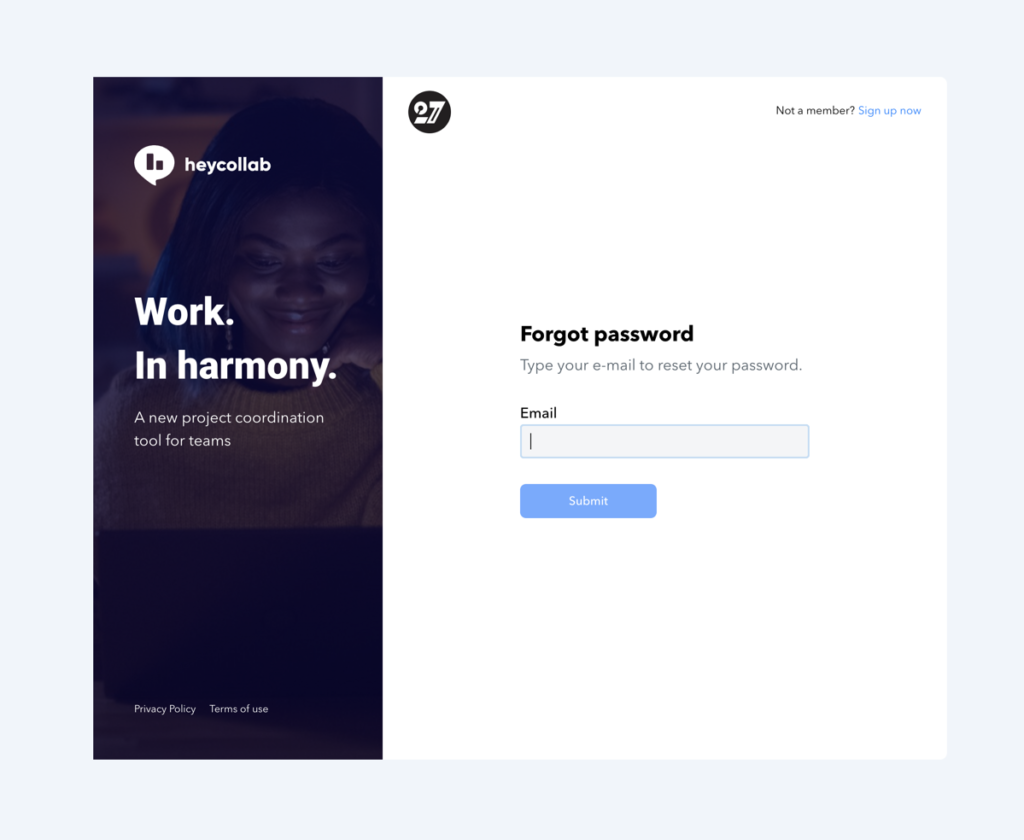
Click the forgot password link on this page (see attached)
Sign in page
Input your e-mail address on this next screen
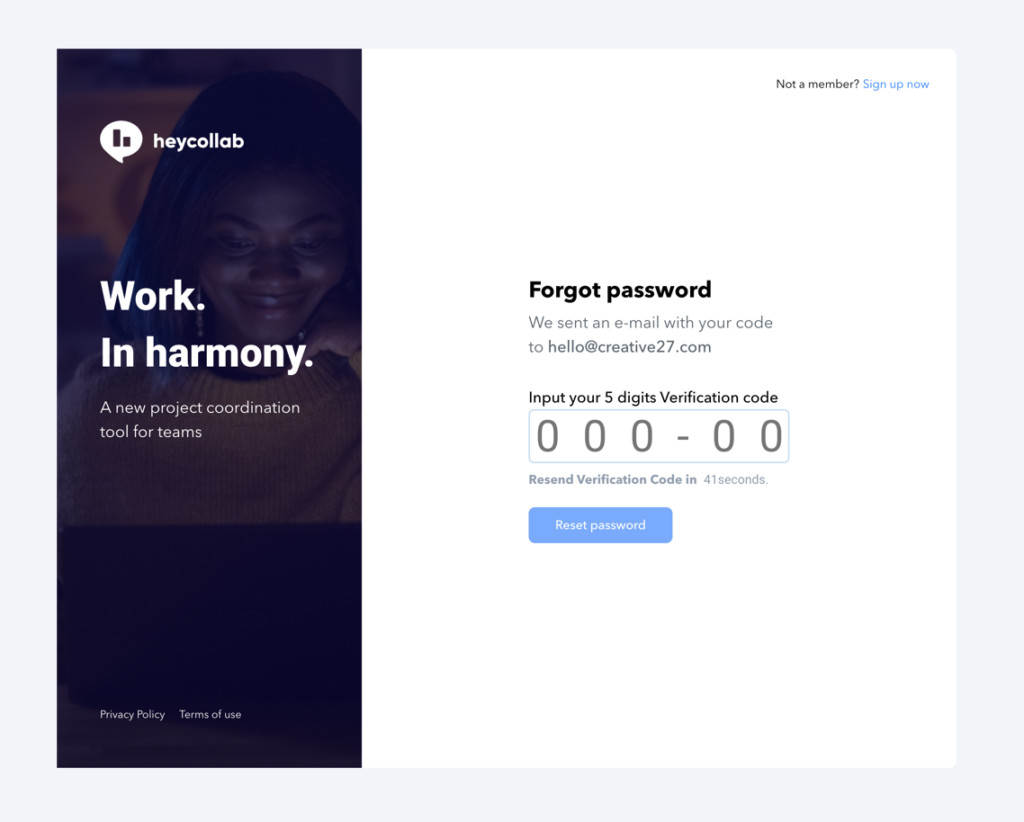
You’ll receive an e-mail with a 5-digit verification code. You’ll need this code to be able to reset your password. Note: If you have not received an e-mail, check your spam or junk mail. After 60 seconds you will be able to resent the code.
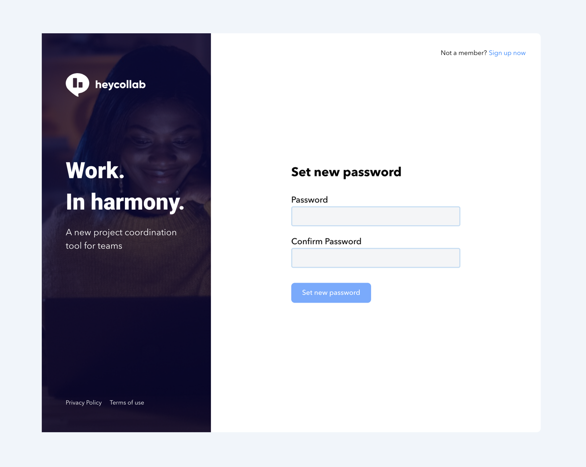
For this last step, simply input your new password and you are now ready to log back in with your new credentials
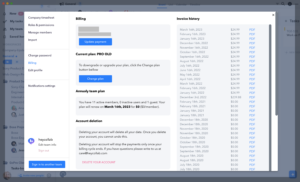
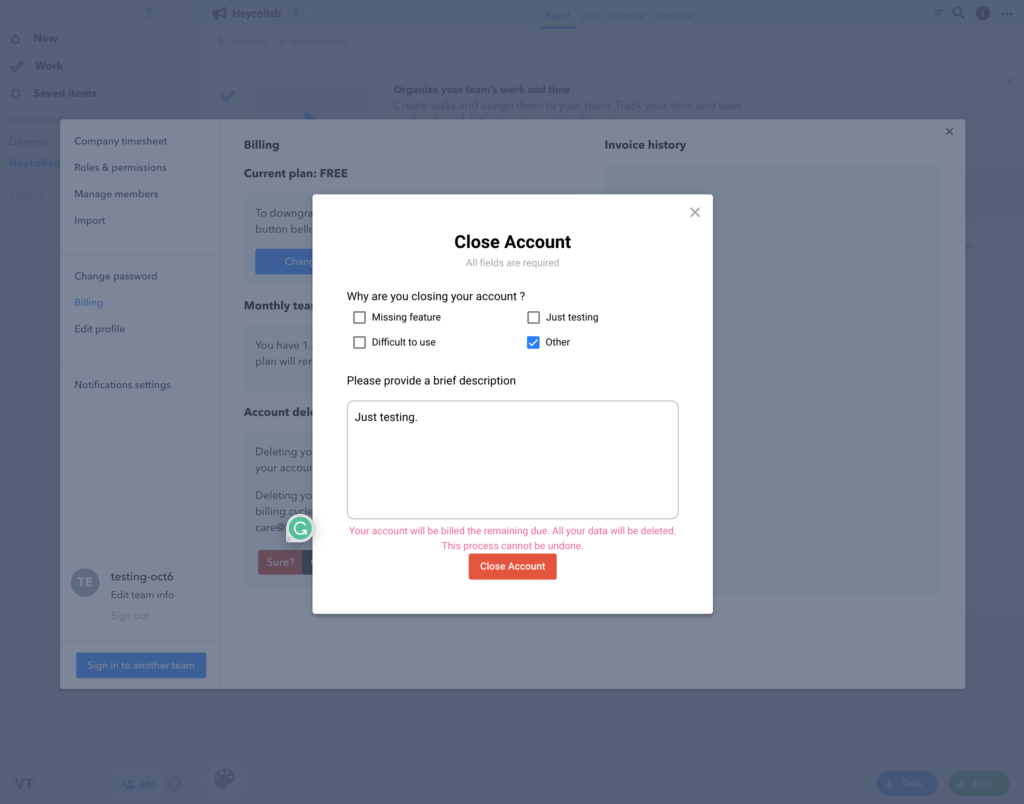
Deleting your account
Once you delete an account, please note that this cannot be undone. Upon the deletion of your account, we delete all of your personal data as well.
To delete your account, follow these steps:
As an admin, open the main menu in the bottom left-hand corner and select billing
From the Billing popup, select Delete your account at the bottom and select Sure
For the last step, select why you are closing your account, give a brief explanation, and click the Close Account button.
Getting Started Video Tutorials
Getting Started Video Tutorials
Use these videos to help you get started on your journey with HeyCollab.
Workspaces, messages, Tasks and files are the building blocks of Heycollab.
To create a workspace, Click the “+” button.Give your workspace a name and in the description field include important details to share. Select if it should be Private or Public and click create Workspace. You are now ready to add your team-members, create Tasks, send messages and share files to keep work going and keep everyone on track.
Invite Your Team Video Tutorial
How to Invite Your Team
Maximizing the power of your Workspace begins with adding in your team members.
In order to add a person to a workspace, they first need to be invited to your team. To invite people to your team, simply click the add people button, then select invite people. Type in the user’s email address and select the Workspace you want them to join. They will receive an email with an invite link. After filling out the brief sign up form your team member will join your Workspace.
Now you can start setting up Tasks, send messages, share files and collaborate together.
Note: You can only assign Tasks to members of your Workspace.
How to Join a Team Video Tutorial
How to Join a Team
If you’ve been invited to a team in heycollab, follow these simple steps to join:
Step One
Open the e-mail invite and click the Join Now button (if you have not received an invite, check your junk-mail folder).
Step Two
Clicking on the Join now button should bring up this page, if it does not, make sure you are not logged in to heycollab. If you are, simply log out, open this e-mail and click the Join Now button.
Step Three
Once you filled out the form and submitted, you should be directed to Heycollab. Now you can start collaborating with your team.
Finding Your Notifications Video Tutorial
Finding Notifications
HeyCollab uses notifications as a central way to keep you updated on any new messages, task assignments or task comments. See your Notifications in the top left corner. There is a separate count for task and message notifications. Click on the “New” panel name to preview all your Notifications. By default the most recent notifications received will be at the top. Click the drop down arrow to filter through other options. Click the … icon in the top right of the panel to mark all notifications read or delete them. And use the same … icon on individual notifications to just make those changes to that notification. All Notifications that are unread will have a blue background, and one’s you’ve seen will have a white background. There are three icons used to visually identify: Messages, Task Comments, and Tasks. Click on any icon on the side of the notification to open more details. You may reply directly from the notifications panel by clicking the reply icon.
Another visual cue that displays is a white dot next to the name of any -Workspace that has a pending Notification. A number will also appear in the icon for Messages or Tasks in the Workspace to show how many notifications are waiting for your review.
Welcome and Overview to Heycollab
Welcome to Heycollab
Overview of Heycollab
Creating and Organizing Folders Video Tutorial
Creating and Organizing Folders Video Tutorial
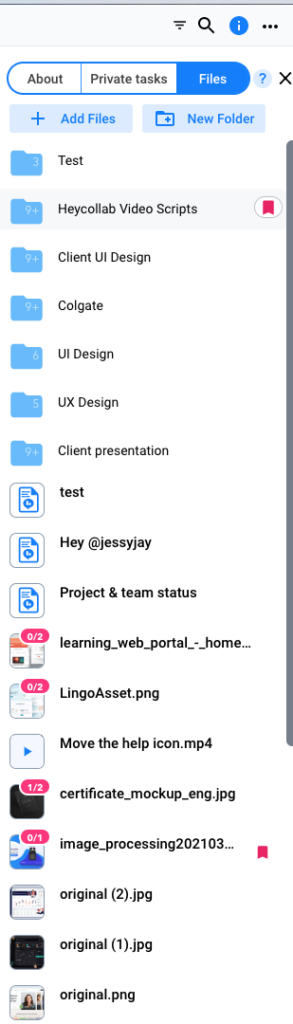
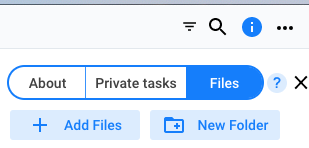
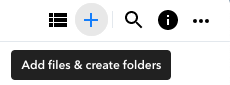
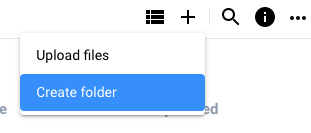
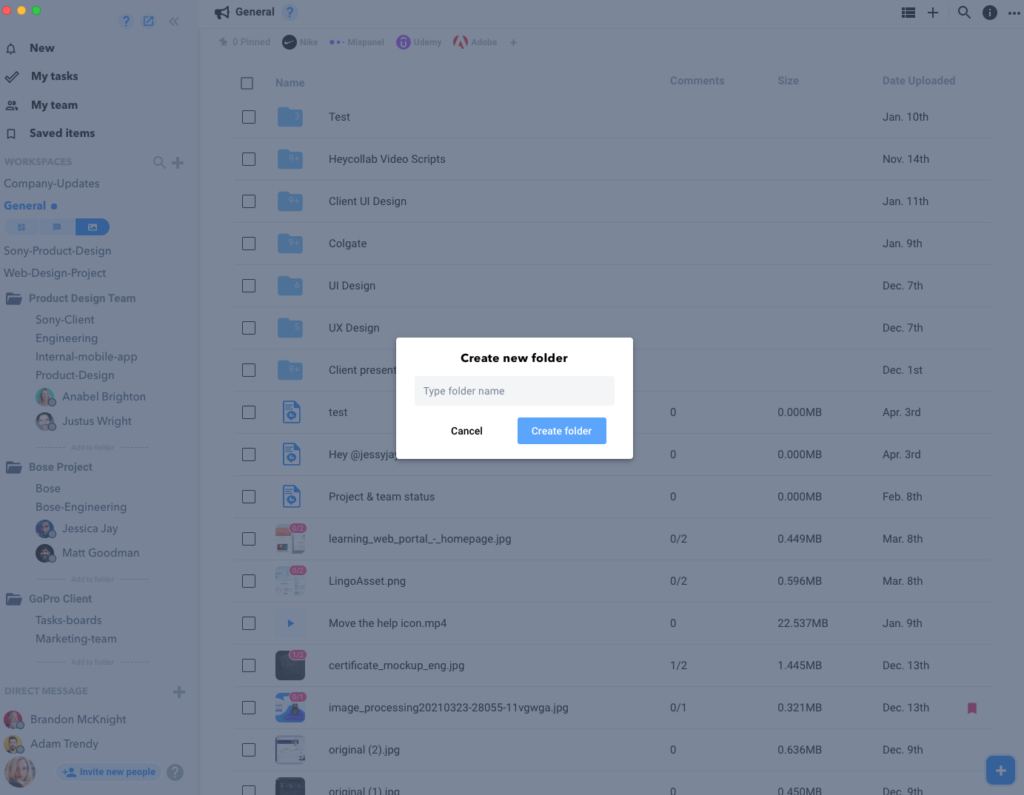
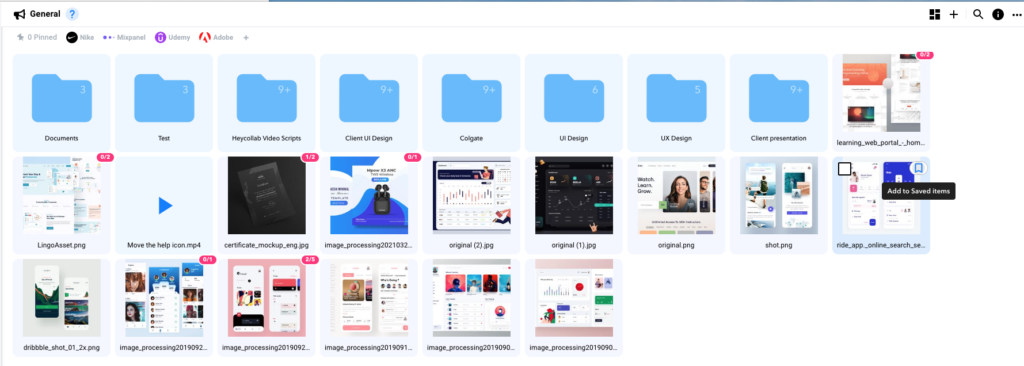
Access your Workspace files by clicking the Folder icon of your Workspace name in the left hand column. You can see your files in either a list or thumbnail view. Toggle between them by clicking the icon in the top right of the window. To find files quickly try typing keywords or file names in the Search field. Add files or folders by clicking the “+” icon in the top right of the window. You can add hundreds of files in just one upload and all of the files will be immediately accessible to your team. Organize your files by creating folders. Once in place, you can move files into the appropriate place.
You can also access your files from the About Sidebar. The files will display in a list view and provide another way to add files or folders while keeping your current work also visible. Any file that has a comment will have a number bubble on top of the file thumbnail. A pink number means the comment is incomplete. A green number mees the comment has been completed.
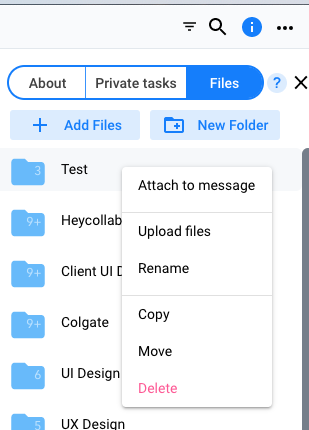
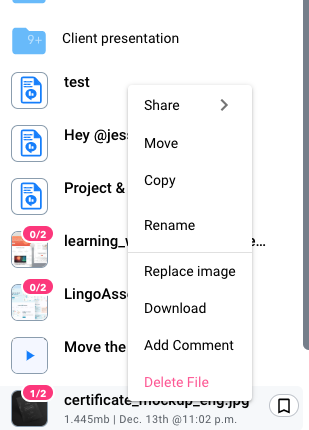
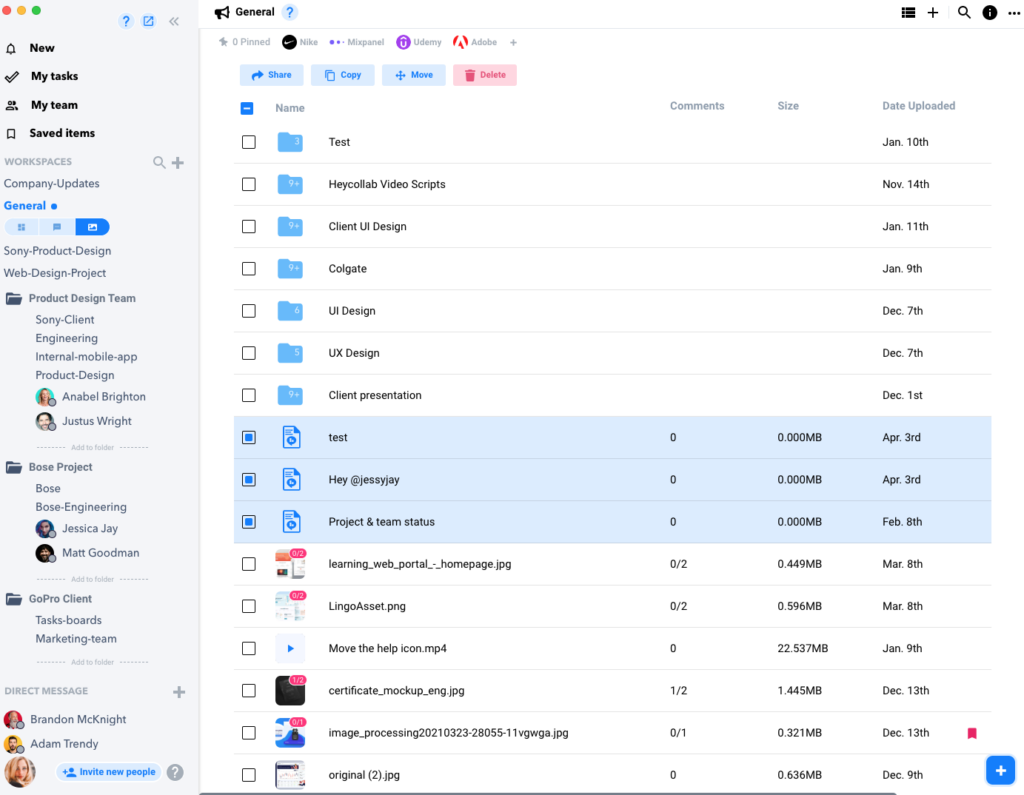
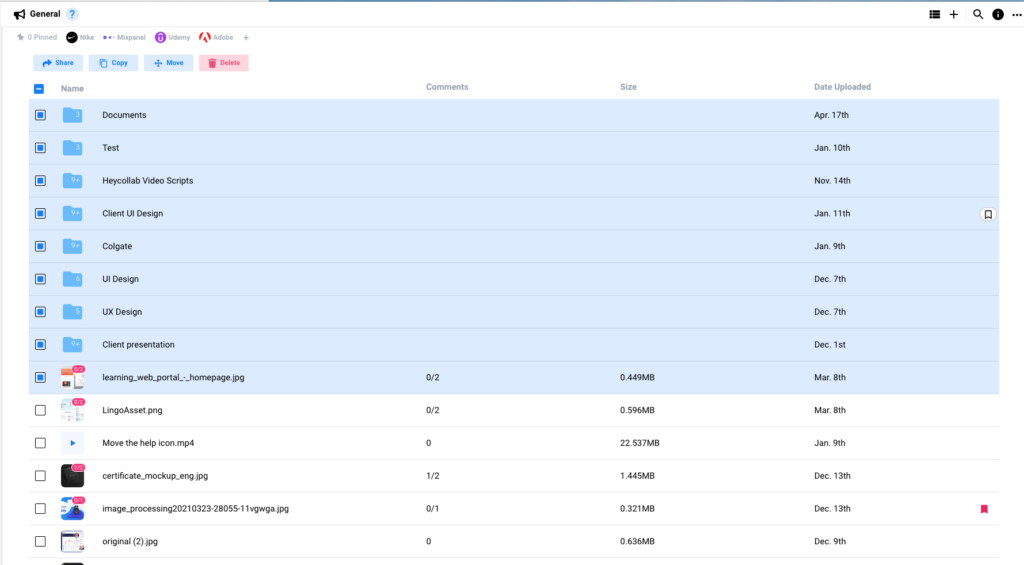
Each file or folder can be selected by clicking the check box in the top left of the thumbnail. This will allow you to take four actions: Share, Copy, Move, or Delete the item. Select the action you want by clicking the button at the top of the Files window. Selecting Share will immediately open a Message with the item attached. Duplicate a File or Folder by clicking Copy. If you need to Rename that copied item click the … icon in the top right of the thumbnail and select Rename. Choose Move to put an item in the appropriate folder, or to move a folder to a different Workspace. Each Folder thumbnail will display a number on the folder which shows how many files are currently stored inside. Remove an item completely by choosing Delete. You can select multiple files and folders when applying any of these actions.
The List view of the Files window makes additional details visible. You can quickly locate how many comments have been made, the size of the file, and when it was uploaded. When you hover over an item click the Bookmark icon on the far right to add it to your Saved Items.
Accessing Team Member Information
Accessing Team Member Information
To get an overview of the details in a workspace use the About Sidebar. Access it by clicking on the info icon in the top right corner. Minimize the About Sidebar by clicking the info icon again. When the sidebar opens you’ll see a blue ? icon which provides access to a Help video walk through. Click on the Members header to expand the list of members that are in this workspace. Click on the Profile Card to view their email, phone, and location. You can remove a Member by clicking the “x” icon to the right of their name. Or you can add a Member by clicking the “Add members button”.
Note: If a member of your team does not show in this list, you need to send them an invite so they can join the team, before they may join this workspace.
Creating, Editing, and Sending Messages
Creating, Editing, and Sending Messages
Bring clear communication to your Workspace by using Messages. Click the Chat icon on the left side-bar to get started in the Messages window and type your message in the top green input box. To add formatting, select the text you wish to format, click the “…” and select bold or italics. Use the “@” symbol to directly mention a team member in the message, doing so will send out an e-mail and in-app notification. Once the message is sent, hover over the message to reveal more options. If you need to quickly edit your message click the pencil icon, and click the “…” if you need to delete the message entirely. Add reactions by clicking the emoji icon. Finally, make sure to save the most important messages by clicking the Bookmark icon.
How to Track Your Time
How to Track Your Time
Heycollab allows your team to track their time spent working. Anywhere you have a Task you will be able to track the time spent on that task. Simply hover over any Task and click the “Play” icon. This will start the timer which can be tracked directly on the Task or in the bottom left of the Workspace window. The Timer will stay visible no matter which Workplace view you move into. The title of the Task you are tracking will display below that Timer, and you can click the Timer to bring up the Task window. When you are finished simply click the “Stop” icon on either Timer interface. A pop up window will allow you to quickly add a description of what you worked on during that period.
Different Views to See Tasks
Different Views to See Tasks
Heycollab allows you to view your tasks in board view, list, calendar and timeline Each view has it’s own advantages and based on your preference heycollab will remember the view set by you across workspaces The board and list view will allow you to move tasks and columns or lists around and setup quick parameters by simply hovering over a task In the calendar view, you’ll need to open a task in order to setup these parameters and you do this simply by clicking on the calendar event Finally, in timeline view, you can drag the ends of a task to change the date range or double click on it to open it.
Add a Comment by clicking the blue “Add Comment” button.
Double click on the exact area of the image you need to make a comment.
A colored marker will be added for future reference.
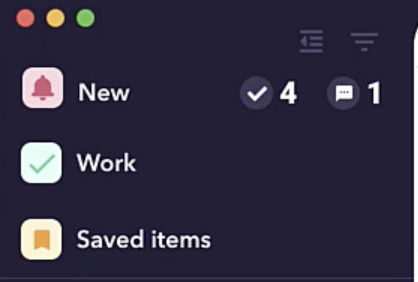
Notification Indicators
There are two main areas to see Notification indicators in the left hand column of the main Workspace window.
The top left hand corner button that says “New” will reveal an icon and a number to show how many new items are waiting for you.
There is another indicator by the Workspace Name in the middle of the left hand column. A white dot will appear any time there is a notification waiting for you in a Workspace other than the one you currently have open
Once you click on the New button in the top left hand corner the Notifications area of the About Sidebar will open on the right hand column of your screen.
Your notifications will be listed with one of three icons to indicate if it is a message, task, or file. You are able to view, reply, and react right in the column.
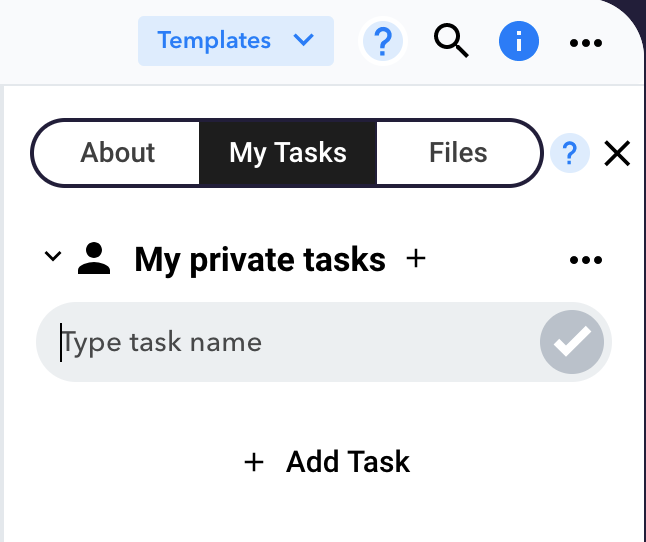
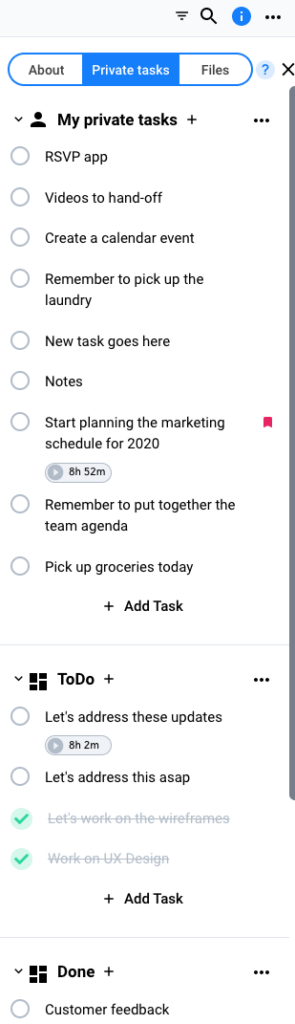
Private Tasks in the About Sidebar
There is a time when you might need to create Tasks that are not visible for your team and meant just for you. You can create these tasks in the About Sidebar.
Sections inside Folders
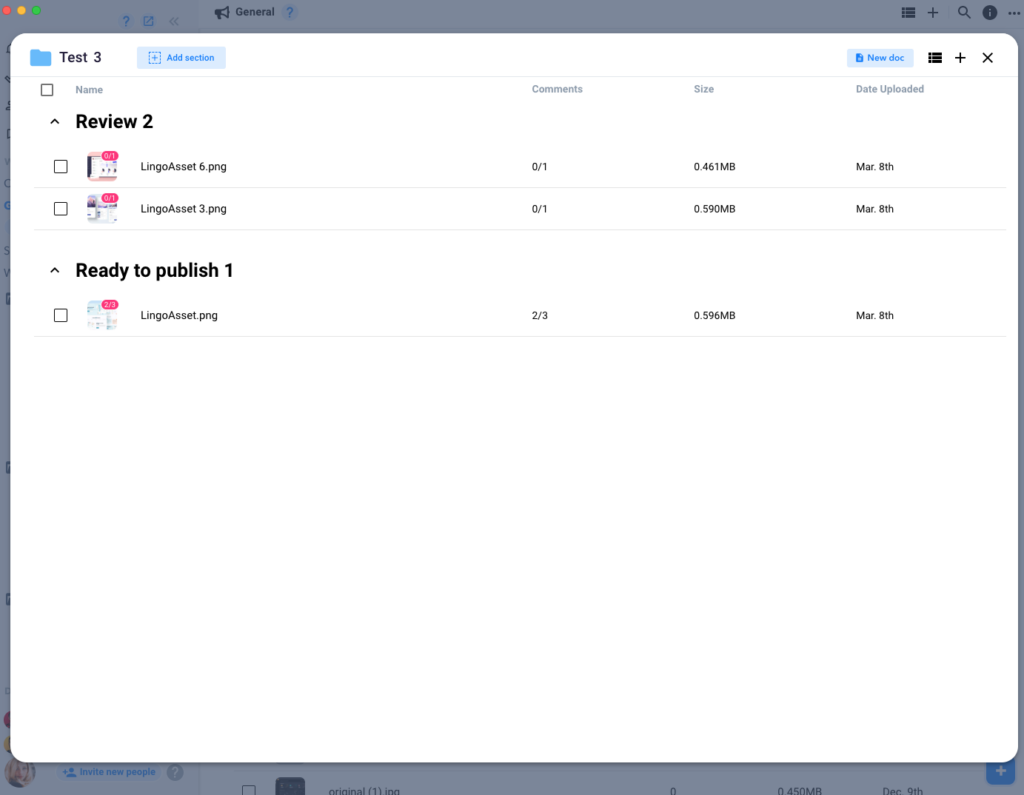
When uploading Files you can organize them into specific Folders. But there are sometimes the need to group your Files into sections within that Folder by clicking the blue button in the top left corner called “Add Section”.
Uploading more than one file at a time.
When you are trying to upload files for your team you can bring several files in one big batch. Just click “Add Files” and then select as many files as you need.
Keyboard Shortcuts
When a task board is open, simply pressing escape on your keyboard will close the dialog box and take you back to the main Workspace view.
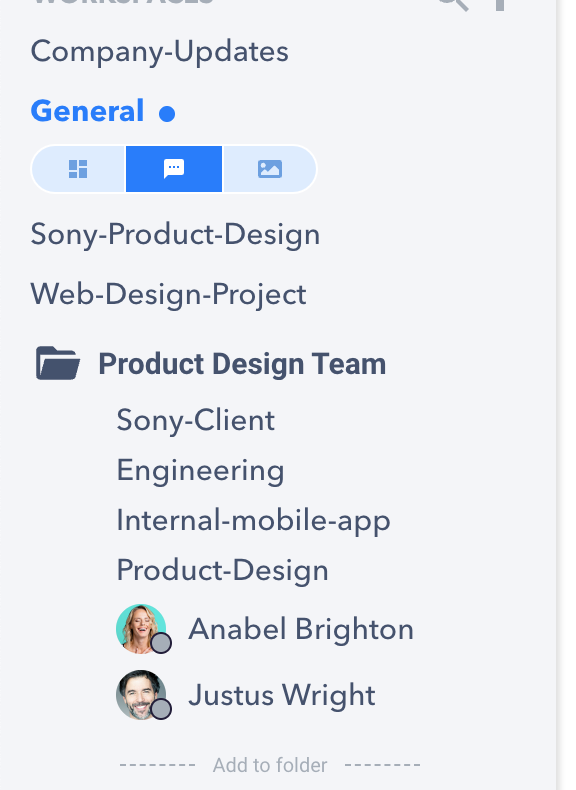
Accessing Multiple Workspaces
If you have several teams, you need the ability to keep them in their own unique Workspaces. But in HeyCollab you can quickly switch between a different Workspace in the left hand column by clicking on the name. Just remember to log in to each Workspace first and then you can easily bounce between your teams spaces!
Dashboard for Administrators
Workspace Dashboard
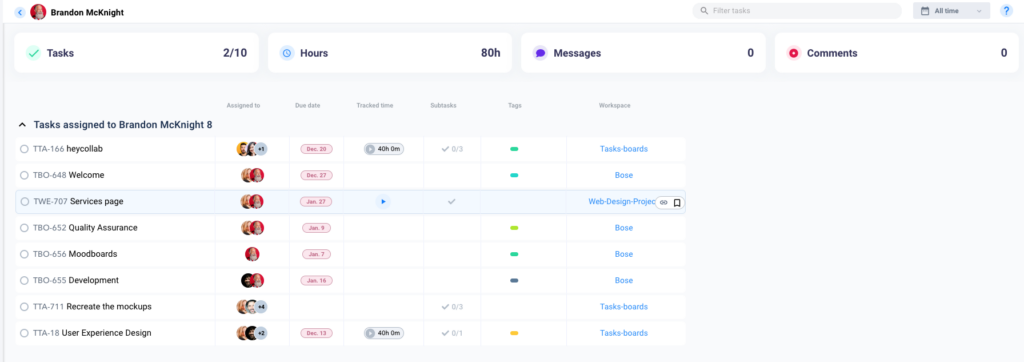
An Administrator can use the My Work Dashboard to keep up to date on all of their team member’s progress.
The Dashboard gives quick visual insight and access to deeper data details if needed.
Viewing Team Members Work
Only Admins in a Workspace have access to the My Team window which shows visibility into the work of other team members.
Access this Dashboard by clicking My Team on the left hand column.
The Dashboard shows a summary of all team members in the Workspace.
The Workload graph at the top gives a visual of activity for your team members
Hover over their profile picture to reveal their name.
Hover over the bar to see specific task counts they are working on.
Or view their profile card below to see even more of a team member’s work details.
The labels displayed are tracked by the labels assigned to a task.
Click each drop down to see which specific tasks they are working on which have that label.
Filter this by searching for a specific team member in the search bar.
Or choose a specific time frame in the drop down menu on the top far right of the window.
The top row of the Work window also allows you to select My Work to see your activity or select a specific team member from the drop down to see their activity.
When a team members work is shown, there will be four summary icons at the top:
Tasks Completed
Hours Worked
Messages Sent
Comments Posted
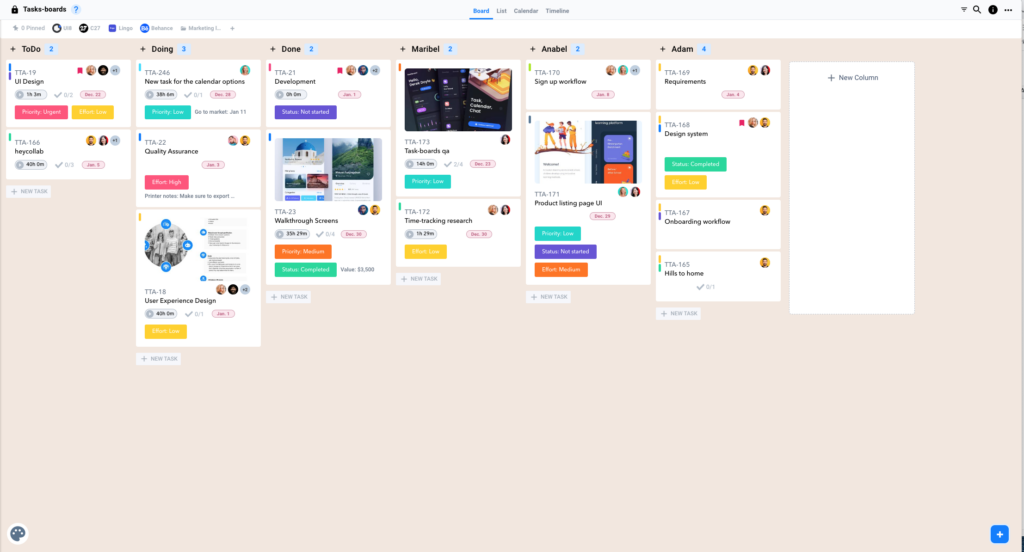
Task boards
Create tasks, set custom labels, see tasks in calendar, list and timeline view and more.
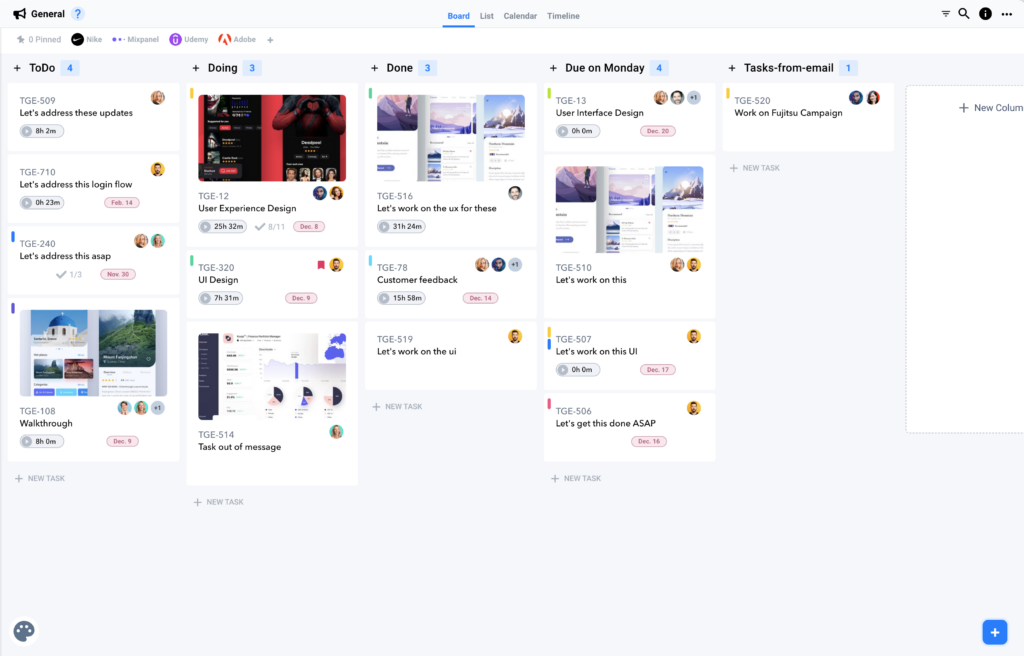
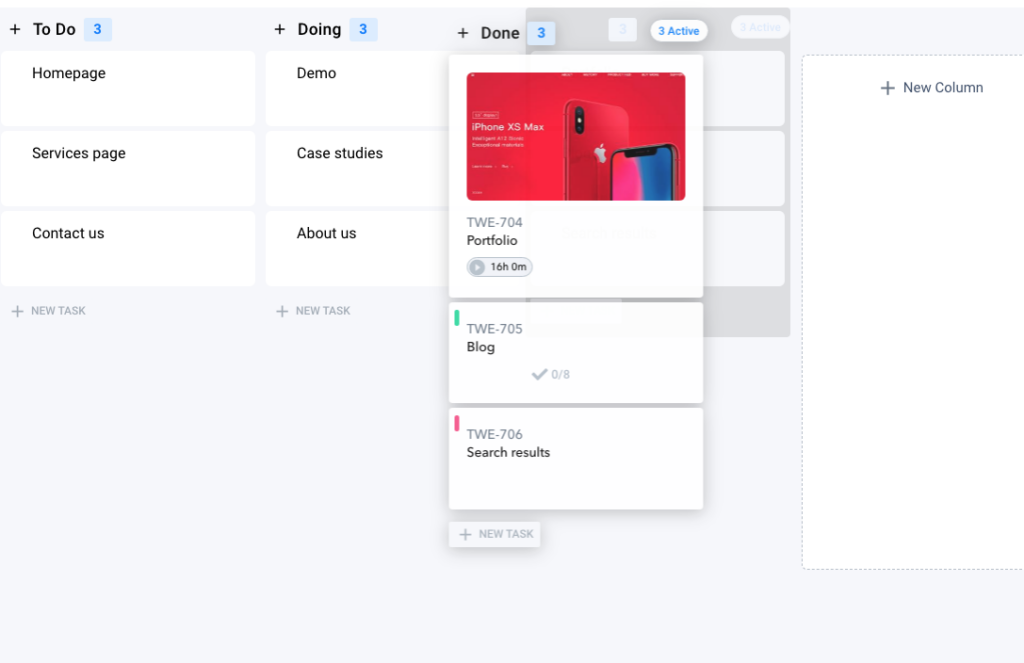
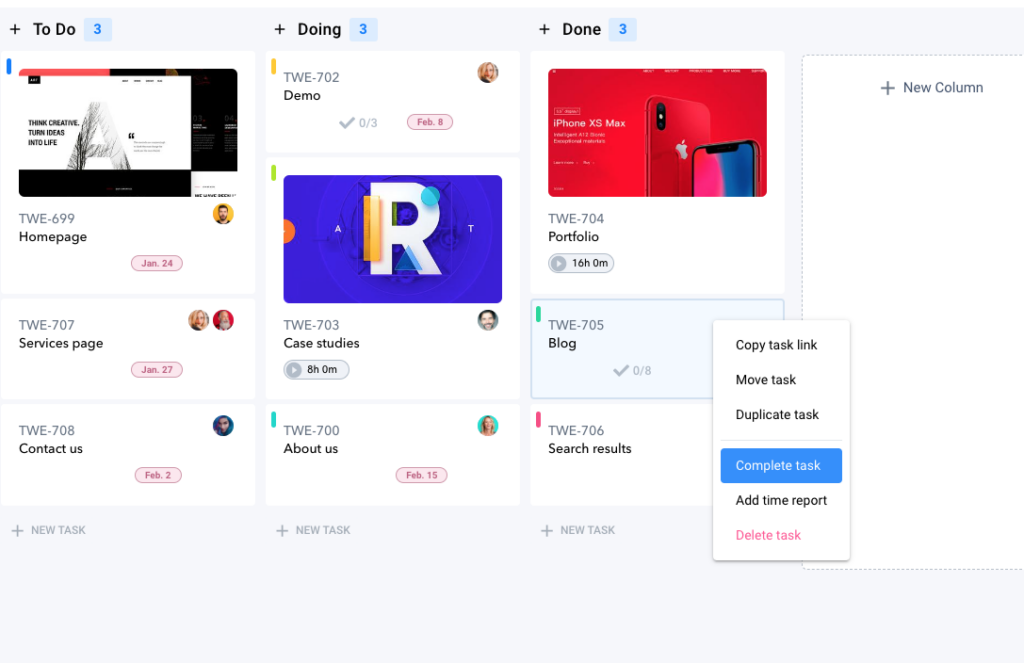
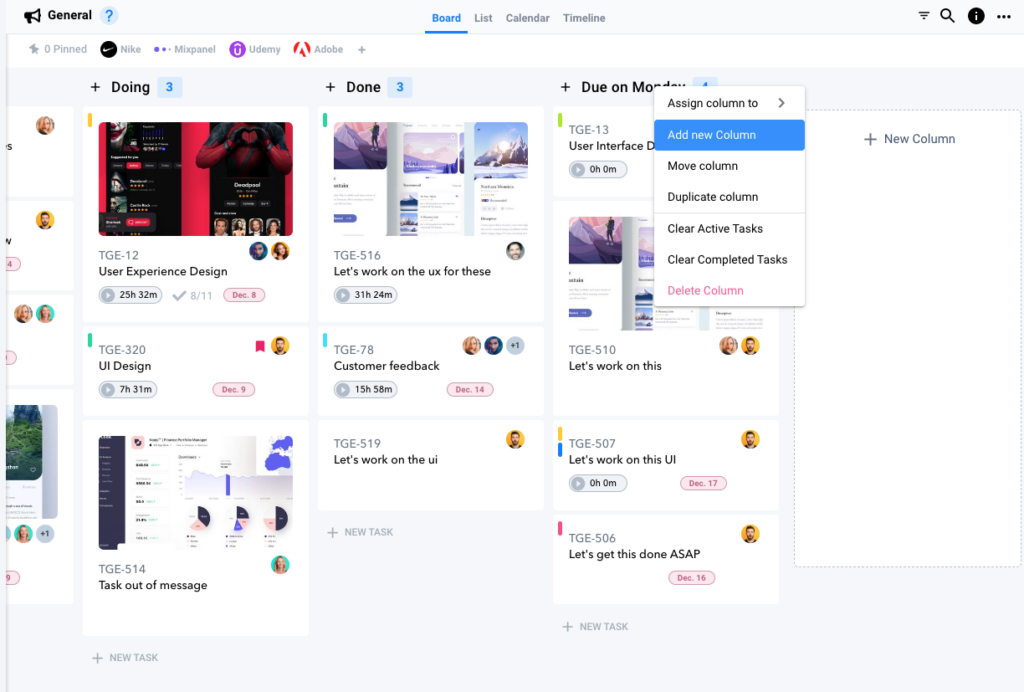
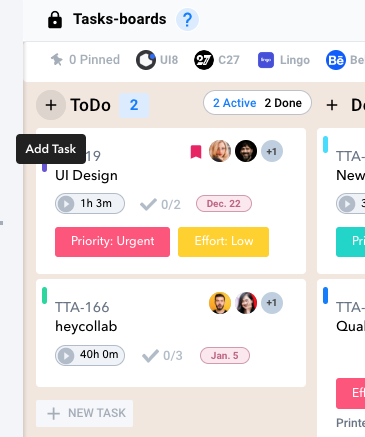
You can create a task from the top or bottom of the column.
Creating at each direction puts it in the appropriate order
Simply click the “+” icon at the top or at the bottom of a column to add a New Task.
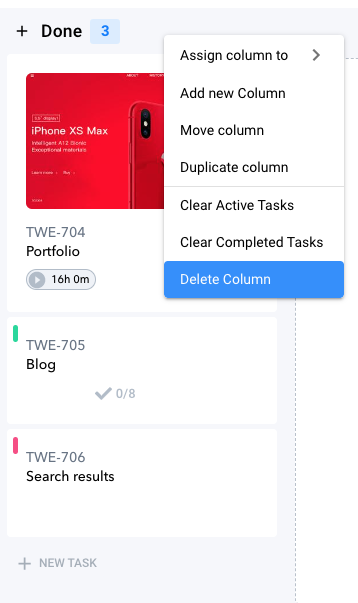
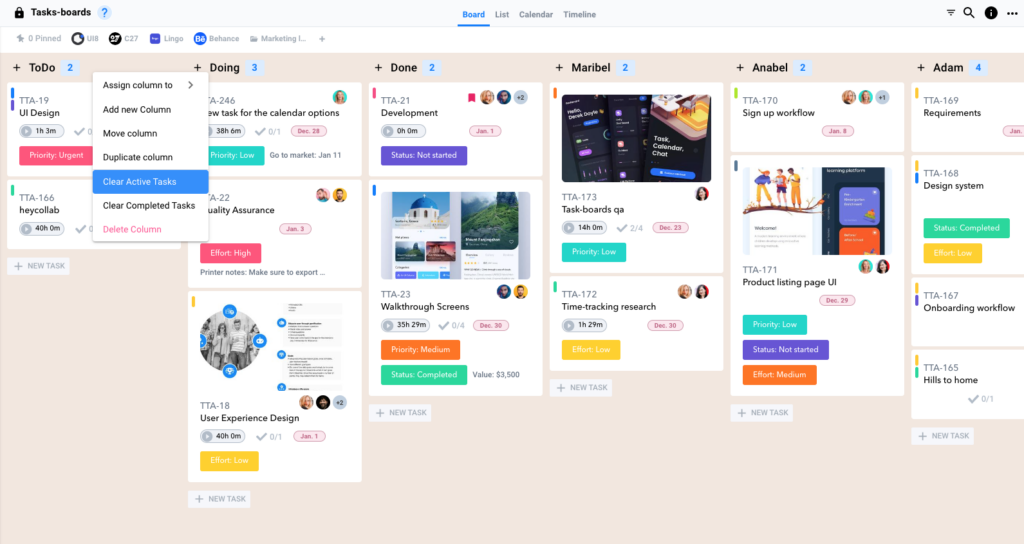
If you want to create a new column, click on “…” and choose Add New Column.
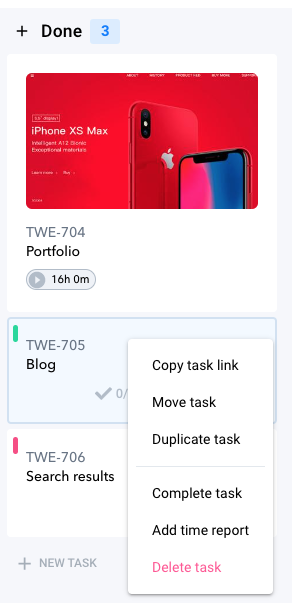
You can also delete a column or task the same way by right clicking on top of the column or task and select delete .
Move a Task or Column
To move a task or column just hover then click and drag to where you want it to move.
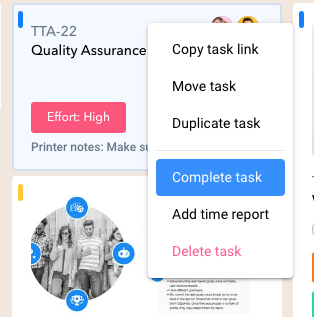
Completing a Task
Hover over a task and click Complete, and then it disappears from view.
To view all complete tasks, hover over the Column and select Active or Done to see the relevant Tasks.
You can always mark a Task as Incomplete to make it Active again.
Organizing Tasks and Columns
How to Organize Tasks and Columns
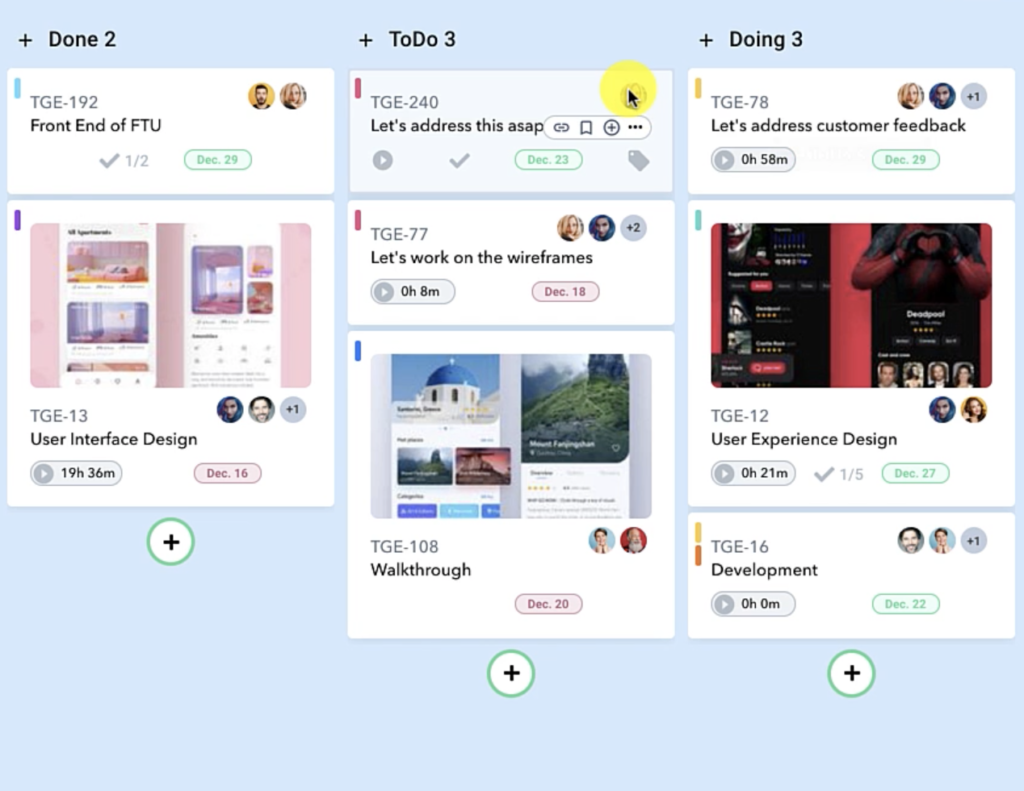
Keep your Tasks organized in labeled Columns.
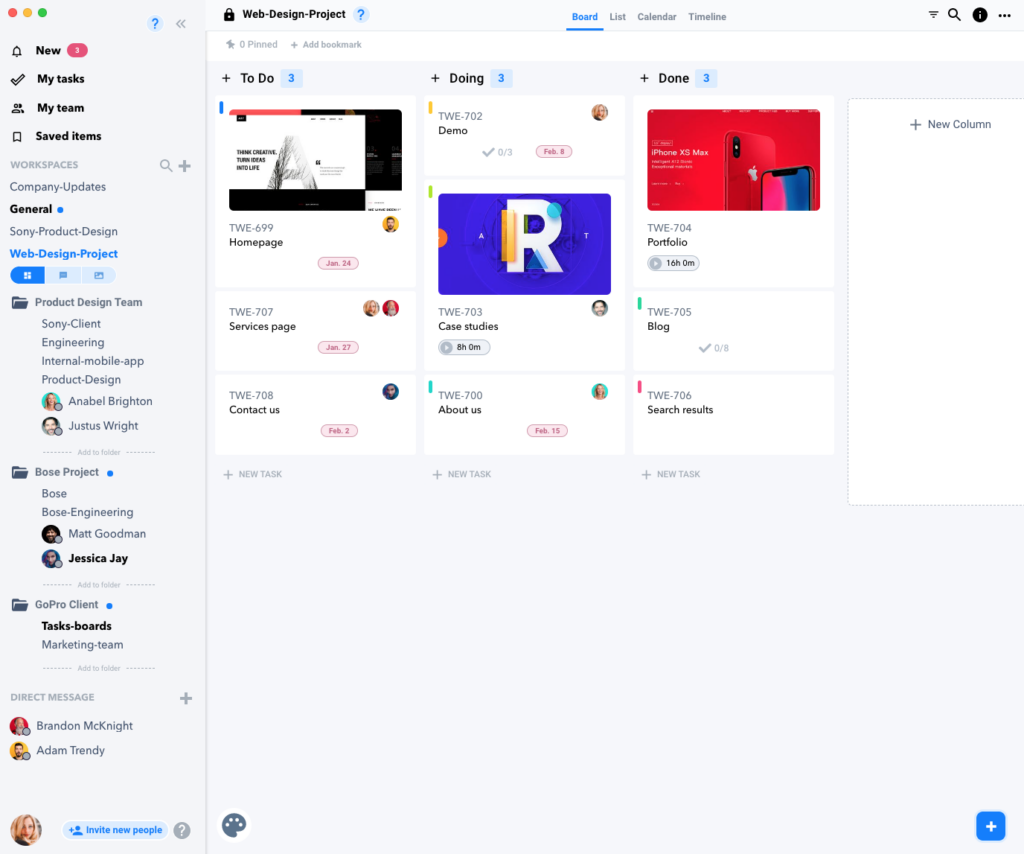
The three columns that are easiest to begin with are To Do, Doing, and Done.
You can create additional columns and move them around the Workspace board.
Click the “+ New Column” on the far right of the Workspace window to create and name a new Column. Or you can hover over the name of a current column and click the “…” icon.
Add an Active Task to a Column
Create a task from the top or bottom of the column. Creating at each direction puts it in the appropriate order.
Simply click the “+” and “+ New Task” icon on either the top or the bottom of the column.
Move a task by hovering and then clicking and dragging. You can move a column the same way.
You can delete a column or task by clicking the “…” icon and select delete.
Or Tasks can also be removed from a column by marking them Complete. Hover over a task and click Complete, and then it disappears from the Active view.
To view all complete tasks, hover over the Column and select Active or Done to see the relevant Tasks.
You can always mark a Task as Incomplete to make it appear in the Active view again.
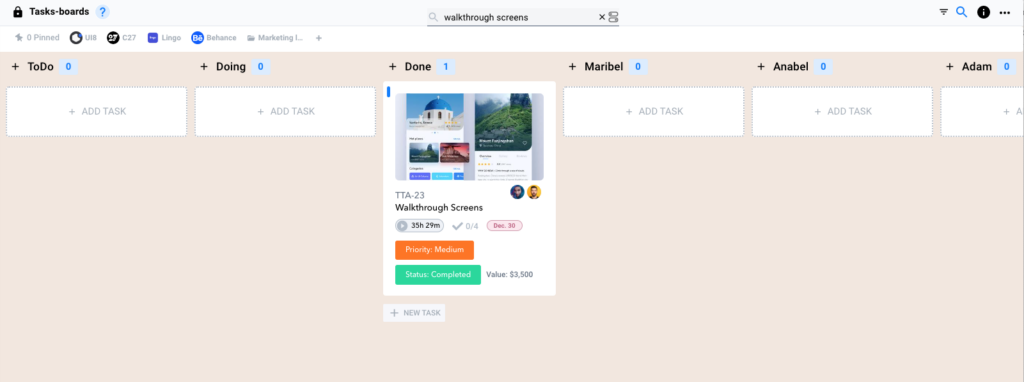
Find Tasks by Searching
Get to the tasks you need quickly using filtering by clicking the Search Icon.
Type a specific Keyword to bring up the related Task.
Type a specific Keyword to bring up the related Task.
You can also filter by specific team member by clicking on the team Profile icons in the top left hand corner.
Select the user and only their tasks will appear in your view.
Use Different Views to Organize your Tasks
Use the different views at the top center of the Workspace window to better visualize your team’s workflow.
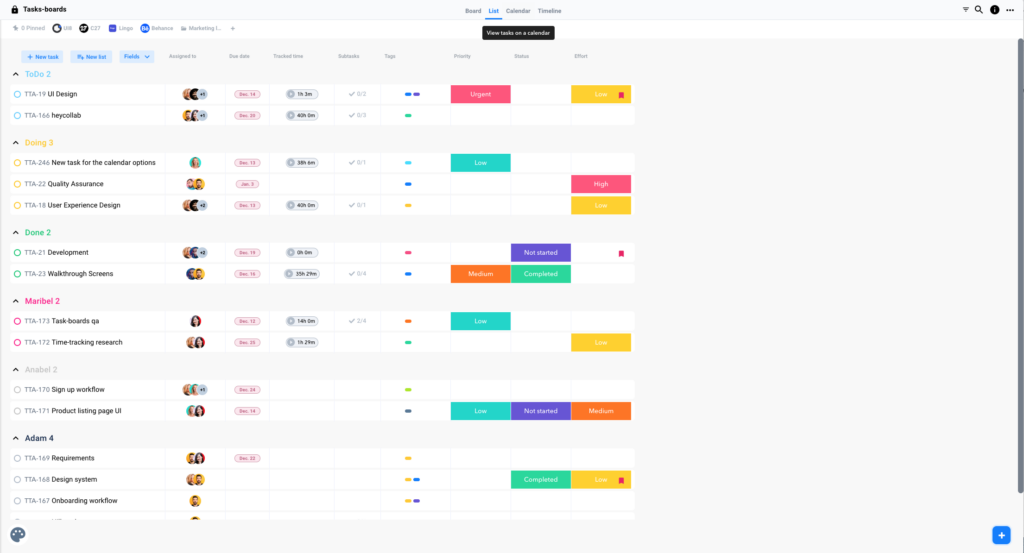
The List view shows a condensed full collection of tasks.
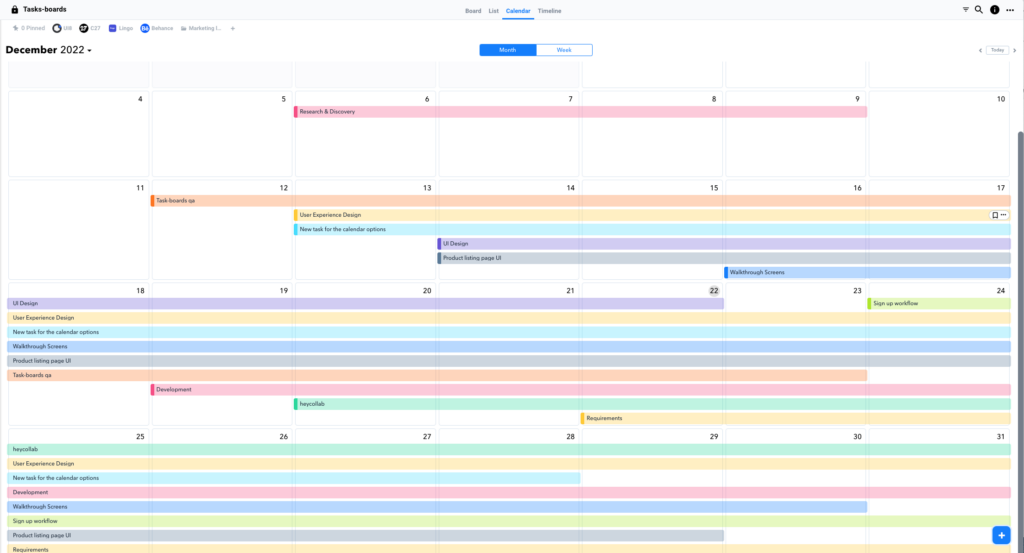
The Calendar view helps to understand your daily and weekly schedule.
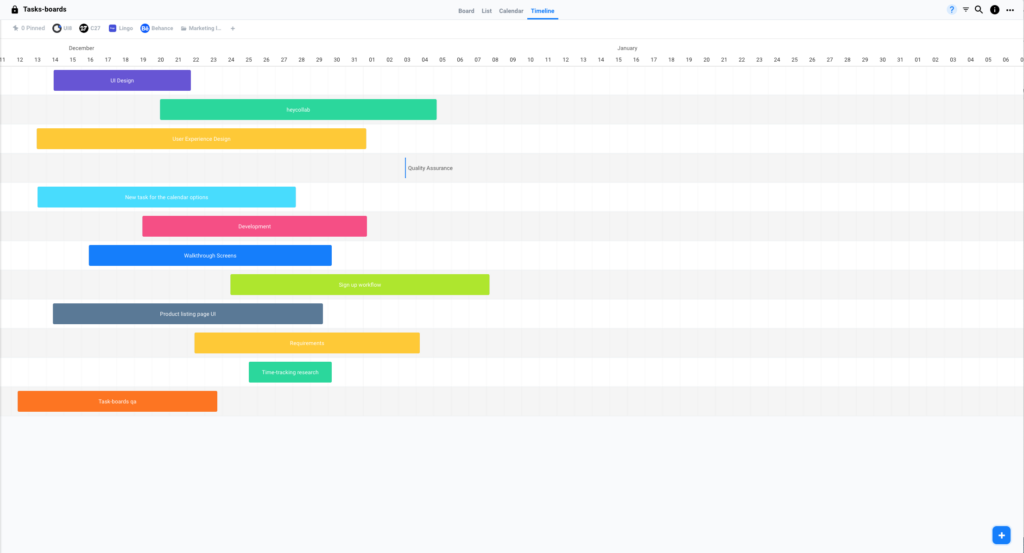
While the Timeline view puts your whole team’s workflow into perspective.
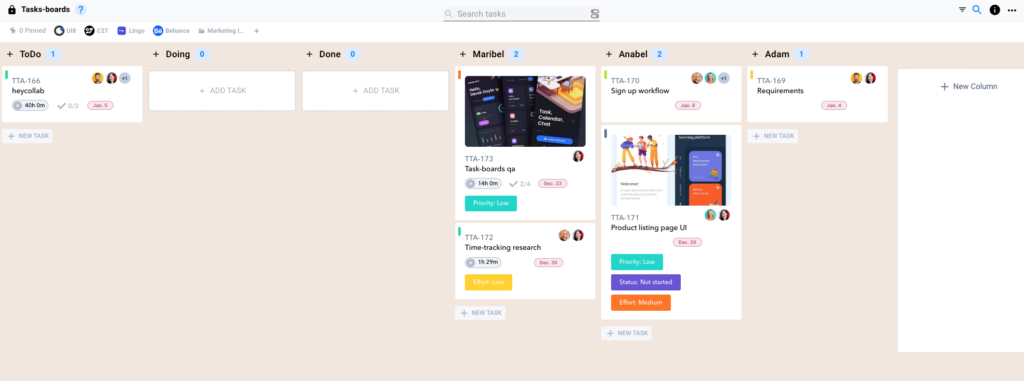
The Board view is the default view showing all the Task cards.
Using Different Task Views
Different Views to Organize your Tasks
Use the different views at the top center of the Workspace window to better visualize your team’s workflow. Click each of the names to switch the view of the main Workspace window.
The Board view is the default view showing all the Task cards.
The List view shows a condensed full collection of tasks. They are listed in order within a column, and are also grouped by columns. This allows a user to see the most amount of tasks and details in a single view.
The Calendar view helps to understand your daily and weekly schedule. Tasks will be displayed and colored according to any labels assigned to them. This can help provide a visual cue to when tasks are scheduled to be due.
Finally, the Timeline view puts your whole team’s workflow into perspective. Tasks will be also be displayed and colored according to any labels assigned to them. This allows a perspective to understand which tasks are working or overlapping with one another.
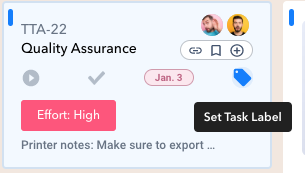
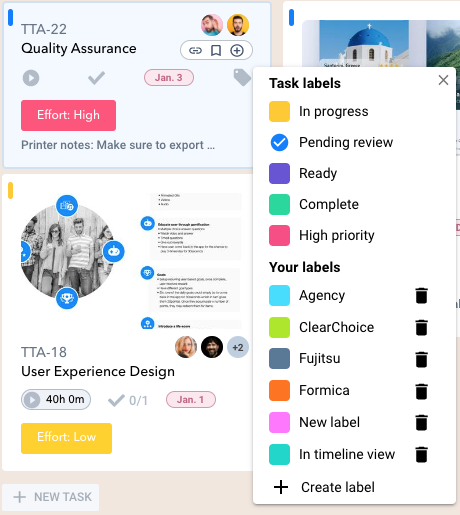
Setting Labels for Tasks
Setting Task Labels
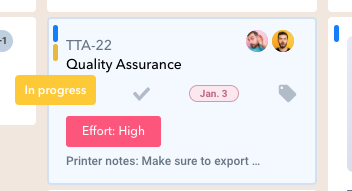
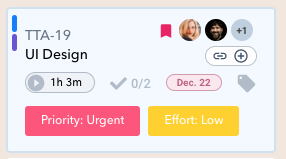
Add Labels to a Task in order to help categorize them for better searching and viewing capabilities within a Workspace. A label will display on the left corner of a Task card. Hover over the colored label indicator to display the Label name.
The default labels available are:
In Progress
Pending Review
Ready
Complete
High Priority
You are able to also add in your own Custom label too.
When creating a Custom label you’ll be able to create the name and color of your label.
Add a Label
Open a Task Card and Click the “Set Task Label” icon.
A pop up window will allow you to click one of the default labels or add a Custom Label. You can select multiple labels to apply to your Task.
You can also add a label by hovering over any Task Card without opening the Task.
Hover over the bottom of the Task Card on the Workspace and click the Label icon on the far right.
Select the label from the pop up window.
You can also add a label in the My Work section when you see any task on the list by clicking the Label icon.
Remove a Label
In the Task Card under the Label icon each of your labels will be visible.
Hover over the label you want to remove and click the “x”.
Similarly, anywhere you see a Label you can hover over it and click the “x” to remove it.
Ways to View Labels
The Calendar and Timeline view are two easy ways to visualize your task labels. The Calendar view helps make your daily or weekly tasks, and the Timeline view helps see the bigger picture of all the tasks your team is working on.
Changing the task label will change the visible color on both of these views.
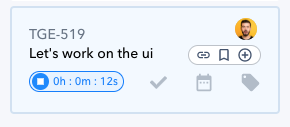
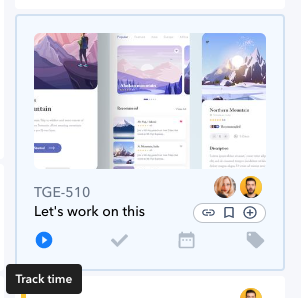
Tracking Your Time Worked on a Task
Tracking Time on a Task
You are able to keep track of the hours spent on each Task you have created for your team. The time will track sessions individually allowing descriptions to be included so it is easy to identify what was done in that time frame.
The timer is located on each Task in several places for your convenience. You can access the timer on the Task card in the Board view of the Workspace. You can also start the timer by clicking and opening the Task card.
Once started the timer will run in the Task and you can also see a Timer in the bottom left corner of the Workspace window. This larger Timer will display the task being currently tracked.
When you are finished with a timed work session, press stop on the timer icon. A pop up window will appear allowing you to add any details or a description of your work. These details can be edited or changed by viewing the Time Report for the Task.
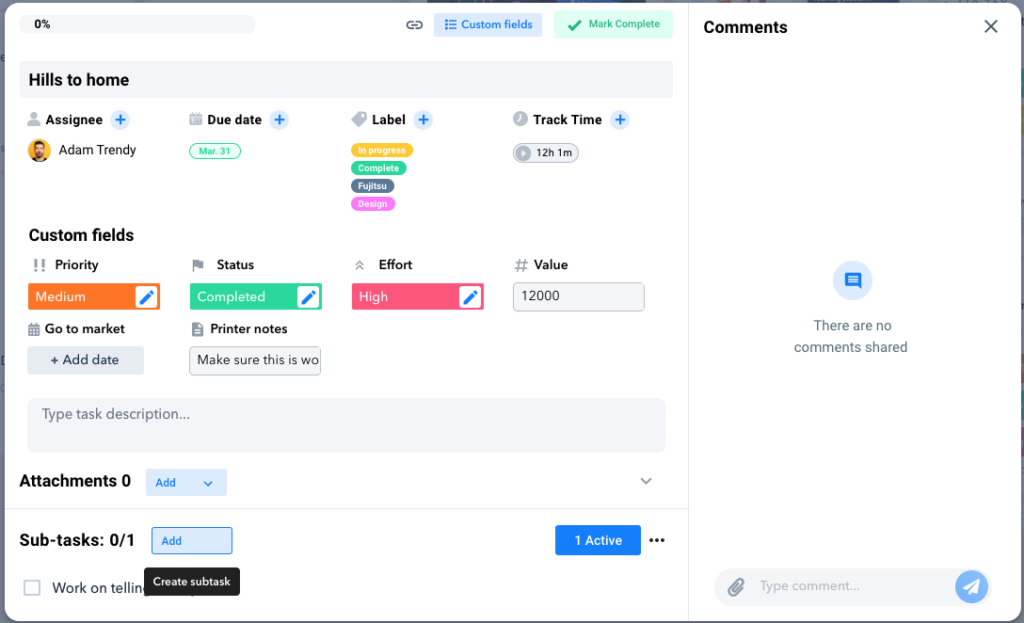
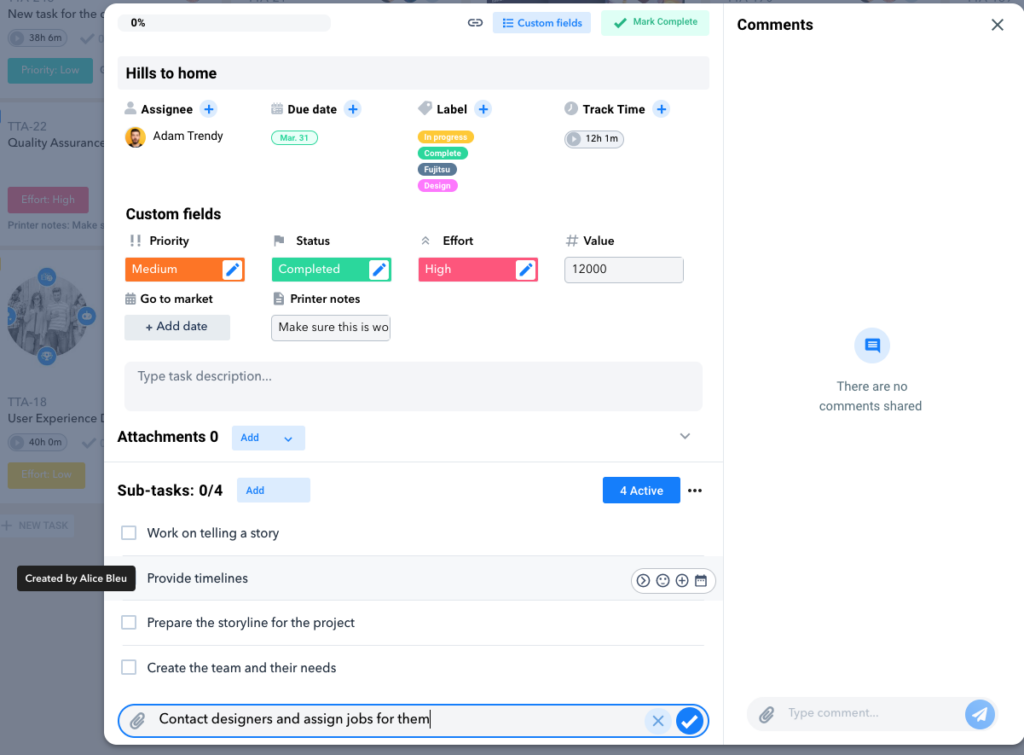
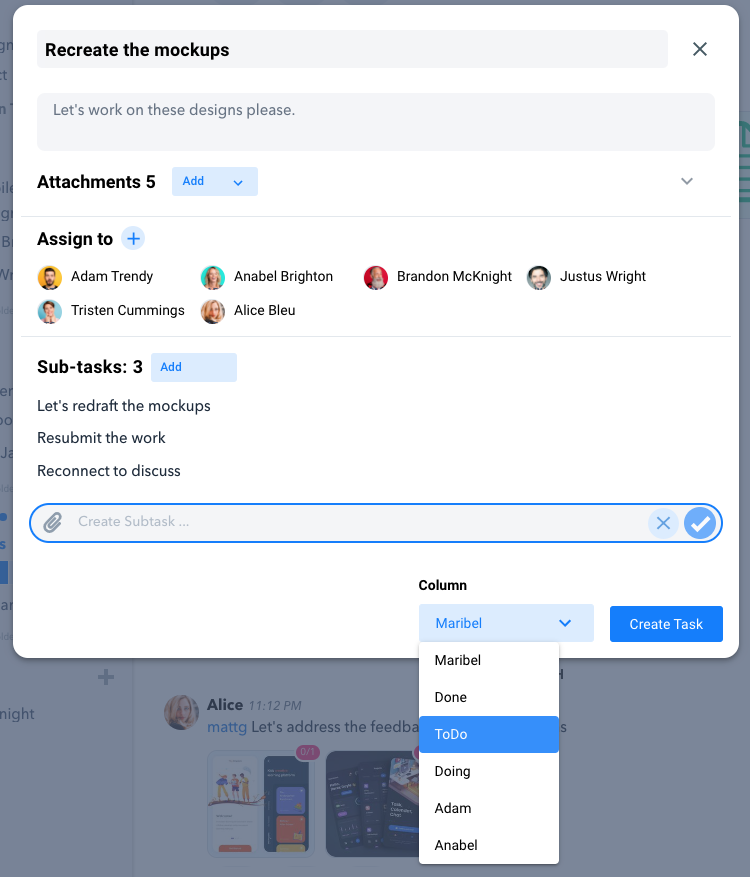
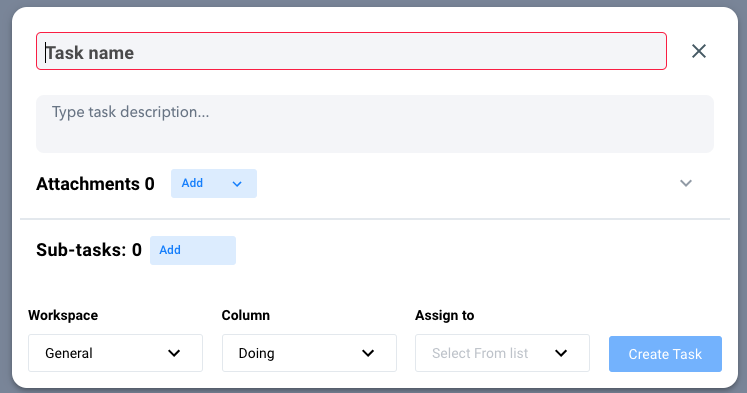
Adding a Subtask allows you to break out larger Tasks into manageable sections for completing the project.
Create a Subtask within the Task Window
Click blue button ” Add ” in the Sub-task section to add a Subtask.
Type in all the information for the Subtask in the text field.
Include any Titles, descriptions, or lists.
You can format the text by adding Bold or Italics (Cntrl/Cmd B or I) and make bulleted lists by using a dash before any new line.
Hit the green check when you are finished.
If you need to make any edits hover over the subtask and click the pencil icon.
Remember: You are able to do similar functions that are also available on a Task like assigning a due date, copying a Subtask link, and tracking time too!
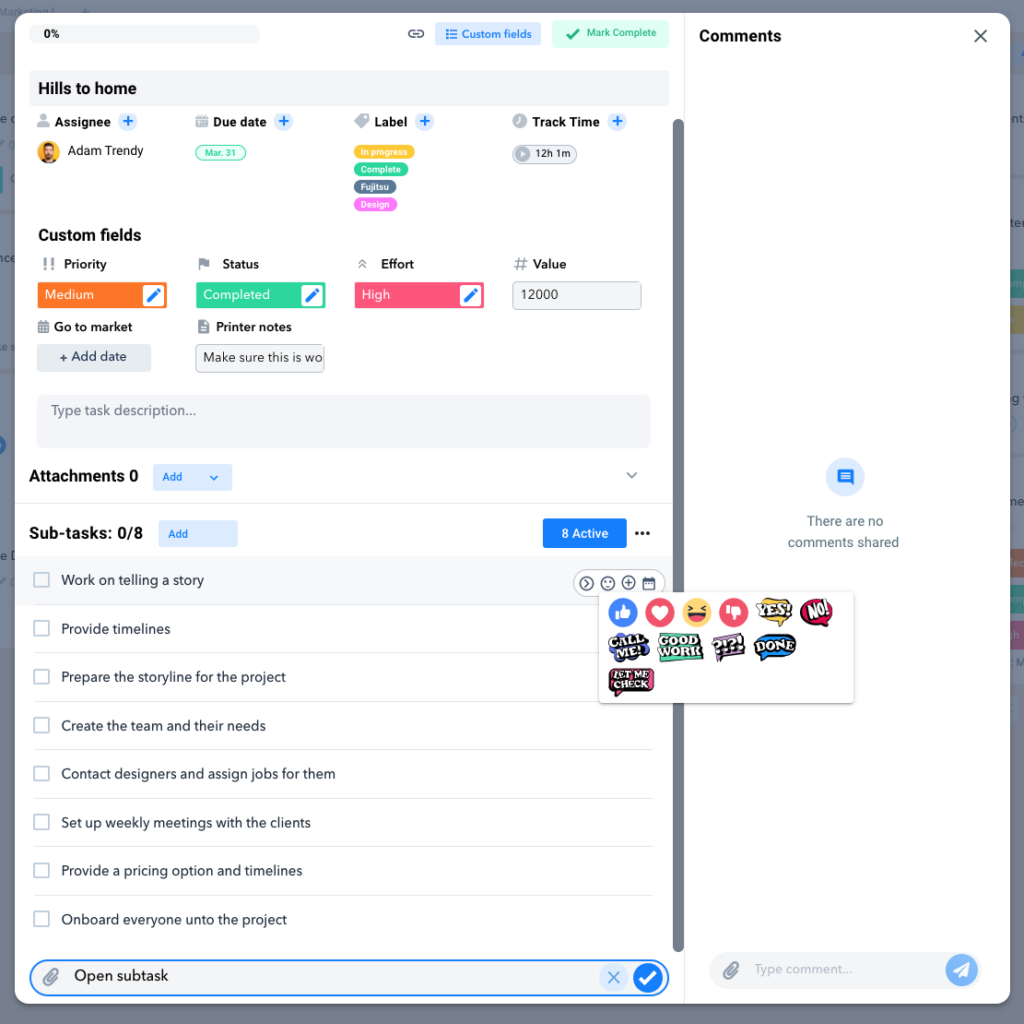
Give Feedback on a Subtask
Providing feedback on a Subtask is done through adding Comments or Reactions.
To add a Reaction, hover over the Subtask and click the emoji icon on the left.
Select the right reaction to add and it will appear below the Subtask.
The Comment section is on the far right of the Task window.
It can be used like you were creating a Message.
Add any feedback or link specific Subtasks in the comment to draw attention to the specific work being mentioned.
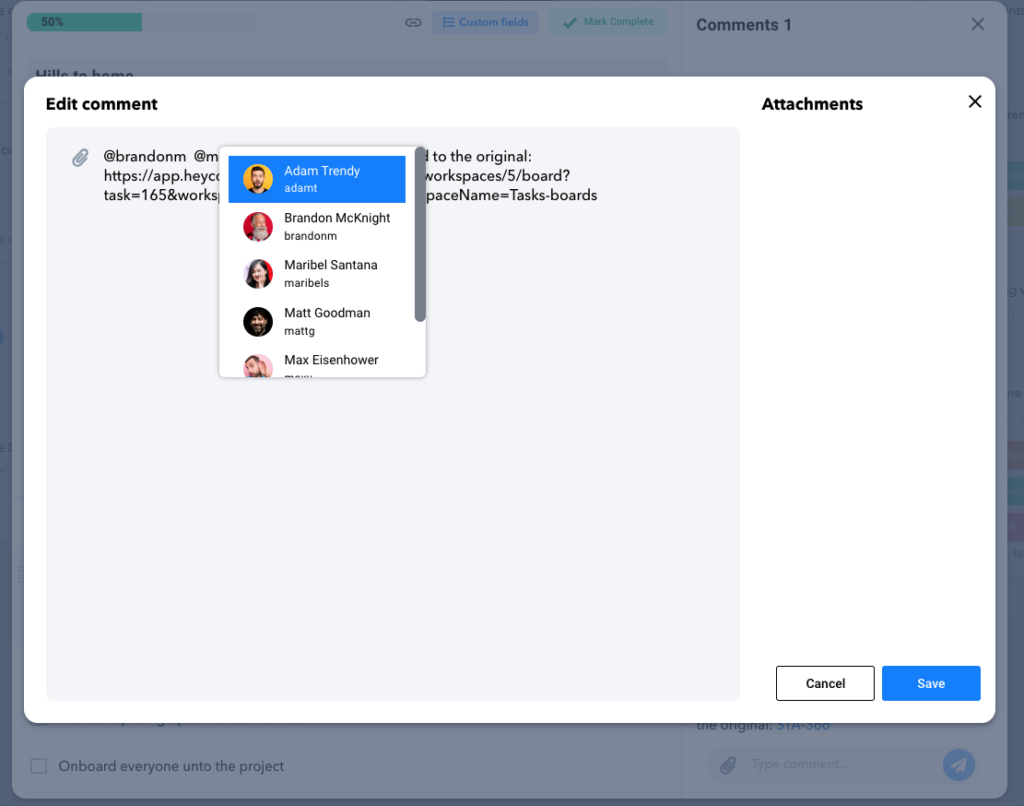
You can also mention a team member in the comment using the “@” symbol.
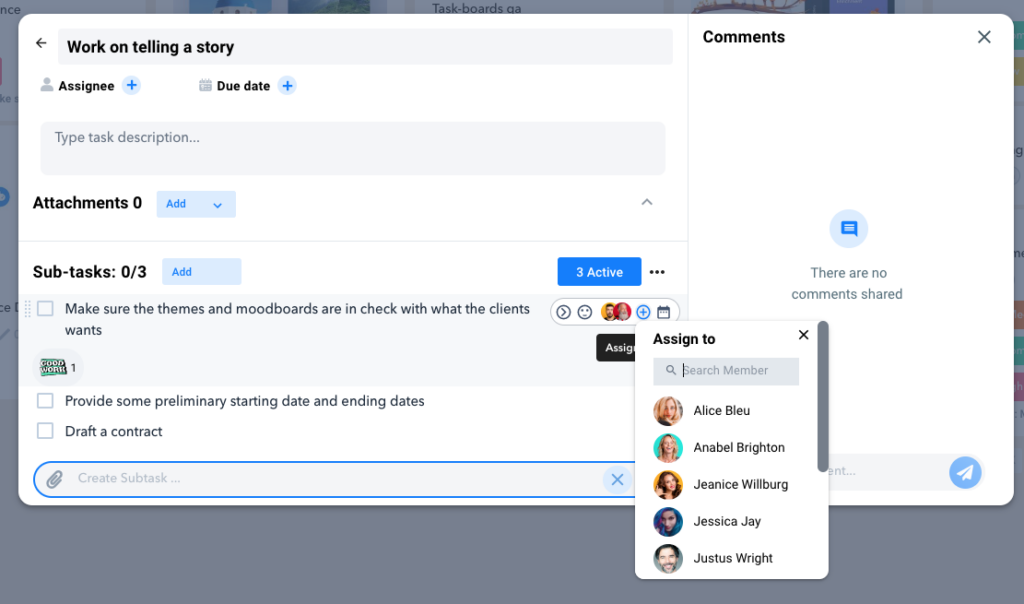
“Open subtask” it refers to a child subtask where a subtask can have one subtask to itself and it will be shown as a tree line in the box- see the image below.
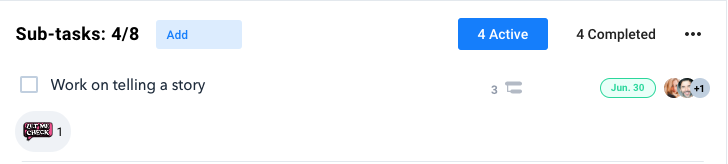
Assign team members to a subtask- again this feature is displayed on the far right of the subtask as you hover over the subtask.
Set the due date option is available for the subtask.
Create custom fields to tasks by clicking or selecting custom fields.
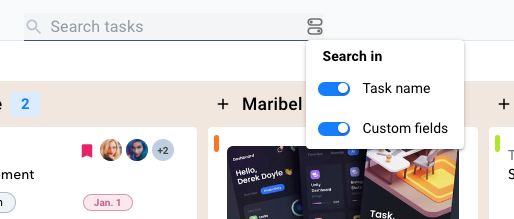
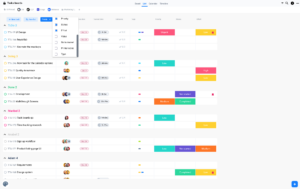
Searching and Filtering Tasks
How to Find Tasks
Get to the tasks you need quickly using these tips:
1. Searching for Tasks
Try searching your Workspace by clicking the Search Icon.
Type a specific Keyword to bring up the related Tasks.
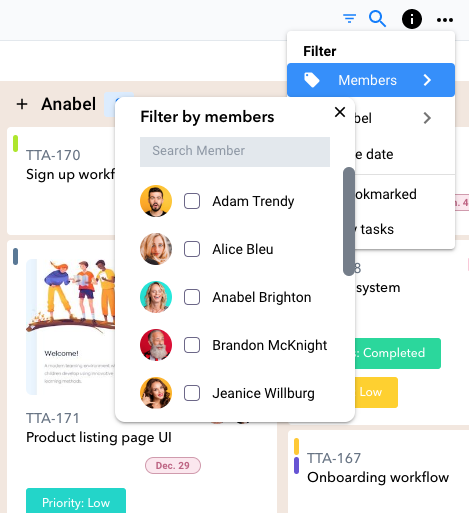
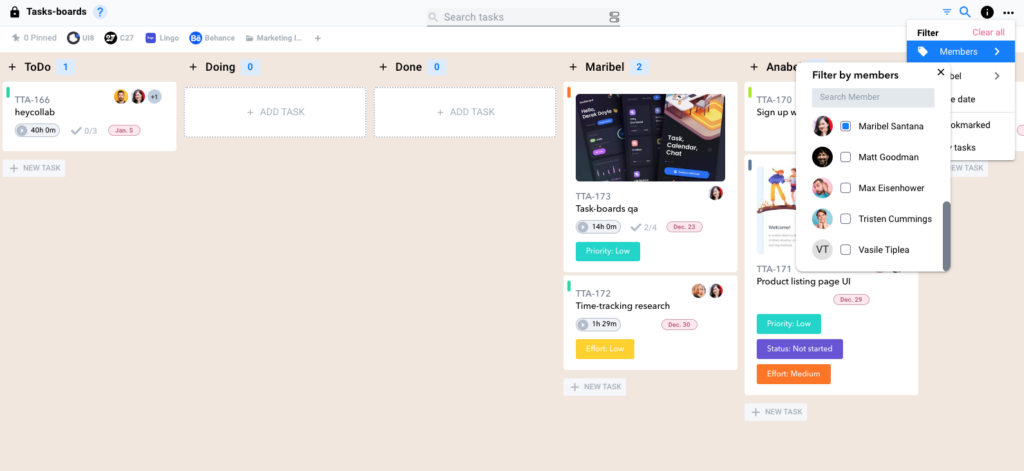
2. Filter Tasks
You can also filter by specific team member by clicking on the team Profile icons in the top left hand corner.
Select the user and only their tasks will appear in your view.
3. Workspace Views
Using a different Workspace view can help you see your team’s tasks in a new way.
Select your view at the top center to better visualize your team’s workflow.
The Board view is the default and shows all the Tasks in their cards.
The List view shows a condensed full collection of tasks listed out and categorized.
The Calendar view helps to understand your tasks through your daily and weekly schedule.
While the Timeline view puts your whole team’s workflow into perspective.
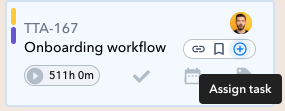
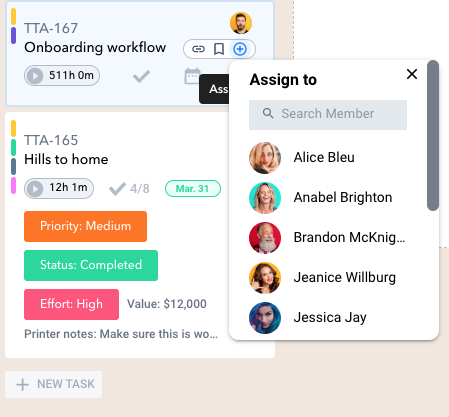
Assigning Tasks to Your Team
How to Assign a Task
You can assign a team member by hovering over the Task and clicking the “+” icon to select the team member.
Or when you open a Task card click the “Assign Task” button in the top left corner.
Multiple team members can be assigned to a Task one at a time.
Remember: You can assign a Subtask the same way.
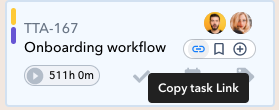
Send a Task Link
You may find it useful to send someone a link to a task directly.
Do this by clicking the Link icon when you hover over the task name.
You’ve now copied the hyperlink for this task, and you can send it to a team member by writing a Message and pasting the link.
The hyperlink will appear in a short name like, “T28”.
If you had copied a Subtask link the short name would appear like, “ST29”.
When your team member clicks on the link the task will immediately open in a window.
Remember: that you can share Task links across a Workspace too!
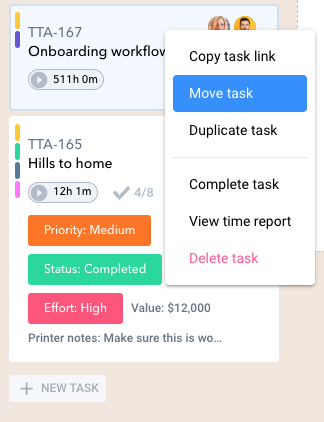
Assigning a Task to Members of a Different Workspace
If you need to move a task to a completely different team on another Workspace.
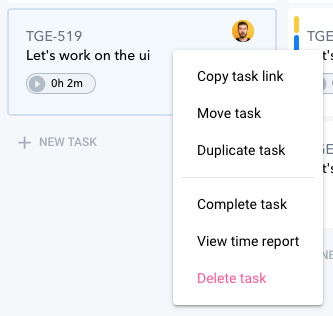
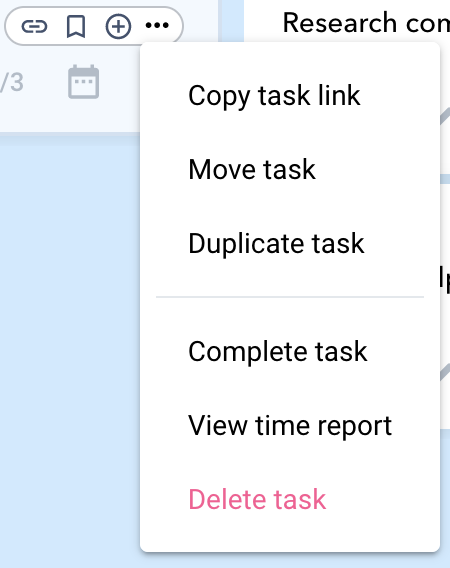
Click the “…” icon when you hover the task name.
Select Move task and choose your new Workspace and then which column to place the task.
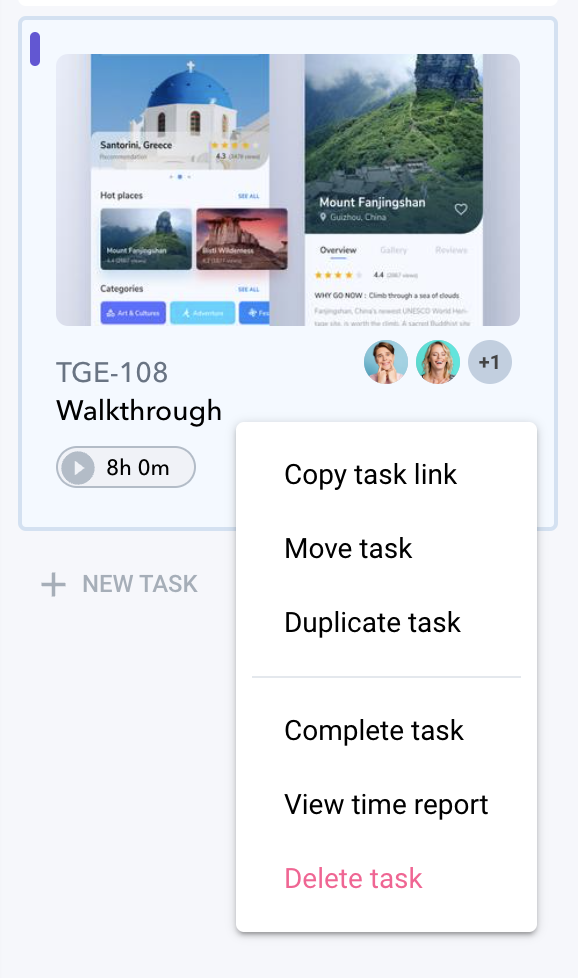
Remember: If you need to duplicate a task then click the “…” icon and select Duplicate Task.
Formatting Your Tasks and Workspace
Formatting Your Tasks and Workspace
It might be helpful to customize your Task cards or even your Workspace to help identify them faster.
Follow these steps to make these formatting changes:
Changing the Look of a Task Card Cover
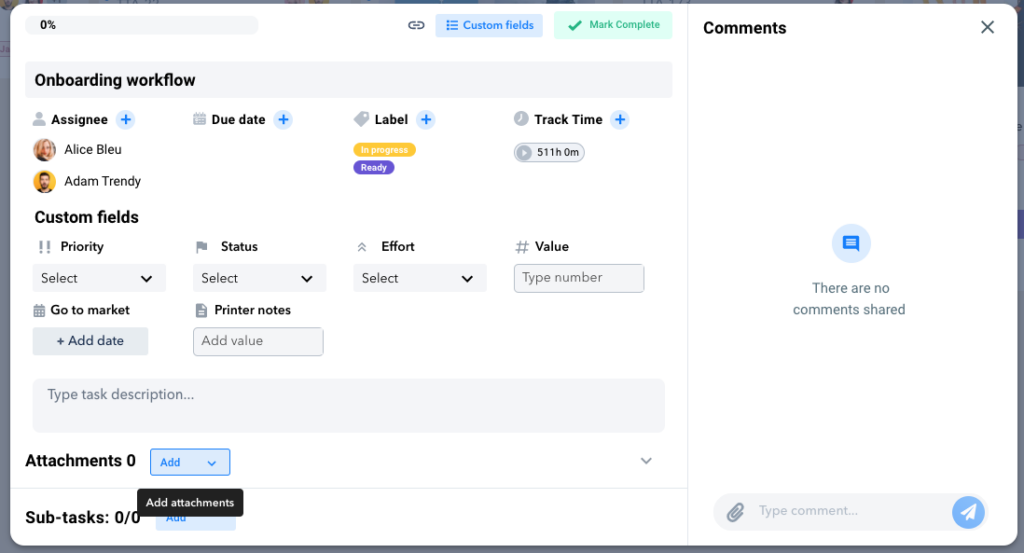
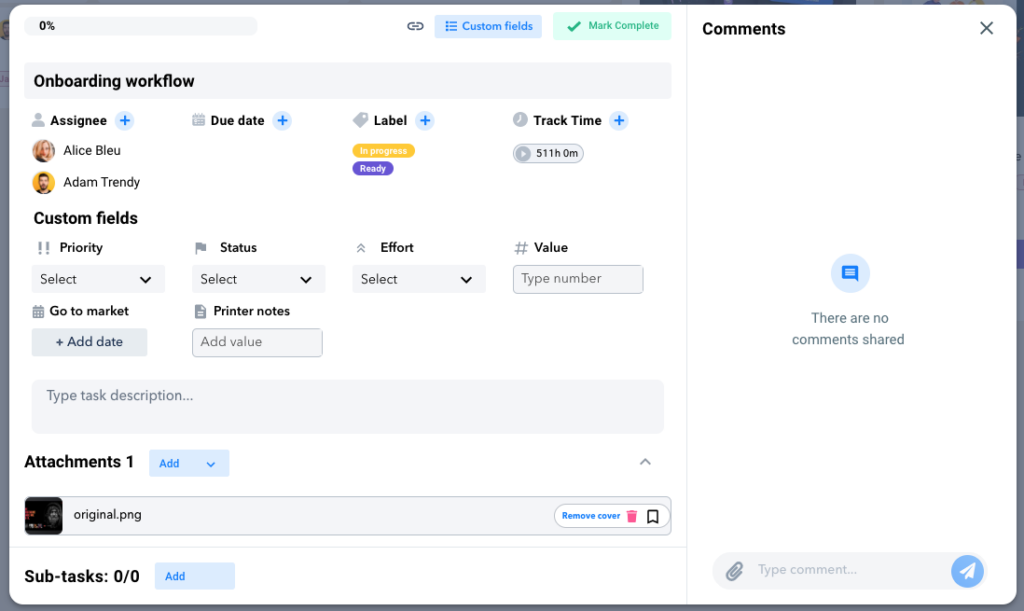
To customize your task and set a specific image to the task cover, open the task and add an attachment.
Scroll below the Description box and click Add Attachment.
You can select from these options:
Your Computer
Shared File
Dropbox
Google Drive
Upload the image from your selected source.
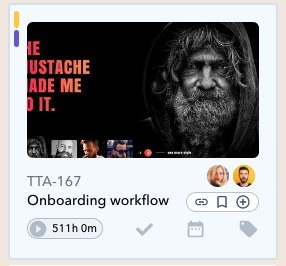
When the image appears in the task window, hover over it and click the icon on the far right to select “Make Cover”.
Your image will display on the Task card in the Workspace Board view.
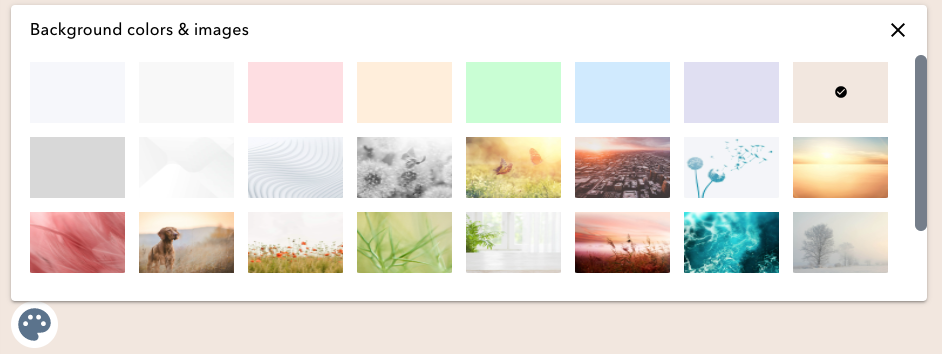
Changing the Look of Your Workspace
You can also customize your entire Workspace by clicking the artist palette icon in the bottom left of the Workspace screen.
You can select from a choice of solid colors or images.
This custom format can even be uniquely set for each Workspace view.
Saving a Board Template
When your design is finalized you can save it as a Board Template.
Start by clicking the “…” icon in the top right of the Workspace window.
Select Board Template > Save Board Template from the drop down list, and name your Template.
To use the template in a different Workspace, click the “…” icon in the top right of the new Workspace window and select Board Template.
Choose your Template name from the drop down list and it will load!
Creating Task Comments and Feedback
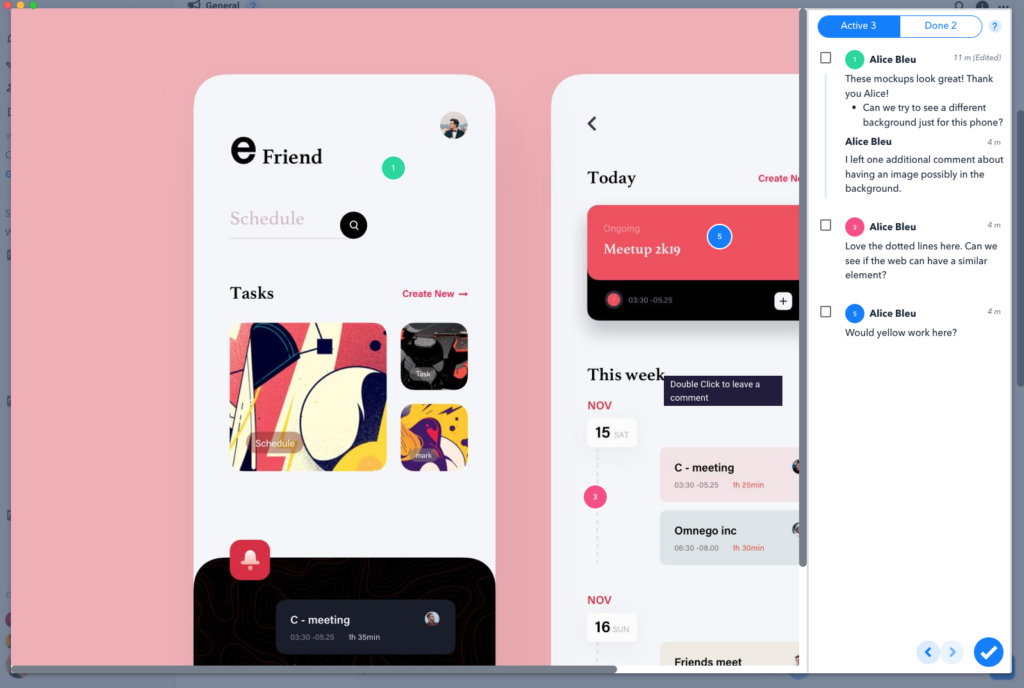
Give Feedback on a Task or Subtask
Providing feedback on a Task or Subtask is done through adding comments or reactions.
Add a Comment
The Comment section is on the far right of the Task window.
Add any feedback or link specific Subtasks in the comment to draw attention to the specific work being mentioned. You can also mention a team member in the comment using the “@” symbol.
Add a Reaction
You can add a Reaction only to a Task Comment that was made or a Subtask.
To add a Reaction, hover over the Task Comment or Subtask and click the emoji icon on the left.
Using Taskboard Templates
Taskboard Templates
Changing the Look of Your Workspace
You can also customize your entire Workspace by clicking the artist palette icon in the bottom left of the Workspace screen.
You can select from a choice of solid colors or images.
This custom format can even be uniquely set for each Workspace view.
Saving a Board Template
When your design is finalized you can save it as a Board Template by clicking the “…” icon in the top right of the Workspace window.
Select Board Template > Save Board Template from the drop down list, and name your Template.
To use the template in a different Workspace, click the “…” icon in the top right of the new Workspace window and select Board Template.
Choose your Template name from the drop down list and it will load!
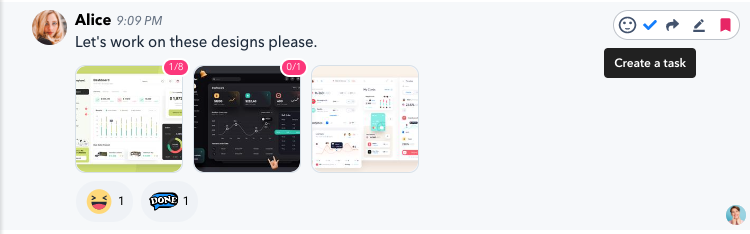
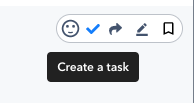
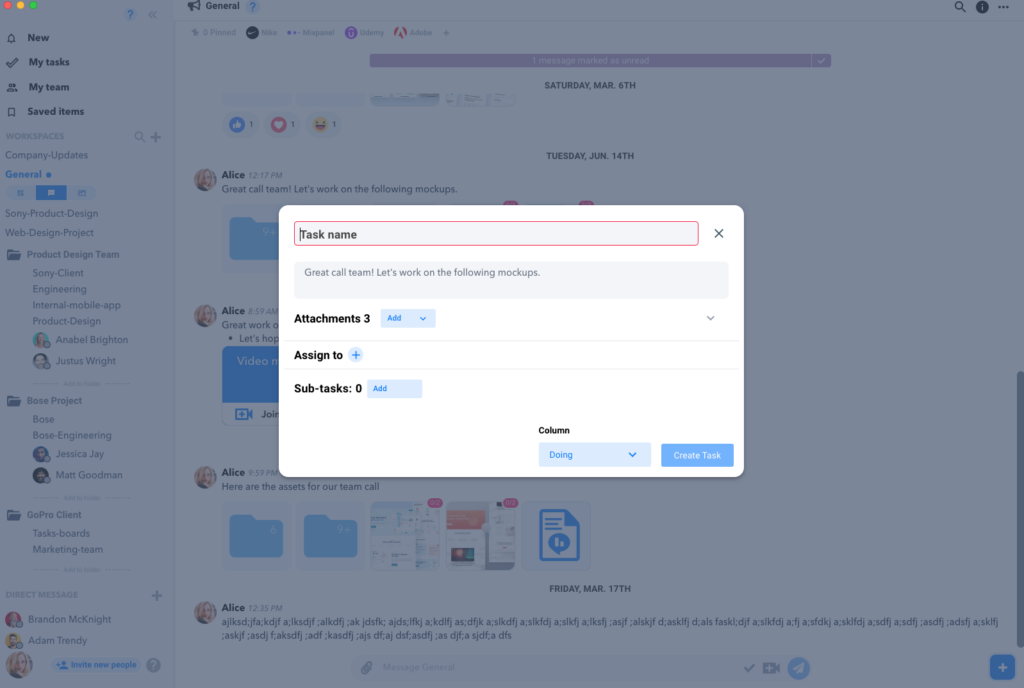
Create a task from a Message
Create a Task from a Message
You are able to create a Task quickly right from your Messages! This can help save a lot of time and keep you productive within the same Messages window.
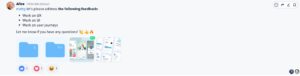
Whenever you have a Message that you want to turn into a Task just hover over the message and in the top right will be a white bubble. Click the “checkmark” icon.
Once that has been clicked, a new Task window will open. The message will be included in the Description of the Task automatically.
You would just need to name the Task, select a due date, and assign it to the appropriate Team member.
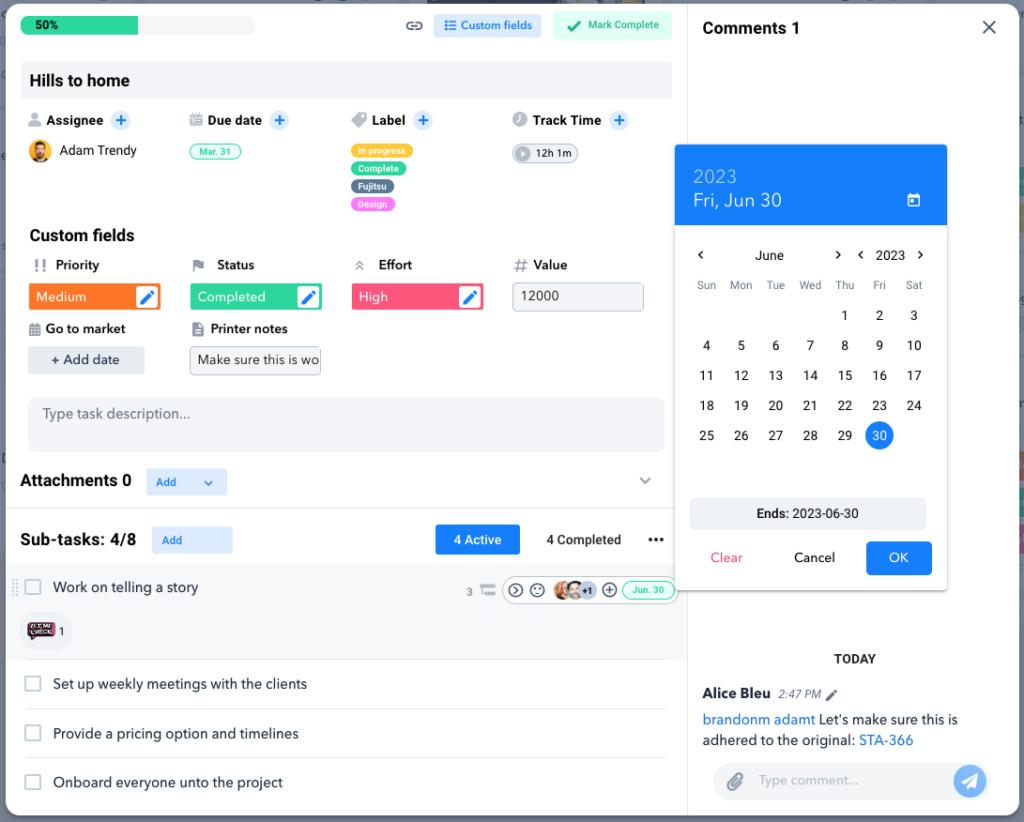
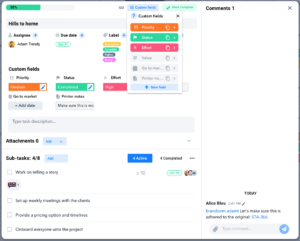
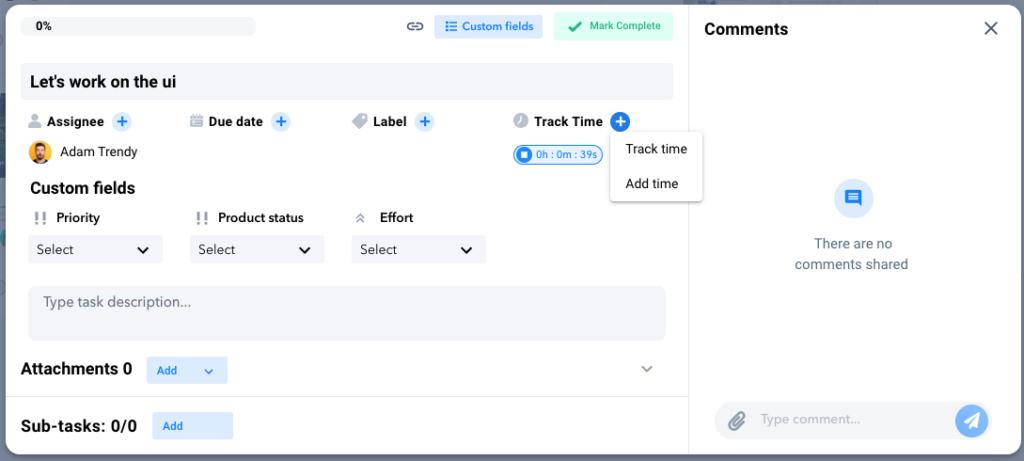
Custom fields
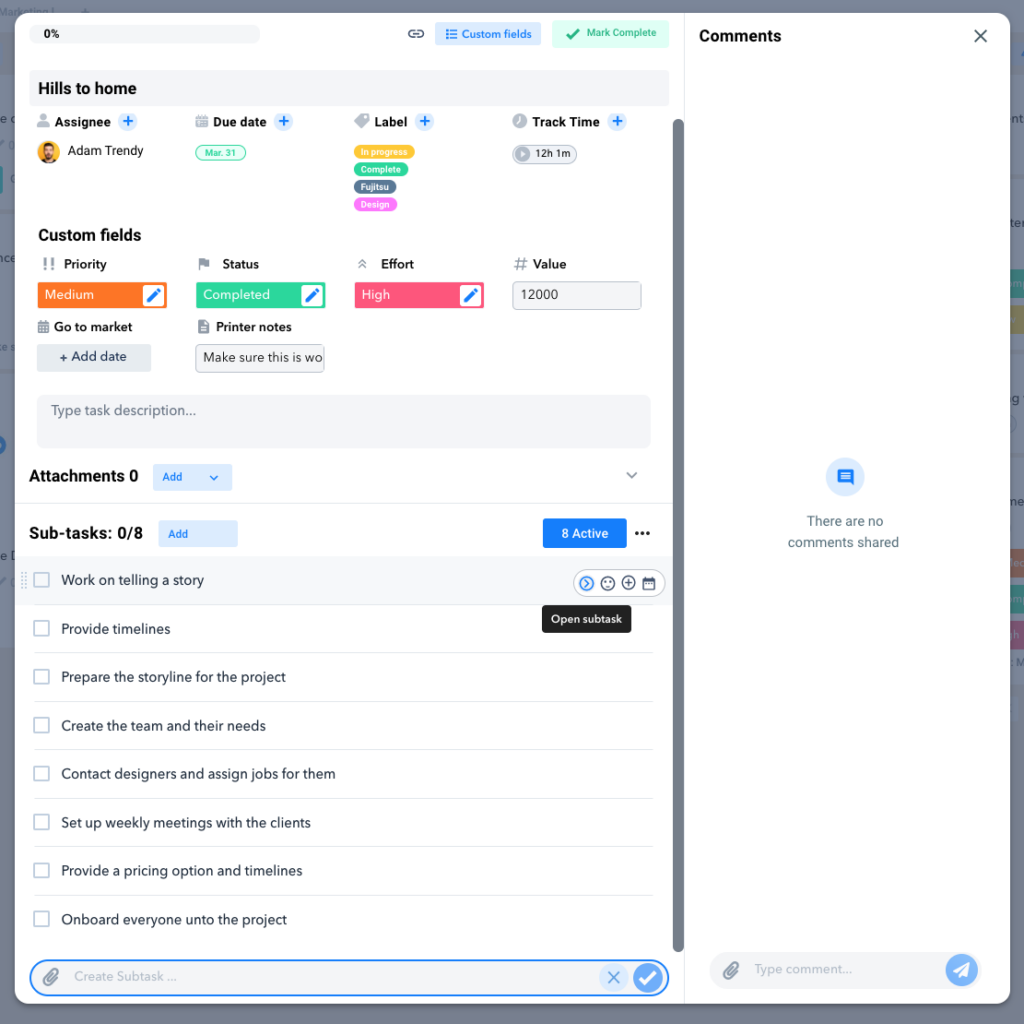
Custom fields expand the functionality of your tasks by allowing you to add new field types and custom data to your Heycollab tasks.
https://vimeo.com/719406868
Heycollab custom fields
To get started, open a task and click the custom field button.
Heycollab custom fields.
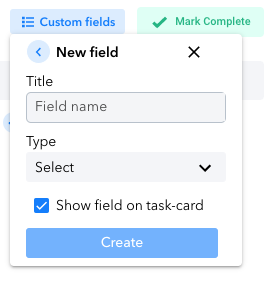
You can either start with one of the suggested fields or create a new one.
Let’s add a priority custom field from the suggested fields.
Notice in the task dialog that now I have a new section labeled custom fields that will show this new property listed here.
I can click on this property and set it’s available values.
To show this field on the face of the task-card, open custom fields, click on priority and at the bottom check show field on task-card
Now, notice how this field shows on the task card.
Each field you create, will be available to use across all tasks you create within this workspace.
Now, let’s create a brand new field. Say we have a product that we want to launch and need to know in which phase of production this product is.
We can create a new field called Product status, select dropdown as the type and create its properties to be: Not started, In progress, In production and Ready to ship. We can also add color for each of these states.
Let’s show this on the task-card and create it.
You can create various types of custom fields like Checkboxes, dates, numbers and free text.
You can show these custom fields in your list view and customize the columns you wish to see. Just click on the fields button and select which columns you wish to show here.
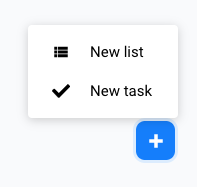
How to create a task or a column
How to Create a Task or Column
Tasks live in Columns within the Workspace.
You can create a task from the top or bottom of the column.
Creating at each direction puts it in the appropriate order
Simply click the “+” icon at the top or at the bottom of a column to add a New Task.
If you want to create a new column, click on “…” and choose Add New Column.
You can also delete a column or task the same way by right clicking on top of the column or task and select delete .
Move a Task or Column
To move a task or column just hover then click and drag to where you want it to move.
Completing a Task
Hover over a task and click Complete, and then it disappears from view.
To view all complete tasks, hover over the Column and select Active or Done to see the relevant Tasks.
You can always mark a Task as Incomplete to make it Active again.
Your Heycollab workspace is where people can work together, connect all their tasks, and send the information they need to do their best work. Use the specific steps below to create your workspace and get started with Heycollab.
1. Click the Add Button on the Workspace title.
Click to allow you to name your Workspace.
Follow the instructions on naming the workspace by adding team members, or inviting new team members to this workspace. Settings provide selections to allow your team members to see messages, tasks, and files.
2. Add a Workspace Name.
Name your workspace so that you and your team can easily determine what type of work will be completed here.
3. Add a description.
Include any important details needed or special instructions like login information that the team might be regularly using to complete their work.
4. Select to make the Workspace "Public" or "Private" and add members or invite new users to the workspace.
This governs who is able to see and join into the Workspace. If this step is skipped- later the administrator of this workspace can add members or invite new users.
5. Ready to Create Workspace!
You are now ready to start adding Tasks and inviting your team to the Workspace. If you created a workspace by mistake or decided to delete it later- right-click on the workspace you desire to delete and select “Delete Workspace”.
Once again there are a few things you can do with a workspace: 1. Add to Favorite 2. Move the workspace 3. Workspace Settings- change the settings of the workspace 4. Change notifications 5. Workspace E-mail 6. View the Timesheet 7. Export Timesheet 8. Export Conversation 9. Delete Workspace
In order to delete a workspace, there are 2 ways to do so, one is from the dropdown as you hover over the workspace and right click; the second is from the far right side on top, selecting the more icon- 3 dots and that will also give the user the ability to delete a workspace.
Hope this helped you learn more about how to become an efficient team!
Invite your team
Invite Your Team to Your Workspace
Maximizing the power of your Workspace begins with adding in your team members.
This will allow you to send them direct messages and assign them Tasks specifically.
Follow the steps below to add in your team!
1. Click “Invite new people”.
In the left hand column click the “Invite new people” button below by the Profile image.
2. Enter the User’s email address.
Type in the user’s email address and select the Workspace you want them to join. You can add up to 5 e-mail addresses and copy the link for the invite as well.
If you’ve been invited to a team in Heycollab, follow these simple steps to join:
Step 1:
Open the e-mail invite and click the Join Now button (if you have not received an invite, check your junk-mail folder)
Step 2:
Clicking on the Join now button should bring up this page, if it does not, make sure you are not logged in to Heycollab. If you are, simply log out, open this e-mail and click the “Join Now” button.
Step 3:
Once you filled out the form and submitted, you should be directed to heycollab. Now you can start collaborating with your team.
How to Create and Send Messages
Create and Send a Message
Communication is key to collaboration, and Messages are a great way to stay in sync with your team.
Writing a Message
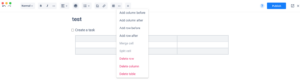
Find your Workspace in the left hand column and click the center Chat icon.
In the below grey window type your message.
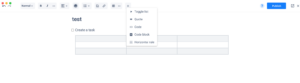
To attach task link, click on checkmark icon.
To add a video link select the video icon.
To create a document select the blue add button on the far right off the screen.
To create a new task, select the same blue box with an add icon in it.
To format your message, such as italicize it or make it bold, select command “v” for iMacs and ” ” type between the quotes. Of course you can write the message first and then format it.
Use the “@” symbol to directly mention a team member in the message.
The paper clip icon on the left will allow you to easily select a file from your computer, Dropbox, or Google Drive. (Or you can drag and drop a file directly to attach it too.)
Don’t forget you can include emojis too!
Workspace Overview
Your Workspace Overview
The Heycollab workspace is a central place for your team and your work. Here is more information about creating or managing your new workspace. This guide is for you, and we’re glad you’re here!
1. Create a Workspace.
First, head to the Create a Workspace page we’ll walk you through the process through the step by step instructions.
Once you’ve created your workspace, you’ll be the Admin for that space to manage your team and add Tasks.
2. Add a Task.
Choose the column of work on your Task board and add a Task. Follow the instructions on the Add a Task page to make sure you understand all of the important features available to you and your team.
3. Invite your Team.
Get your teammates into your new Workspace so they can start collaborating and can receive all Tasks that are assigned to them. You can make sure they are up to speed with all Heycollab can do by sending them to the Heycollab overview for users page.
Overview of My Work
How to See My Work
The My Work window allows you to see an overall summary of your activity in the Workspace.
When your work is shown, there will be four summary icons at the top: Tasks Completed, Hours Worked, Messages Sent, and Comments Posted.
The top section is “Tasks Assigned to Me” and is a collection of your work.
This previews important details like: due dates, tracked time, labels, and Workspace. Click on the Workspace on the far right to jump directly into that Task board.
A helpful quick tip is to organize your window by creating a List!
Creating a Custom List:
Step 1:
Click the “New List” button at the top row of the window, and the list will be added to the bottom of the display window.
Step 2:
Click on the name to edit and type your own name for the list.
Step 3:
To re-order a list you can click and drag it in any order under the “Tasks Assigned to Me” list.
Step 4:
Simply drag any Task in the window into any list you create to organize your work.
Tracking Your Time Worked
Tracking Your Time
In Heycollab, wherever you have a Task you will be able to track the time spent on that work.
How to Start Tracking Time
To start tracking time, simply hover over any Task and click the “Play” icon. This will start the timer which can be viewed directly on the Task or in the bottom left of the Workspace window.
The Timer will stay visible no matter which Workplace view you move into.
The title of the Task you are tracking will display below that Timer, or you can also click the Timer to bring up the Task window directly.
When you are finished simply click the “Stop” icon on either Timer interface.
A pop up window will allow you to quickly add a description of what you worked on during that period.
You can edit your descriptions by clicking the “Pencil” icon or by viewing the Time Report Log.
View the Time Report Log by clicking the “…” icon to the right of the Task Name.
Using the About Sidebar
Using the About Sidebar
When working with several team members it can be helpful to have an overview of the details in your Workspace.
Use the About Sidebar to get that summary!
Open the About Sidebar
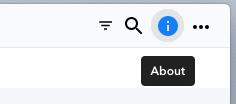
Access the Sidebar by clicking on the Blue “i” icon in the top right corner of the Workspace window. (Just click the same “i” icon to minimize the Sidebar from view.)
When the Sidebar opens there is a small blue “?” icon to the right of the top buttons which provides access to a Help video tutorial to learn more about using this area.
The About Section
When you select the “About” tab in the Sidebar you will see it divided into 4 areas.
Members
Description
Notifications
Activity Log
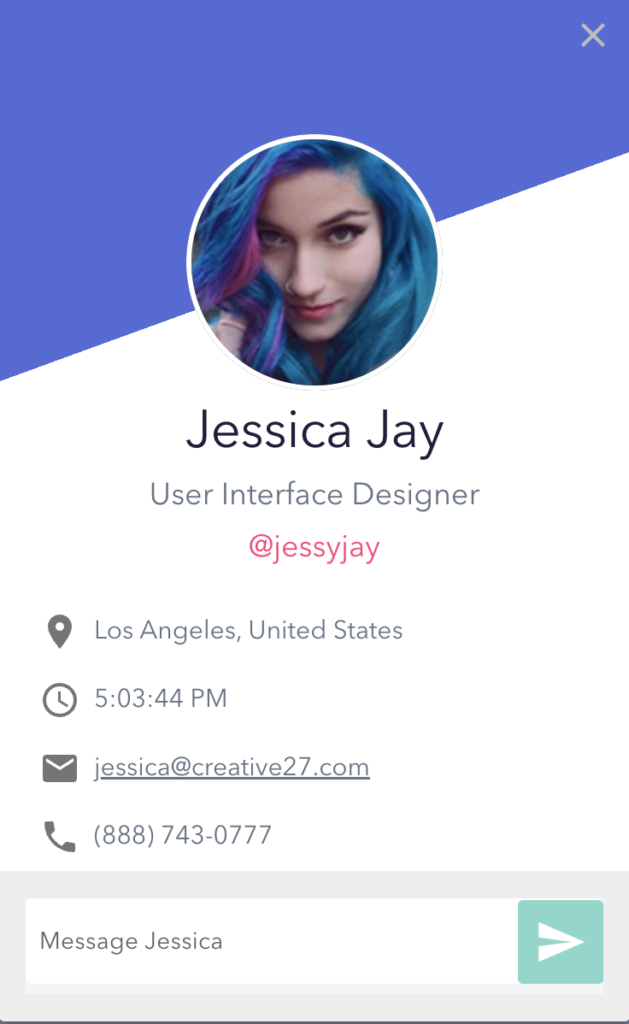
Clicking to open the Members area allows you to see the Profile Card of any member by clicking their Name on the list.
The Profile Card will provide you a variety of helpful information like their email, phone, and location.
You can remove a Member by clicking the “x” icon to the right of their name.
Or you can add a Member by clicking the “+” icon at the bottom.
If a Team member doesn’t show in the list. You would need to first Invite them to the Workspace.
The Description Section
The next section is the Description area.
This is a space that provides the overall details needed for this Workspace.
Some ideas to help you know how to best utilize this area are: adding login credentials, a shared Zoom room link, or other important data for the team.
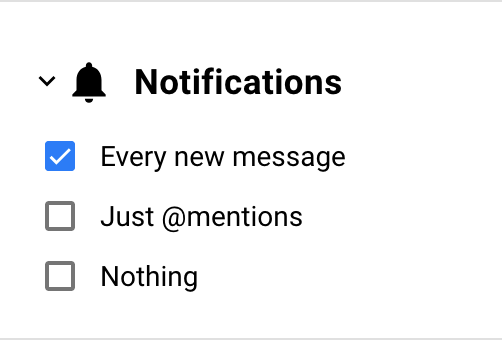
The Notification Section
This area gives you some control over how you would prefer to be notified of messages and mentions in the Workspace.
The options are:
Every New Message
Just @ mentions
Nothing
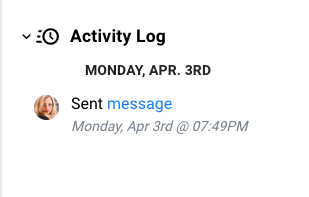
The Activity Log Section
This section shows you all of the actions and edits that you preformed in the Workspace.
It shows a description of the action that was taken, and a time/date stamp of when it happened.
A link is also provided to directly access the Message, Task, or File changed.
Editing Time Tracked and Descriptions
Time Report Descriptions
After every work session where you track your time, when the timer is stopped a pop up window appears.
This window allows you to enter in a description of your work.
You can access the Time Report Log by clicking the pencil icon when you hover over the timer on a Task card.
Or you can access it by right-clicking on a Task card.
Once the Time Report Log window opens you will see a list of all the tracked work sessions for a Task.
Each of these sessions can be edited.
You can manually adjust the time worked or the description of the work.
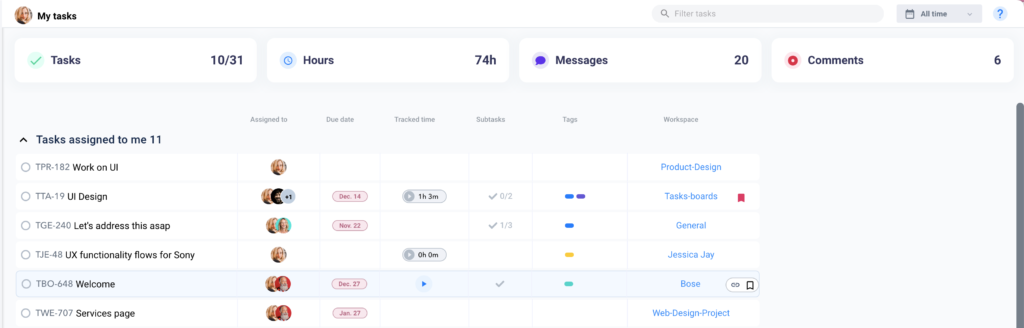
Viewing the My Work Dashboard
My Tasks Dashboard
The My Tasks window allows you to see an overall summary of your activity in the Workspace on an easy to use Dashboard.
Your work is shown and organized in four categories displayed in separate icons at the top of the window.
The four categories are:
Tasks Completed
Hours Worked
Messages Sent
Comments Posted
The main section is called “Tasks Assigned to Me” and is an overall collection of your work.
Your work is shown in a list and previews important details like:
Assigned to
Due dates
Tracked time
Subtasks
Tags
Workspace
Anytime there is hyperlink it will take your directly to that section. As an example, if you click on the Workspace on the far right, it will take you directly into that Taskboard.
Organize Your Window by Creating a List.
Click the “New List” button at the bottom right Add button of the window.
The new list will be added to the bottom of the display window for you to edit.
Click on the name to edit and type your own name for the list.
The new list will be added to the bottom of the display window for you to edit.
Click on the name to edit and type your own name for the list.
Quick Tips and Best Features
Quick Tips and Best Features
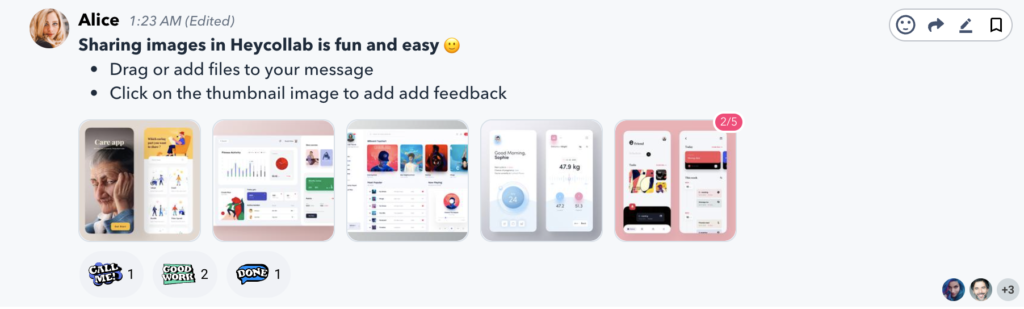
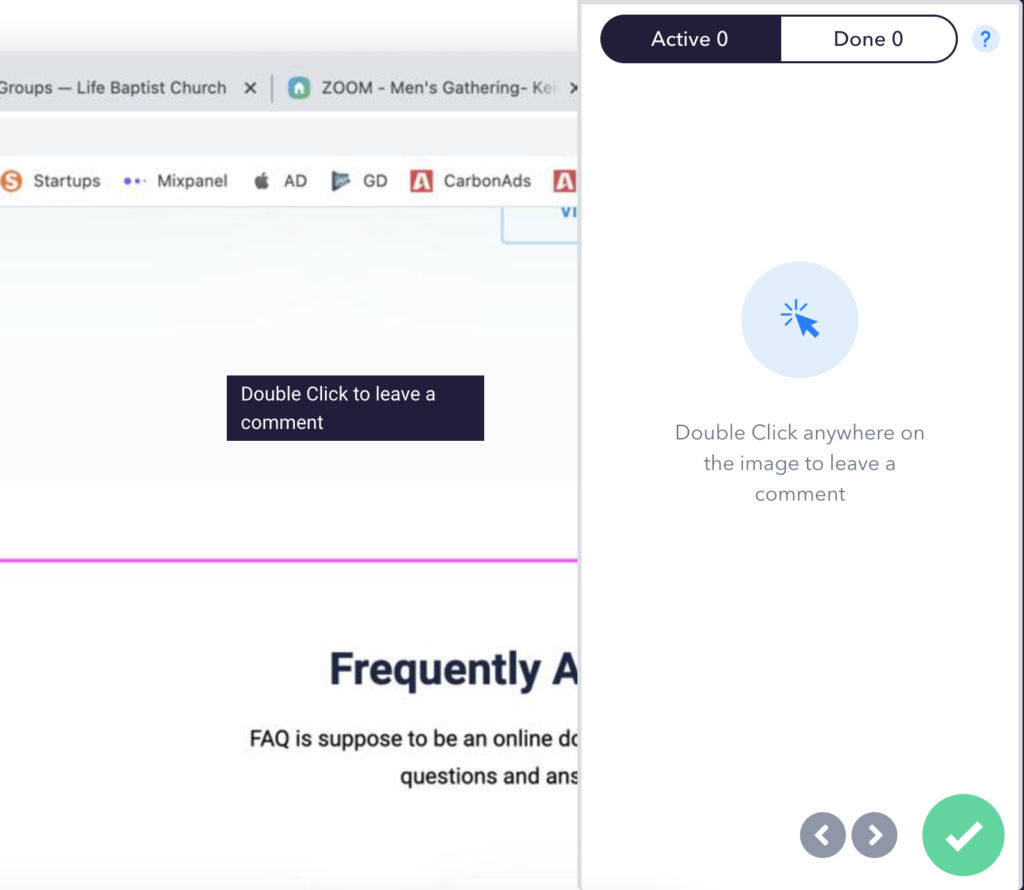
Markup Images with Comments
Open your image.
Add a Comment by clicking the blue “Add Comment” button.
Double click on the exact area of the image you need to make a comment.
A colored marker will be added for future reference.
Notification Indicators
There are two main areas to see Notification indicators in the left hand column of the main Workspace window.
The top left hand corner button that says “New” will reveal an icon and a number to show how many new items are waiting for you.
There is another indicator by the Workspace Name in the middle of the left hand column. A white dot will appear any time there is a notification waiting for you in a Workspace other than the one you currently have open
Once you click on the New button in the top left hand corner the Notifications area of the About Sidebar will open on the right hand column of your screen.
Your notifications will be listed with one of three icons to indicate if it is a message, task, or file. You are able to view, reply, and react right in the column.
Private Tasks in the About Sidebar
There is a time when you might need to create Tasks that are not visible for your team and meant just for you. You can create these tasks in the About Sidebar.
Sections inside Folders
When uploading Files you can organize them into specific Folders. But there are sometimes the need to group your Files into sections within that Folder by clicking the blue button in the top left corner called “Add Section”.
Uploading more than one file at a time.
When you are trying to upload files for your team you can bring several files in one big batch. Just click “Add Files” and then select as many files as you need.
Keyboard Shortcuts
When a task board is open, simply pressing escape on your keyboard will close the dialog box and take you back to the main Workspace view.
Accessing Multiple Workspaces
If you have several teams, you need the ability to keep them in their own unique Workspaces. But in HeyCollab you can quickly switch between a different Workspace in the left hand column by clicking on the name. Just remember to log in to each Workspace first and then you can easily bounce between your teams spaces!
Create a Workspace Video Tutorial
Create Your Workspace
Workspaces, messages, Tasks and files are the building blocks of Heycollab.
To create a workspace, Click the “+” button.Give your workspace a name and in the description field include important details to share. Select if it should be Private or Public and click create Workspace. You are now ready to add your team-members, create Tasks, send messages and share files to keep work going and keep everyone on track.
Heycollab allows you to view your tasks in board view, list, calendar and timeline Each view has it’s own advantages and based on your preference heycollab will remember the view set by you across workspaces The board and list view will allow you to move tasks and columns or lists around and setup quick parameters by simply hovering over a task In the calendar view, you’ll need to open a task in order to setup these parameters and you do this simply by clicking on the calendar event Finally, in timeline view, you can drag the ends of a task to change the date range or double click on it to open it.
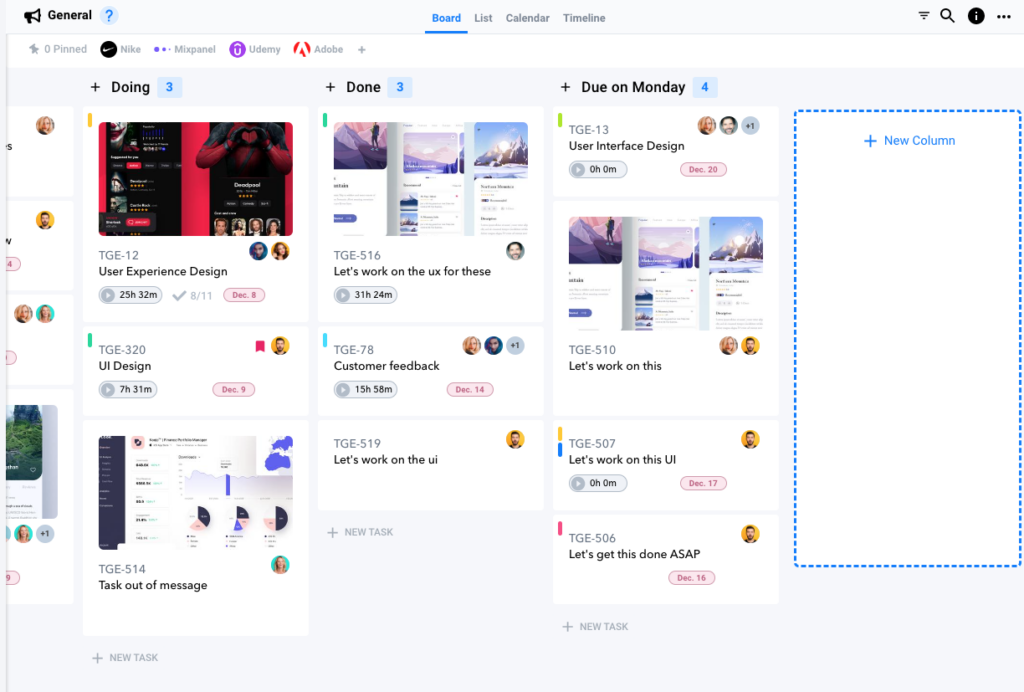
Organizing Tasks and Columns
Organizing Tasks and Columns
Create a task from the top or bottom of the column. Creating at each direction puts it in the appropriate order (top or bottom) Move a task by dragging it around the board…same with a column. If you want to create a new column, click on new column and give it a name. If you want to add a column, between columns, click on … and choose Add New Column You can also delete a column or task the same way by clicking the “…” and select delete. To complete a task hover over the task, click the 3-dot menu and select Complete task To view all complete tasks, Hover over the Column and select Active or Done to see the relevant Tasks. You can always mark a Task as Incomplete to make it Active again.
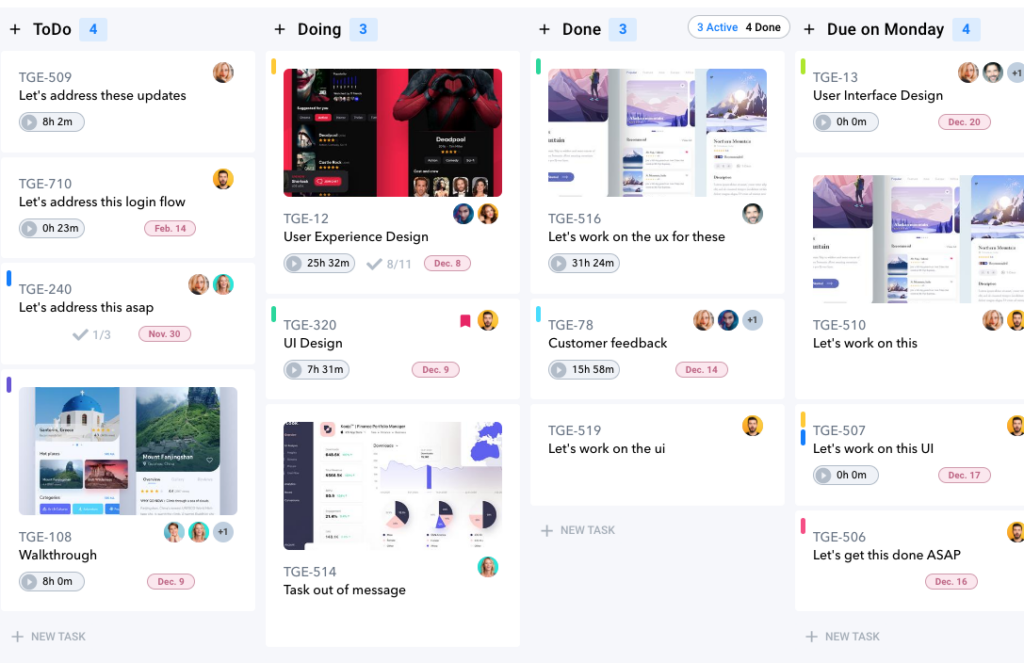
Task Due Dates and Labels
Task Due Dates and Labels
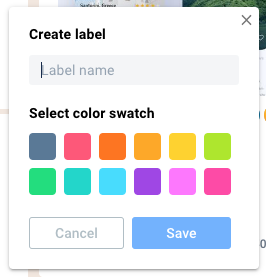
Get your tasks completed on specific time frames by clicking the Calendar icon at the bottom of the Task Card. If you have a specific due date then select the day on the calendar and double click. If you need to select a date range then click once on the start date and again on the end date. You can even choose a specific time you need a task completed The Calendar and Timeline view are two easy ways to visualize these due dates. The Calendar view helps make your daily or weekly tasks, and the Timeline view helps see the bigger picture of all the tasks your team is working on. Changing the task label will change the visible color on both of these views. Hover over the bottom of the Task Card and click the Tag icon. Choose from one of our pre-set labels or click Create Label at the bottom to create a custom one. You can add more than one label to any task.
Creating Tasks and Managing Subtasks
Creating Tasks and Managing Subtasks
Create a Subtask within the Task Window. Click the green “+” icon to add a Subtask. Type in all the information for the subtask in the text field Include any Titles, descriptions, or lists. You can format the text by adding Bold or Italics (Cntrl/Cmd B or I) and make bulleted lists by using a dash before any new line. Attach files and folders to this subtask and arrange their order and add visual comments to images shared. Hit the green check when you are finished, and if you need to make any edits hover over the subtask and click the pencil icon. You can now assign a team member by hovering over the subtask and clicking the “+” icon to select the team member. You are able to do similar functions that are also available on a Task like assigning a due date and copying the subtask link.
Searching and Filtering Tasks
Searching and Filtering Tasks
Try filtering by clicking the Search Icon. Type a specific Keyword to bring up the related task. Click the filter icon within search for more ways to filter your tasks. Filter by label, Due date, bookmarked and My tasks You can also filter by specific team member. To do so, simply click on the team -Profile icons in the top left hand corner and only their tasks will appear.
Track Time on a Task
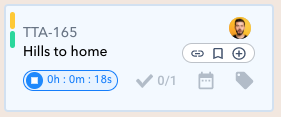
Track Time on a Task
The time worked on a particular task is displayed at the bottom of the Task card. To start tracking your time, hover over a task-card and click the play button and the Timer will start tracking in the Task. The timer will also show at the bottom left hand corner. You can always click the timer and it will show you the Task you are currently tracking. When you are ready to stop the timer hit the Stop button and it will allow you to enter a brief description of what you worked on during that time period. To learn more about time-tracking, see our walkthrough videos within the time-tracking section below
Using Links for Tasks or Subtasks
Using Links for Tasks or Subtasks
You may find it useful to send someone a link to a task or subtask directly. Do this by clicking the Link icon when you hover over the task name. You’ve now copied the hyperlink for this task, and you can send it to a team member by writing a message and pasting the link. The hyperlink will appear in a short name like, “T28”. If you had copied a Subtask link the short name would appear like, “ST29”. When your team member clicks on the link the task will immediately open in a window. Remember that you can share Task links across Workspaces too! If you are in the messaging section, you can access the tasks assigned to you in the about sidebar. You can copy the task link directly from here, so you don’t have to leave the messaging section
Assigning Tasks or Subtasks
Assigning Tasks or Subtasks
You can assign the right people in your team to a task by clicking the “+” icon to bring up a list of the team that are part of your Workspace. Multiple people can be assigned to a task. Select them one at a time to add them. You can assign Subtasks to team members in the same way. If you need to move a task to a different Workspace Click the “…” icon when you hover the task name, Select Move task and choose your new Workspace and then which column to place the task in. If you need to duplicate a task then click the “…” icon and select Duplicate Task.
Adding Feedback to Tasks
Adding Feedback to Tasks
Providing feedback on a subtask is done through adding comments or reactions. To add a Reaction, hover over the subtask and click the emoji icon. Select the right reaction to add and it will appear below the Subtask. The Comment section is on the far right of the Task window. It can be used like you were creating a Message. Add any feedback or link specific subtasks in the comment to draw attention to the specific work being mentioned. You can also mention a team member in the comment using the “@” symbol. Mentioning a member will send out an e-mail notification to that member.
Customizing Task Boards
Customizing Task Boards
If you’d like to customize your task and set a specific image to the task cover, open the task and add an image as an attachment. Upload the image from your computer or choose from a shared image in the Workspace. When you see the image appear in the task window, hover over it and click the icon on the far right to select “Make Cover”. You can also customize the background of your Workspace by clicking the artist palette icon in the bottom left of the Workspace screen. You can select from solid colors or images. This can even be uniquely set for each Workspace view.
Using Task Board Templates
Using Task Board Templates
You can save a task-board as a template and you can save as many templates as you wish to be used across workspaces. To do this click the “…” icon in the top right of the Workspace window. Select Board Template > Save Board Template from the dropdown list, and name your Template. To apply templates, click the “…” icon in the top right of the new Workspace window and select Board Template. Choose your Template name from the dropdown list and the template will be applied to your current board.
Utilizing the Work and My Work Sections
Utilizing Work and My Work Sections
Admins in a Workspace have access to the Work window. The Dashboard shows a summary of all team members in the Workspace. Filter this by searching for a specific team member in the search bar. Or choose a specific time frame in the drop down menu on the top far right of the window. The Workload graph gives a visual of activity for your team members. Hover over their profile picture to reveal their name. Hover over the bar to see specific task counts they are working on. Or view their profile card below to see even more of a team member’s work details. The labels displayed are tracked by the labels assigned to a task. Click each drop down to see which specific tasks they are working on which have that label.
The top row of the Work window also allows you to select My Work to see your activity or select a specific team member from the drop down to see their activity. When a team members work is shown, there will be four summary icons at the top: Tasks Completed, Hours Worked, Messages Sent, and Comments Posted.
From the Dashboard screen you can create tasks across all Workspaces by clicking the “New Task” button at the top. The window allows you to choose your task name, add a description, and create subtasks. Choose the specific Workspace for your task in the drop down Depending on which Workspace is chosen will allow you to assign certain team members to the task.
The My Work window allows you to see an overall summary of your activity in the Workspace When your work is shown, there will be four summary icons at the top: Tasks Completed, Hours Worked, Messages Sent, and Comments Posted. The top section is “Tasks Assigned to Me” and is a collection of your work. This previews important details like: due dates, tracked time, labels, and Workspace. Click on the Workspace on the far right to jump directly into that Task board.
Organize your window by creating a List. Click the “New List” button at the top row of the window, and the list will be added to the bottom of the display window. Click on the name to edit and type your own name for the list. To re-order a list you can click and drag it in any order under the “Tasks Assigned to Me” list. Simply drag any Task in the window into any list you create to organize your work.
Accessing Workspace Descriptions
Accessing Workspace Descriptions
The next section is the Description area. This is a space that provides the overall details needed for this Workspace. You can add login credentials, a shared Zoom room link, or other important data for the team.
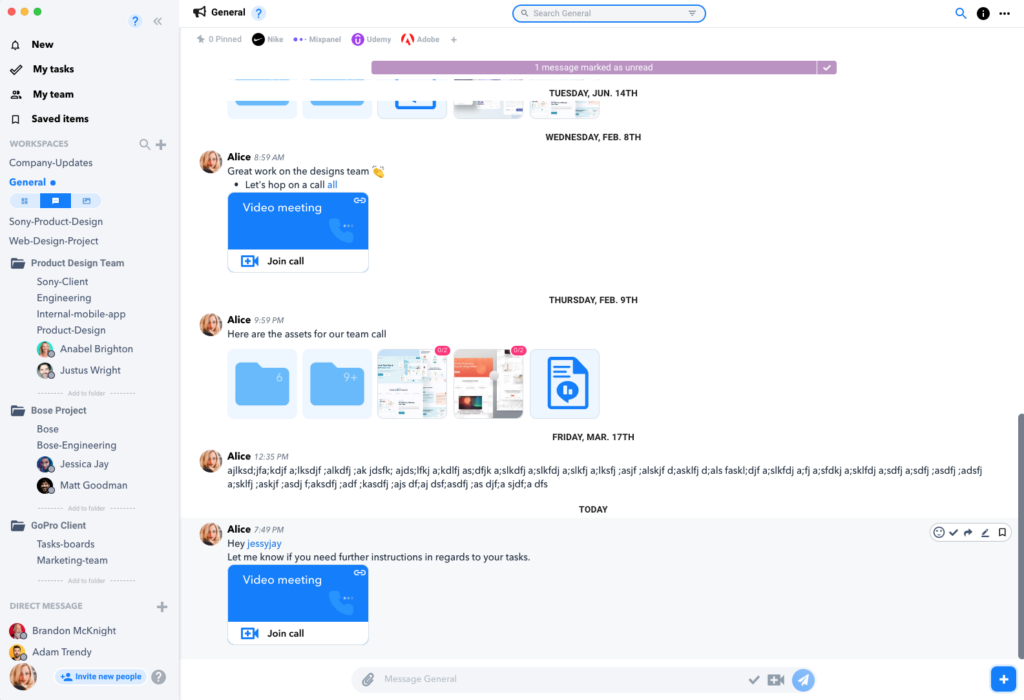
Message Notifications and Sending Direct Messages
Message Notifications and Sending Direct Messages
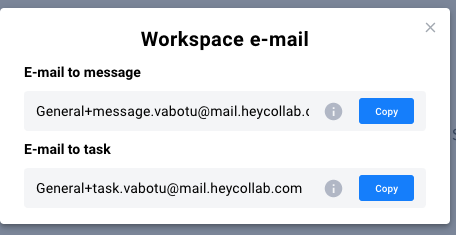
When you need to mark a message as unread, click the circle to the left of the team members picture. And if you want a read-receipt of who viewed the message, check for the team members icon at the bottom right corner of the message when you hover over the message. Clicking on a team member’s profile image here will bring up their Profile window that gives additional ways to communicate with them directly. You can even send a message to your workspace from your external email! Click the “…” by your Workspace name in the left hand column. Select Workspace Email. Copy the e-mail address and send your e-mail to this address. The copy of your email will be received as a message while the attachments of your e-mail will be attached to the message.
Learn more ways to utilize the Message feature in the next video!
Editing Time Entries
Editing Time Entries
You can edit your time description or time entries by clicking the “Pencil” icon or by viewing the Time Report Log. The Time Log Report window shows you who has worked on this specific Task. It details which team member did the work, what date and time range they worked, and the description of the work they completed. You can also manually enter a time range by adjusting the time range.
Organizing Tasks and Columns
Organizing Tasks and Columns
Create a task from the top or bottom of the column. Creating at each direction puts it in the appropriate order (top or bottom) Move a task by dragging it around the board…same with a column. If you want to create a new column, click on new column and give it a name. If you want to add a column, between columns, click on … and choose Add New Column You can also delete a column or task the same way by clicking the “…” and select delete. To complete a task hover over the task, click the 3-dot menu and select Complete task To view all complete tasks, Hover over the Column and select Active or Done to see the relevant Tasks. You can always mark a Task as Incomplete to make it Active again.
Notifications overview
Overview of Notifications
HeyCollab uses notifications as a central way to keep you updated on any new messages, task assignments or comments. You can see all your Notifications in the top left corner of the window.
Notice that there is a separate count for task and message notifications.
Click on the “New” panel name to preview all your Notifications in the About Sidebar on the right of your screen.
By default the most recent notifications received will be at the top.
You can click the drop down arrow to filter other options
Click the “…” icon in the top right of the panel to mark all notifications read or delete them.
And use the same “…” icon on individual notifications to just make those changes to that notification.
Note: All Notifications that are unread will have a blue background, and one’s you’ve seen will have a white background.
There are three icons used to visually identify: Messages, Task Comments, and Tasks.
Click on the icon in individual notifications to open the specific window related to that notification directly.
Another visual cue that displays is a white dot next to the name of any Workspace that has a pending Notification.
A number will also appear in the icon for Messages or Tasks in the Workspace to show how many notifications are waiting for your review.
Reporting for Administrators
Viewing Team Reports
Administrators need the ability to see what work is being completed across individual team members and entire Workspaces. Heycollab offers reporting insights for both of these needs.
You are able to view some of the top level data in Dashboards, but you can export Time Reports for more detailed data.
Time Reports Summary
Time Reports is a collection of all the work that has been timed on the tasks in a Workspace.
These Time Reports are helpful to keep track of your work through specific descriptions included on each entry.
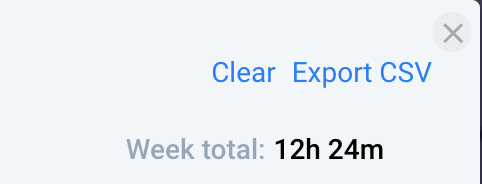
Time Reports can be tracked across any Workspace for all individual team members.
As an Admin you are able to view Time Reports for all the team members in a Workspace.
Any Time Report can be exported into a .csv file for your records!
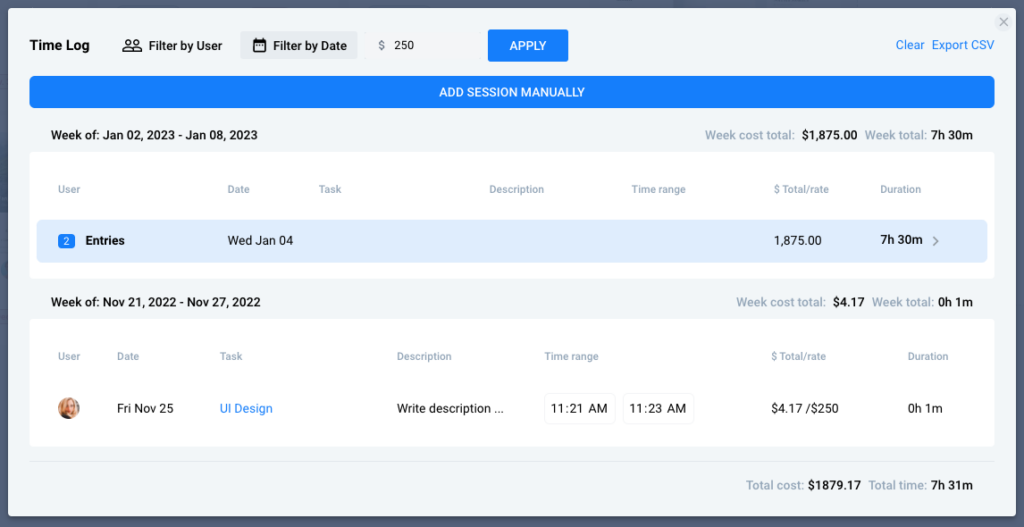
Viewing Time Reports
You can access the Time Report Log by clicking the pencil icon when you hover over the timer on a Task card. Or you can access it by clicking the “…” icon on a Task card.
Once the Time Report Log window opens you will see a list of all the tracked work sessions for a Task.
The Time Report organizes the work by week.
In the header of each group will be the date of the week on the left and a total of the time worked on the right.
Each of these sessions can be edited.
You can manually adjust the time worked or the description of the work.
Exporting Time Reports
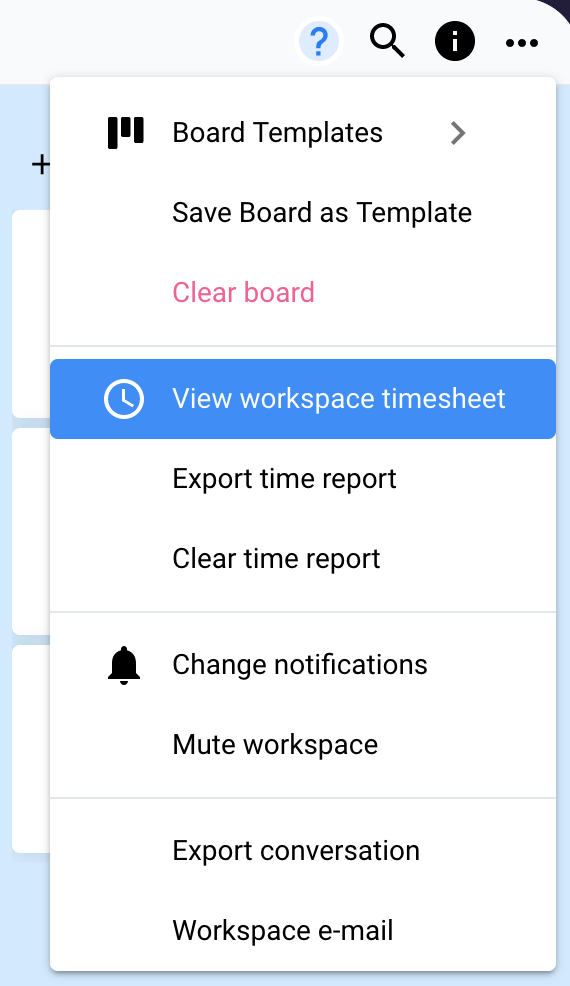
In the Task Board view of the Workspace click the “…” icon in the top right corner of the window.
Select “View Workspace Timesheet”.
Then a Time Log Report window will open revealing all of the work that has been recorded across each of the Tasks in the Workspace.
If you need to view any of the tasks more closely, each name is a hyperlink which opens the Task window directly when clicked.
Click “Export CSV” in the top right corner of the window and Save the file to your computer.
Multiple Workspace Time Reports
In a similar way you can view the tracked time you’ve spent working across multiple Workspaces.
Click your Profile picture in the bottom left hand corner of the Workspace window.
Select “View Company Timesheet”
Then a Time Log Report window will open revealing all of the work that has been recorded across each of the Workspaces for the company.
Remember: Another way to see a quick total of your time worked is in the My Work section.
Intro for members
From creating workspaces and tasks to managing your team’s time and more.
The My Work window allows you to see an overall summary of your activity in the Workspace.
When your work is shown, there will be four summary icons at the top: Tasks Completed, Hours Worked, Messages Sent, and Comments Posted.
The top section is “Tasks Assigned to Me” and is a collection of your work.
This previews important details like: due dates, tracked time, labels, and Workspace. Click on the Workspace on the far right to jump directly into that Task board.
A helpful quick tip is to organize your window by creating a List!
Creating a Custom List:
Step 1:
Click the “New List” button at the top row of the window, and the list will be added to the bottom of the display window.
Step 2:
Click on the name to edit and type your own name for the list.
Step 3:
To re-order a list you can click and drag it in any order under the “Tasks Assigned to Me” list.
Step 4:
Simply drag any Task in the window into any list you create to organize your work.
Notifications overview
Overview of Notifications
HeyCollab uses notifications as a central way to keep you updated on any new messages, task assignments or comments. You can see all your Notifications in the top left corner of the window.
Notice that there is a separate count for task and message notifications.
Click on the “New” panel name to preview all your Notifications in the About Sidebar on the right of your screen.
By default the most recent notifications received will be at the top.
You can click the drop down arrow to filter other options
Click the “…” icon in the top right of the panel to mark all notifications read or delete them.
And use the same “…” icon on individual notifications to just make those changes to that notification.
Note: All Notifications that are unread will have a blue background, and one’s you’ve seen will have a white background.
There are three icons used to visually identify: Messages, Task Comments, and Tasks.
Click on the icon in individual notifications to open the specific window related to that notification directly.
Another visual cue that displays is a white dot next to the name of any Workspace that has a pending Notification.
A number will also appear in the icon for Messages or Tasks in the Workspace to show how many notifications are waiting for your review.
Saved items overview
Saved Items Overview
Heycollab allows you to gather and save all your important Files, Messages, and Tasks in one place. This allows for a quick way to get to the information that matters to you most when you are trying to complete your work related goals.
To access your Saved Items, look in the left hand column of the Workspace and select “Saved Items” from the top List.
You can add three types of items to Saved Items. They are: Messages, Tasks, and Files.
How Can You Add Items to Saved Items?
To add a Message go to any message and hover over it to reveal the Bookmark icon to the right.
If you click the Bookmark icon again it will unselect and remove it from the Saved Items area.
In the same way when you hover over a Task in either the Board or List view it will show you the Bookmark icon you can click to add the Task to the Saved Items area.
Files can be added to Saved Items by going to the Files section in the Workspace or by looking at the Files in the About Sidebar. Hover over the file name and select the Bookmark icon.
BONUS TIP: Even your Private Tasks in the About Sidebar can also be added to your Saved Items and will display in the Task column of your Saved Items window.
Tracking my time
Tracking Your Time Overview
In Heycollab, wherever you have a Task you will be able to track the time spent on that work.
This timer is available no matter which view you use to access your Tasks.
Start Tracking your Time:
Simply hover over any Task or Subtask and click the “Play” icon.
This will start the timer which can be viewed directly on the Task or in the bottom left of the Workspace window.
The Timer will stay visible no matter which Workplace view you move into.
The title of the Task you are tracking will display below that Timer, or you can also click the Timer to bring up the Task window directly.
When you are finished simply click the “Stop” icon on either Timer interface.
A pop up window will automatically reveal an area to add a description of what you worked on during that period.
You can edit your descriptions by clicking the “Pencil” icon or by viewing the Time Report Log.
How to Use the Time Report Log
The Time Log Report window shows you who has worked on this specific Task.
It details which team member did the work, what date and time range they worked, and the description of the work they completed.
You can also manually enter a time range by adjusting the time range.
View the Time Report Log by clicking the “…” icon to the right of the Task Name.
Click the “Add Session Manually” button at the top of the Time Log Report window to enter any work that was not timed yet.
Choose the date or date range that was worked.
Then select the time range that was worked.
As you add more timed work the Time Log Report will section out the display in week long increments, providing a total for each week.
Export any Time Log Report into a .csv file by clicking “Export Time Report” in the top right corner of the window.
In a similar way you can view the tracked time you’ve spent working across multiple Workspaces.
Click your Profile picture in the bottom left hand corner of the Workspace window.
Select “View Company Timesheet”
Then a Time Log Report window will open revealing all of the work that has been recorded across each of the Workspaces for the company.
Sending messages overview
Sending Messages Overview
Communication is key to collaboration, and Messages are a great way to reach out.
Heycollab’s focus is making messages an easy and direct part of the interface workflow experience.
How to Write and Send a Message:
1. Find your Workspace in the left hand column and click the center Chat icon.
2. In the below grey window type your message.
3. Attach any files by clicking the “paper clip” icon on the left. You can select from Dropbox, Google Drive or files uploaded from your computer. (Or you can drag and drop a file directly to attach it too.)
4. Directly mention a team member by clicking the “…” on the right and then select the “@” icon from the dropdown. (you can add some simple formatting or insert an emoji here too.)
5. Click the blue paper airplane icon when you are finished and ready to send.
Using Heycollab
From top to bottom, learn all there is to know about Heycollab.
Create tasks, set custom labels, see tasks in calendar, list and timeline view and more.
How to create a task or a column
How to Create a Task or Column
Tasks live in Columns within the Workspace.
You can create a task from the top or bottom of the column.
Creating at each direction puts it in the appropriate order
Simply click the “+” icon at the top or at the bottom of a column to add a New Task.
If you want to create a new column, click on “…” and choose Add New Column.
You can also delete a column or task the same way by right clicking on top of the column or task and select delete .
Move a Task or Column
To move a task or column just hover then click and drag to where you want it to move.
Completing a Task
Hover over a task and click Complete, and then it disappears from view.
To view all complete tasks, hover over the Column and select Active or Done to see the relevant Tasks.
You can always mark a Task as Incomplete to make it Active again.
Organizing Tasks and Columns
How to Organize Tasks and Columns
Keep your Tasks organized in labeled Columns.
The three columns that are easiest to begin with are To Do, Doing, and Done.
You can create additional columns and move them around the Workspace board.
Click the “+ New Column” on the far right of the Workspace window to create and name a new Column. Or you can hover over the name of a current column and click the “…” icon.
Add an Active Task to a Column
Create a task from the top or bottom of the column. Creating at each direction puts it in the appropriate order.
Simply click the “+” and “+ New Task” icon on either the top or the bottom of the column.
Move a task by hovering and then clicking and dragging. You can move a column the same way.
You can delete a column or task by clicking the “…” icon and select delete.
Or Tasks can also be removed from a column by marking them Complete. Hover over a task and click Complete, and then it disappears from the Active view.
To view all complete tasks, hover over the Column and select Active or Done to see the relevant Tasks.
You can always mark a Task as Incomplete to make it appear in the Active view again.
Find Tasks by Searching
Get to the tasks you need quickly using filtering by clicking the Search Icon.
Type a specific Keyword to bring up the related Task.
Type a specific Keyword to bring up the related Task.
You can also filter by specific team member by clicking on the team Profile icons in the top left hand corner.
Select the user and only their tasks will appear in your view.
Use Different Views to Organize your Tasks
Use the different views at the top center of the Workspace window to better visualize your team’s workflow.
The List view shows a condensed full collection of tasks.
The Calendar view helps to understand your daily and weekly schedule.
While the Timeline view puts your whole team’s workflow into perspective.
The Board view is the default view showing all the Task cards.
Using Different Task Views
Different Views to Organize your Tasks
Use the different views at the top center of the Workspace window to better visualize your team’s workflow. Click each of the names to switch the view of the main Workspace window.
The Board view is the default view showing all the Task cards.
The List view shows a condensed full collection of tasks. They are listed in order within a column, and are also grouped by columns. This allows a user to see the most amount of tasks and details in a single view.
The Calendar view helps to understand your daily and weekly schedule. Tasks will be displayed and colored according to any labels assigned to them. This can help provide a visual cue to when tasks are scheduled to be due.
Finally, the Timeline view puts your whole team’s workflow into perspective. Tasks will be also be displayed and colored according to any labels assigned to them. This allows a perspective to understand which tasks are working or overlapping with one another.
Setting Labels for Tasks
Setting Task Labels
Add Labels to a Task in order to help categorize them for better searching and viewing capabilities within a Workspace. A label will display on the left corner of a Task card. Hover over the colored label indicator to display the Label name.
The default labels available are:
In Progress
Pending Review
Ready
Complete
High Priority
You are able to also add in your own Custom label too.
When creating a Custom label you’ll be able to create the name and color of your label.
Add a Label
Open a Task Card and Click the “Set Task Label” icon.
A pop up window will allow you to click one of the default labels or add a Custom Label. You can select multiple labels to apply to your Task.
You can also add a label by hovering over any Task Card without opening the Task.
Hover over the bottom of the Task Card on the Workspace and click the Label icon on the far right.
Select the label from the pop up window.
You can also add a label in the My Work section when you see any task on the list by clicking the Label icon.
Remove a Label
In the Task Card under the Label icon each of your labels will be visible.
Hover over the label you want to remove and click the “x”.
Similarly, anywhere you see a Label you can hover over it and click the “x” to remove it.
Ways to View Labels
The Calendar and Timeline view are two easy ways to visualize your task labels. The Calendar view helps make your daily or weekly tasks, and the Timeline view helps see the bigger picture of all the tasks your team is working on.
Changing the task label will change the visible color on both of these views.
Tracking Your Time Worked on a Task
Tracking Time on a Task
You are able to keep track of the hours spent on each Task you have created for your team. The time will track sessions individually allowing descriptions to be included so it is easy to identify what was done in that time frame.
The timer is located on each Task in several places for your convenience. You can access the timer on the Task card in the Board view of the Workspace. You can also start the timer by clicking and opening the Task card.
Once started the timer will run in the Task and you can also see a Timer in the bottom left corner of the Workspace window. This larger Timer will display the task being currently tracked.
When you are finished with a timed work session, press stop on the timer icon. A pop up window will appear allowing you to add any details or a description of your work. These details can be edited or changed by viewing the Time Report for the Task.
Adding a Subtask allows you to break out larger Tasks into manageable sections for completing the project.
Create a Subtask within the Task Window
Click blue button ” Add ” in the Sub-task section to add a Subtask.
Type in all the information for the Subtask in the text field.
Include any Titles, descriptions, or lists.
You can format the text by adding Bold or Italics (Cntrl/Cmd B or I) and make bulleted lists by using a dash before any new line.
Hit the green check when you are finished.
If you need to make any edits hover over the subtask and click the pencil icon.
Remember: You are able to do similar functions that are also available on a Task like assigning a due date, copying a Subtask link, and tracking time too!
Give Feedback on a Subtask
Providing feedback on a Subtask is done through adding Comments or Reactions.
To add a Reaction, hover over the Subtask and click the emoji icon on the left.
Select the right reaction to add and it will appear below the Subtask.
The Comment section is on the far right of the Task window.
It can be used like you were creating a Message.
Add any feedback or link specific Subtasks in the comment to draw attention to the specific work being mentioned.
You can also mention a team member in the comment using the “@” symbol.
“Open subtask” it refers to a child subtask where a subtask can have one subtask to itself and it will be shown as a tree line in the box- see the image below.
Assign team members to a subtask- again this feature is displayed on the far right of the subtask as you hover over the subtask.
Set the due date option is available for the subtask.
Create custom fields to tasks by clicking or selecting custom fields.
Searching and Filtering Tasks
How to Find Tasks
Get to the tasks you need quickly using these tips:
1. Searching for Tasks
Try searching your Workspace by clicking the Search Icon.
Type a specific Keyword to bring up the related Tasks.
2. Filter Tasks
You can also filter by specific team member by clicking on the team Profile icons in the top left hand corner.
Select the user and only their tasks will appear in your view.
3. Workspace Views
Using a different Workspace view can help you see your team’s tasks in a new way.
Select your view at the top center to better visualize your team’s workflow.
The Board view is the default and shows all the Tasks in their cards.
The List view shows a condensed full collection of tasks listed out and categorized.
The Calendar view helps to understand your tasks through your daily and weekly schedule.
While the Timeline view puts your whole team’s workflow into perspective.
Assigning Tasks to Your Team
How to Assign a Task
You can assign a team member by hovering over the Task and clicking the “+” icon to select the team member.
Or when you open a Task card click the “Assign Task” button in the top left corner.
Multiple team members can be assigned to a Task one at a time.
Remember: You can assign a Subtask the same way.
Send a Task Link
You may find it useful to send someone a link to a task directly.
Do this by clicking the Link icon when you hover over the task name.
You’ve now copied the hyperlink for this task, and you can send it to a team member by writing a Message and pasting the link.
The hyperlink will appear in a short name like, “T28”.
If you had copied a Subtask link the short name would appear like, “ST29”.
When your team member clicks on the link the task will immediately open in a window.
Remember: that you can share Task links across a Workspace too!
Assigning a Task to Members of a Different Workspace
If you need to move a task to a completely different team on another Workspace.
Click the “…” icon when you hover the task name.
Select Move task and choose your new Workspace and then which column to place the task.
Remember: If you need to duplicate a task then click the “…” icon and select Duplicate Task.
Formatting Your Tasks and Workspace
Formatting Your Tasks and Workspace
It might be helpful to customize your Task cards or even your Workspace to help identify them faster.
Follow these steps to make these formatting changes:
Changing the Look of a Task Card Cover
To customize your task and set a specific image to the task cover, open the task and add an attachment.
Scroll below the Description box and click Add Attachment.
You can select from these options:
Your Computer
Shared File
Dropbox
Google Drive
Upload the image from your selected source.
When the image appears in the task window, hover over it and click the icon on the far right to select “Make Cover”.
Your image will display on the Task card in the Workspace Board view.
Changing the Look of Your Workspace
You can also customize your entire Workspace by clicking the artist palette icon in the bottom left of the Workspace screen.
You can select from a choice of solid colors or images.
This custom format can even be uniquely set for each Workspace view.
Saving a Board Template
When your design is finalized you can save it as a Board Template.
Start by clicking the “…” icon in the top right of the Workspace window.
Select Board Template > Save Board Template from the drop down list, and name your Template.
To use the template in a different Workspace, click the “…” icon in the top right of the new Workspace window and select Board Template.
Choose your Template name from the drop down list and it will load!
Creating Task Comments and Feedback
Give Feedback on a Task or Subtask
Providing feedback on a Task or Subtask is done through adding comments or reactions.
Add a Comment
The Comment section is on the far right of the Task window.
Add any feedback or link specific Subtasks in the comment to draw attention to the specific work being mentioned. You can also mention a team member in the comment using the “@” symbol.
Add a Reaction
You can add a Reaction only to a Task Comment that was made or a Subtask.
To add a Reaction, hover over the Task Comment or Subtask and click the emoji icon on the left.
Using Taskboard Templates
Taskboard Templates
Changing the Look of Your Workspace
You can also customize your entire Workspace by clicking the artist palette icon in the bottom left of the Workspace screen.
You can select from a choice of solid colors or images.
This custom format can even be uniquely set for each Workspace view.
Saving a Board Template
When your design is finalized you can save it as a Board Template by clicking the “…” icon in the top right of the Workspace window.
Select Board Template > Save Board Template from the drop down list, and name your Template.
To use the template in a different Workspace, click the “…” icon in the top right of the new Workspace window and select Board Template.
Choose your Template name from the drop down list and it will load!
Create a task from a Message
Create a Task from a Message
You are able to create a Task quickly right from your Messages! This can help save a lot of time and keep you productive within the same Messages window.
Whenever you have a Message that you want to turn into a Task just hover over the message and in the top right will be a white bubble. Click the “checkmark” icon.
Once that has been clicked, a new Task window will open. The message will be included in the Description of the Task automatically.
You would just need to name the Task, select a due date, and assign it to the appropriate Team member.
Custom fields
Custom fields expand the functionality of your tasks by allowing you to add new field types and custom data to your Heycollab tasks.
https://vimeo.com/719406868
Heycollab custom fields
To get started, open a task and click the custom field button.
Heycollab custom fields.
You can either start with one of the suggested fields or create a new one.
Let’s add a priority custom field from the suggested fields.
Notice in the task dialog that now I have a new section labeled custom fields that will show this new property listed here.
I can click on this property and set it’s available values.
To show this field on the face of the task-card, open custom fields, click on priority and at the bottom check show field on task-card
Now, notice how this field shows on the task card.
Each field you create, will be available to use across all tasks you create within this workspace.
Now, let’s create a brand new field. Say we have a product that we want to launch and need to know in which phase of production this product is.
We can create a new field called Product status, select dropdown as the type and create its properties to be: Not started, In progress, In production and Ready to ship. We can also add color for each of these states.
Let’s show this on the task-card and create it.
You can create various types of custom fields like Checkboxes, dates, numbers and free text.
You can show these custom fields in your list view and customize the columns you wish to see. Just click on the fields button and select which columns you wish to show here.
Messages
Create messages to tasks, comment on files, view read receipts, save messages to your saved items and more.
How to Create and Send Messages
Create and Send a Message
Communication is key to collaboration, and Messages are a great way to stay in sync with your team.
Writing a Message
Find your Workspace in the left hand column and click the center Chat icon.
In the below grey window type your message.
To attach task link, click on checkmark icon.
To add a video link select the video icon.
To create a document select the blue add button on the far right off the screen.
To create a new task, select the same blue box with an add icon in it.
To format your message, such as italicize it or make it bold, select command “v” for iMacs and ” ” type between the quotes. Of course you can write the message first and then format it.
Use the “@” symbol to directly mention a team member in the message.
The paper clip icon on the left will allow you to easily select a file from your computer, Dropbox, or Google Drive. (Or you can drag and drop a file directly to attach it too.)
Don’t forget you can include emojis too!
Saving and Viewing Messages
Saving and Viewing Messages
When you’ve been working in your Workspace for awhile there are going to be several messages coming in, and you will need a good system for retrieving the ones you need. Use these steps to help your Messages stay organized.
Viewing and Reading Messages
To read and view your messages click on the chat icon on the left hand column under the Workspace name. Your messages will appear in the center Workspace window.
Each message has additional options that can be applied to that single message.
Add a Reaction (like an emoji.)
Create a Task from the Message
Share the Message
Add Message to Saved Items
Mark Message as Unread
Add a Message to Saved Items
Click the Bookmark icon in the far right corner of a message and it will highlight the icon with the color red.
You can view anything placed in the Saved Items by clicking on the “Saved Items” button on the far left column of the Workspace window. Once the window opens you will be able to see any Messages, Tasks, or Files that you have marked as Saved.
To remove from saved items, just hover over the item wished to be removed and deselect the bookmark icon.
Creating Tasks from Messages
Create a Task from a Message
In several instances we’ve found the need to create a task directly from a message. So, we have made this as easy to do as possible!
When you hover over any Message click the Checkmark icon.
This brings up a Task window with the Message pre-filled into the Details box of the Task.
The Task will also be assigned to the recipient of the Message.
Fill out the rest of the Task information by adding a Task Name, Label, and any Subtasks.
You can select which Column to place the Task at the bottom of the window, then click Create Task.
Attaching Files, Folders, and Images to your Message
Attaching Items to Your Message
Get your team exactly what they need by attaching different items to your Message before sending.
Upload a File
You can easily attach files, folders, or images to your Messages by simply dragging and dropping the file on the message.
Or you can click the paperclip icon to upload.
When attaching multiple files you can rearrange the order as needed by dragging them.
Benefits to Attaching Images
Attaching images allows users to add comments with visual markers that highlight the specific areas of the document which need attention or updates.
You can add a comment before or after you send a message.
All of your team’s comments and feedback will be collected in the comments column on the right.
Using an outside email to send a Message
Outside Email to Send a Message
Collaboration and Communication are essential to Heycollab. So, it is helpful to send a Message or even create a Task from an outside email address.
To do that, you will need to know your Workspace email address.
Click on the “…” icon next to the Workspace name in the left hand column.
Select “Workspace Email” from the dropdown list.
In the window that pops up, there will be two email addresses available to you. One will just send a message from your outside email. The second will create a task from your outside email that is sent.
Formatting text in messages
Heycollab allows you to change the text style across messages, task comments and subtasks.
There are two ways to update the text:
Via the New Doc
Via shortcuts
Add formatting to text via New Doc found in the blue box on the far right side of the screen.
With this new feature, you are able 1. To select the type of the text,
2. Style of text such as bold, italicized, underline etc., 3 Align the text, left, center or right justified. 4. Color of the text 5. Add bullet list or numbered lists 6. Add a task list to the document 7. Add a URL to the document
8. Add a table to your document
9. To format that table you can do it by selecting “…” beside the table icon.
10. And if that is not enough, we also have more items on the plus box, such as toggle list, quote, code, code block, and horizontal line.
It all depends on the your needs. These documents created in heycollab can be exported in pdfs. Also, as you publish these documents, they are saved in the file section of that specific workspace.
2. Add formatting to text via shortcuts
Simply select the text you wish to format and these shortcuts will stylize your text:
Bold by pressing command+b or control+b
Bold more by adding a second layer of asterixes (*) so you would have two at the beginning and two at the end of a text like this **text**
Italicize text by pressing command+i or control+i, or you can simply add _italicized text_ this (_)
If at the beginning of a message you add a line (-) and a space, that message will become a bullet point
NOTE: all the formatting will be visible once you send the message through.
Searching and Filtering Messages
Finding Messages
After working for several weeks the amount of conversations can create a lot of content to sort through. Finding the Message you need can be made easier by Searching, Filtering, and Bookmarking.
Searching for Messages
You can quickly jump to the message you need by searching for specific keywords by clicking the magnifying glass icon in the top right of the window.
Then simply type the keyword or keyword phrase you are hoping to find and the Messages will automatically show the results of any Message that included the keyword.
Filtering Messages
By filtering a Message you are selecting to view only the Messages sent by a certain team member or sent during a certain time frame.
Click the magnifying glass icon in the top right of the window.
Then click the Filter icon in the search bar.
Choose “Member” and select a specific member of the team and only their messages will appear.
Choose “Date” and select a date range and view just the messages sent during that time.
Bookmarking a Message
Hover over any Message and then click the Bookmark icon to send that Message to your Saved Items.
Heycollab allows you and your team to stay connected with team video calling via the web, mac, windows, iOS and Android apps.
To start a call, click the video Icon. Next, click the Join meeting button and heycollab will send out a message with a video call link so others in this workspace may join
Call via heycollab
As you start a call, you will be the moderator of the call, so when others will Ask to Join, you will need to admit them in
Once a call has started, at the bottom nav, you’ll have the option to:
Video calling toolbar
mute yourself or change your microphone settings
start or stop your camera and change the cam settings
Share your screen
use the video chat and polls feature
raise your hand or post a video reaction
Within the participants pane you can invite others to join
Hover over a participants field and click the 3-dot menu to view additional options and add breakout rooms
At the bottom nav the thumbnails icon would allow you to see all viewers in tile view
For more options including subtitles, call recording, video background and more, click the 3-dot menu.
Heycollab call recording including subtitles, call recording, video background and more.
Here’s a little useful tip: You may invite anyone to join your meeting even if they do not have an account with Heycollab
About sidebar
Add members to a workspace, add description, change notifications, view activity log, my tasks and quick-view files.
Using the About Sidebar
Using the About Sidebar
When working with several team members it can be helpful to have an overview of the details in your Workspace.
Use the About Sidebar to get that summary!
Open the About Sidebar
Access the Sidebar by clicking on the Blue “i” icon in the top right corner of the Workspace window. (Just click the same “i” icon to minimize the Sidebar from view.)
When the Sidebar opens there is a small blue “?” icon to the right of the top buttons which provides access to a Help video tutorial to learn more about using this area.
The About Section
When you select the “About” tab in the Sidebar you will see it divided into 4 areas.
Members
Description
Notifications
Activity Log
Clicking to open the Members area allows you to see the Profile Card of any member by clicking their Name on the list.
The Profile Card will provide you a variety of helpful information like their email, phone, and location.
You can remove a Member by clicking the “x” icon to the right of their name.
Or you can add a Member by clicking the “+” icon at the bottom.
If a Team member doesn’t show in the list. You would need to first Invite them to the Workspace.
The Description Section
The next section is the Description area.
This is a space that provides the overall details needed for this Workspace.
Some ideas to help you know how to best utilize this area are: adding login credentials, a shared Zoom room link, or other important data for the team.
The Notification Section
This area gives you some control over how you would prefer to be notified of messages and mentions in the Workspace.
The options are:
Every New Message
Just @ mentions
Nothing
The Activity Log Section
This section shows you all of the actions and edits that you preformed in the Workspace.
It shows a description of the action that was taken, and a time/date stamp of when it happened.
A link is also provided to directly access the Message, Task, or File changed.
Accessing Files and Folders in the Sidebar
Files in the About Sidebar
Get a quick overview of your Files in the About Sidebar by clicking the “Files” button.
Remember: to click the small blue “?” icon to get a help video reviewing this specific Files area.
Use this visibility into your Files to make workflow easier, instead of changing your entire Workspace window, you can view your Messages or Tasks in the main window and your Files in the Sidebar.
To save time you can upload hundreds of files at once by clicking the “Add Files” button.
Organize them into folders if desired by clicking “New Folder”.
When you hover over a Folder, click the “…” icon to upload files directly into the folder or rename the folder.
Click “Attach to Message” to immediately attach the Folder to a message to send out.
When working with files, hovering over a file shows important data (like file size and upload date) below the name of the file.
To the right of the name you can click the bookmark icon to add the file to your Saved Items.
Additional File Options
Click the “…” icon to the right of the file name to Share, Move, or Copy the file.
You can Share the file and it will attach it to a Message or just Copy the Link.
To Move the file you would need to first select the Workspace and then the Root Directory or a Folder you want the file to be stored in.
Select Copy to duplicate the file and choose where you want it to be stored in the same way.
Click “Add a Comment” to open the file and type your Comment in the right hand column. (A visual marker will be added to the area related to your remarks.)
If needed you can always click the “…” icon and select Delete to remove a file or folder.
Viewing Private and Public Tasks in the Sidebar
Tasks in the About Sidebar
Get a quick overview of your Tasks in the About Sidebar by clicking the “Tasks” button.
Remember: to click the small blue “?” icon to get a help video reviewing this specific Task area.
Private Tasks
At the top of the list are your Private Tasks.
These are only visible to you and no one else on the team.
Use these to create Notes for calls, to do lists, or other personal work.
Create these tasks using the same window and utilizing features like time tracking or labels as you would in a public task.
Public Tasks
Beneath the Private Tasks are the “To Do” and “Doing” columns, and any other columns manually created will also be visible here too.
The tasks that show in this area of the About Sidebar are the tasks assigned to you. (If needed, you can also drag a Private Task down into the bottom sections and it will make it a publicly visible task.)
Use this area to quickly locate the tasks requiring your attention, because it may be more difficult to locate them just by looking at the Board View of Tasks.
Adding a task in the About Sidebar area will automatically add it in the main Task board and it will be assigned to you.
Complete any task in the About Sidebar area by clicking the checkbox to the left of the task.
Tracking time
Track your time, view and export time-reports and much more.
Tracking Your Time Worked
Tracking Your Time
In Heycollab, wherever you have a Task you will be able to track the time spent on that work.
How to Start Tracking Time
To start tracking time, simply hover over any Task and click the “Play” icon. This will start the timer which can be viewed directly on the Task or in the bottom left of the Workspace window.
The Timer will stay visible no matter which Workplace view you move into.
The title of the Task you are tracking will display below that Timer, or you can also click the Timer to bring up the Task window directly.
When you are finished simply click the “Stop” icon on either Timer interface.
A pop up window will allow you to quickly add a description of what you worked on during that period.
You can edit your descriptions by clicking the “Pencil” icon or by viewing the Time Report Log.
View the Time Report Log by clicking the “…” icon to the right of the Task Name.
Editing Time Tracked and Descriptions
Time Report Descriptions
After every work session where you track your time, when the timer is stopped a pop up window appears.
This window allows you to enter in a description of your work.
As an Admin you are able to view Time Reports for all the team members in a Workspace.
Accessing Time Reports
You can access the Time Report Log by clicking the pencil icon when you hover over the timer on a Task card. (Or you can access it by right clicking on a Task card.)
Once the Time Report Log window opens you will see a list of all the tracked work sessions for a Task.
Each of these sessions can be edited.
You can manually adjust the time worked or the description of the work.
Add a Session Manually
If needed you can also enter a session manually by clicking the large blue button at the top of the window.
When clicked, a pop up window will allow you to select the date and time worked.
First click on the date you started the work.
Then click again on the date you ended the work. (If the work was completed on the same day, you will need to click the day twice)
Then enter the time you started and ended the work. Make sure to also enter “AM” or “PM” correctly.
Then click the button that says “OK” to submit that session.
Exporting Time Reports
Exporting Time Reports
Time Report Logs are available for individual users, and entire team in a Workspace, or for all Workspaces combined!
Any Time Report can be exported into a .csv file for your records.
Exporting Time Reports
In the Task Board view of the Workspace click the “…” icon in the top right corner of the window.
Select “View Workspace Timesheet”.
Then a Time Log Report window will open revealing all of the work that has been recorded across each of the Tasks in the Workspace.
If you need to view any of the tasks more closely, each name is a hyperlink which opens the Task window directly when clicked.
Click “Export CSV” in the top right corner of the window and Save the file to your computer.
Multiple Workspace Time Reports
In a similar way you can view the tracked time you’ve spent working across multiple Workspaces.
Click your Profile picture in the bottom left hand corner of the Workspace window.
Select “View team-wide Timesheet”
Then a Time Log Report window will open revealing all of the work that has been recorded across each of the Workspaces for the company.
Remember: Another way to see a quick total of your time worked is in the My Work section.
Files and folders
Create folders & sub-sections, add files, search, view and share.
Uploading Files and Creating Folders
Workspace Files
Access your Workspace files by clicking the Folder icon of your Workspace name in the left hand column.
You can see your files in either a list or thumbnail view.
Toggle between them by clicking the icon in the top right of the window.
Adding Files to the Workspace
Add files or folders by clicking the “+” icon in the top right of the window.
You can add hundreds of files in just one upload and all of the files will be immediately accessible to your team.
You can also use the Search box to find files quickly by typing keywords or file names into the Search field.
Organize Files into Folders
Organize your files by creating folders.
Click on the “+” icon in the top right of the window and select Create Folder.
Once in place, you can move files into the appropriate place.
Inside folders you are able to create Sections for your files.
The Sections can allow you to organize your files one level deeper inside the folder.
Share files As Attachments Or Link Per selecting a file, or right clicking- this will bring a dropdown with the following selections:
Share
Move
Copy
Rename
Replace image
download
Add Comment
Delete file
Selecting to share, there are to ways to share and that is the following: 1. Attach to message 2. Copy Link
A Folder Can Have Sub-Sections
Before organizing your images, creating a folder takes precedence and then images can be selected to move to that created folder. Within a folder, the images, documents, video files or other items can be organized in sections.
Working with Files
Working with Files
Each file or folder can be selected by clicking the check box in the top left of the thumbnail. This will allow you to take four actions:
Share
Copy
Move
Delete
Select the action you want by clicking the button at the top of the Files window.
Selecting “Share” will immediately open a Message with the item attached.
Duplicate a File or Folder by clicking Copy.
Choose Move to put an item in the appropriate folder, or to move a folder to a different Workspace. (Each Folder thumbnail will display a number on the folder which shows how many files are currently stored inside.)
Remove an item completely by choosing Delete.
Remember: You can select multiple files and folders when applying any of these actions.
Additional options are available by clicking the “…” icon to the right of a file or folder. This will allow you to take these actions:
Share
Move
Copy
Rename
Replace image
Download
Add comment
Delete File
The main action which is different in this section is Renaming a file or folder.
Using the List View
The List view of the Files window makes additional details visible.
You can quickly locate how many comments have been made, the size of the file, and when it was uploaded.
When you hover over an item click the Bookmark icon on the far right to add it to your Saved Items.
Work & My work
As an admin, view all your team’s work in a dashboard layout, assign tasks from on central location and prioritize work. As a member view all tasks assigned to you in one neat place.
Viewing the My Work Dashboard
My Tasks Dashboard
The My Tasks window allows you to see an overall summary of your activity in the Workspace on an easy to use Dashboard.
Your work is shown and organized in four categories displayed in separate icons at the top of the window.
The four categories are:
Tasks Completed
Hours Worked
Messages Sent
Comments Posted
The main section is called “Tasks Assigned to Me” and is an overall collection of your work.
Your work is shown in a list and previews important details like:
Assigned to
Due dates
Tracked time
Subtasks
Tags
Workspace
Anytime there is hyperlink it will take your directly to that section. As an example, if you click on the Workspace on the far right, it will take you directly into that Taskboard.
Organize Your Window by Creating a List.
Click the “New List” button at the bottom right Add button of the window.
The new list will be added to the bottom of the display window for you to edit.
Click on the name to edit and type your own name for the list.
The new list will be added to the bottom of the display window for you to edit.
Click on the name to edit and type your own name for the list.
Viewing Team Members Work
Viewing Team Members Work
Only Admins in a Workspace have access to the Work window which shows visibility into the work of other team members.
Access this Dashboard by clicking My Team on the left hand column.
The Dashboard shows a summary of all team members in the Workspace.
The Workload graph at the top gives a visual of activity for your team members
Hover over their profile picture to reveal their name.
Hover over the bar to see specific task counts they are working on.
Or view their profile card below to see even more of a team member’s work details.
The labels displayed are tracked by the labels assigned to a task.
Click each drop down to see which specific tasks they are working on which have that label.
Or choose a specific time frame in the drop down menu on the top far right of the window.
The top row of the Work window also allows you to select My Work to see your activity or select a specific team member from the drop down to see their activity.
When a team members work is shown, there will be four summary icons at the top:
Tasks Completed
Hours Worked
Messages Sent
Comments Posted
Editing and Updating Tasks in the My Work Dashboard
Creating a Task from the My Tasks Dashboard
When you are in the My Task Dashboard screen you can create tasks across all your Workspaces by clicking the “New Task” button at the bottom blue “Plus” icon.
A Task window will open.
The window allows you to choose your task name, add a description, and create Subtasks.
Choose the specific Workspace for your task in the drop down menu in the bottom left corner.
Depending on which Workspace is chosen, it will allow you to assign specific team members to the task.
Administration
Learn about dashboards and administrators, reporting and team management.
Dashboard for Administrators
Workspace Dashboard
An Administrator can use the My Work Dashboard to keep up to date on all of their team member’s progress.
The Dashboard gives quick visual insight and access to deeper data details if needed.
Viewing Team Members Work
Only Admins in a Workspace have access to the My Team window which shows visibility into the work of other team members.
Access this Dashboard by clicking My Team on the left hand column.
The Dashboard shows a summary of all team members in the Workspace.
The Workload graph at the top gives a visual of activity for your team members
Hover over their profile picture to reveal their name.
Hover over the bar to see specific task counts they are working on.
Or view their profile card below to see even more of a team member’s work details.
The labels displayed are tracked by the labels assigned to a task.
Click each drop down to see which specific tasks they are working on which have that label.
Filter this by searching for a specific team member in the search bar.
Or choose a specific time frame in the drop down menu on the top far right of the window.
The top row of the Work window also allows you to select My Work to see your activity or select a specific team member from the drop down to see their activity.
When a team members work is shown, there will be four summary icons at the top:
Tasks Completed
Hours Worked
Messages Sent
Comments Posted
Reporting for Administrators
Viewing Team Reports
Administrators need the ability to see what work is being completed across individual team members and entire Workspaces. Heycollab offers reporting insights for both of these needs.
You are able to view some of the top level data in Dashboards, but you can export Time Reports for more detailed data.
Time Reports Summary
Time Reports is a collection of all the work that has been timed on the tasks in a Workspace.
These Time Reports are helpful to keep track of your work through specific descriptions included on each entry.
Time Reports can be tracked across any Workspace for all individual team members.
As an Admin you are able to view Time Reports for all the team members in a Workspace.
Any Time Report can be exported into a .csv file for your records!
Viewing Time Reports
You can access the Time Report Log by clicking the pencil icon when you hover over the timer on a Task card. Or you can access it by clicking the “…” icon on a Task card.
Once the Time Report Log window opens you will see a list of all the tracked work sessions for a Task.
The Time Report organizes the work by week.
In the header of each group will be the date of the week on the left and a total of the time worked on the right.
Each of these sessions can be edited.
You can manually adjust the time worked or the description of the work.
Exporting Time Reports
In the Task Board view of the Workspace click the “…” icon in the top right corner of the window.
Select “View Workspace Timesheet”.
Then a Time Log Report window will open revealing all of the work that has been recorded across each of the Tasks in the Workspace.
If you need to view any of the tasks more closely, each name is a hyperlink which opens the Task window directly when clicked.
Click “Export CSV” in the top right corner of the window and Save the file to your computer.
Multiple Workspace Time Reports
In a similar way you can view the tracked time you’ve spent working across multiple Workspaces.
Click your Profile picture in the bottom left hand corner of the Workspace window.
Select “View Company Timesheet”
Then a Time Log Report window will open revealing all of the work that has been recorded across each of the Workspaces for the company.
Remember: Another way to see a quick total of your time worked is in the My Work section.
Team Management for Administrators
Team Management for Administrators
An Administrator has several tools available to build, manage, and interact with their team in Heycollab.
The absolute first step is getting your team into your Workspace.
Follow the steps below to invite them:
Invite Your Team to a Workspace.
Maximizing the power of your Workspace begins with adding in your team members. This will allow you to send them direct messages and assign them Tasks specifically.
1. Click “Invite new people”.
In the left hand column click the “Add People” button below the Workspace name.
2. Enter the User’s email address.
Type in the user’s email address and select the Workspace you want them to join.
3. User is sent an email invitation.
They will open the email and click to join.
Once all of your team members are added you can get to work setting up and assigning Tasks!
View and Manage Your Team.
An Administrator in a Workspace has access to the My Team window.
The Dashboard on this window shows a summary of all team members in the Workspace.
You can Filter this entire section by searching for a specific team member in the search bar in the top right corner. Or choose a specific time frame in the drop down menu on the top far right of the window.
The Workload graph gives a helpful visual graph of activity for your team members.
You can hover over a profile picture to reveal the teammate’s name, or hover over the bar graph to see specific task counts they are working on.
Each teammate has a profile card with even more of their work details in one location.
You can utilize labels on Tasks to help group types of work and see which team members are working on which Tasks.
Specific reports can help you see how your team members are working and what they have been working on.
When a team members work is shown, there will be four summary icons at the top: Tasks Completed, Hours Worked, Messages Sent, and Comments Posted.
Managing Your Team in the About Section
You can quickly manage your team and add important details about the Workspace for them to reference in the About Sidebar. You can access the About Sidebar by clicking the blue “i” icon in the top right corner of the Workspace window.
When you select the “About” tab in the Sidebar you will see it divided into 4 areas.
Members
Description
Notifications
Activity Log
Clicking to open the Members area allows you to see the Profile Card of any member by clicking their Name on the list.
The Profile Card will provide you a variety of helpful information like their email, phone, and location.
You can remove a Member by clicking the “x” icon to the right of their name. Or you can add a Member by clicking the “+” icon at the bottom.
If a Team member doesn’t show in the list you would need to first Invite them to the Workspace.
Manage Roles and Permissions of Users
Managing Permissions and Roles of Users
Every Workspace has an Administrator assigned and each team member that is invited and joined can be assigned certain roles and permissions.
To view and make changes to a team member, follow these steps:
Step 1: Click on your name in the bottom left hand corner of the window.
Step 2: Click on “Roles and Permissions” from the list.
Step 3: In the Permissions window make any adjustment to the different Roles able to be assigned.
Step 4: Click on “Manage Members” in the left hand column of the window and assign your team members the roles they need.
Manage Members
Managing Team Members
Each Workspace can assign specific team members with access to view certain areas or to complete certain actions.
The full list of what can be assigned to a Member user:
Create, Join or See Public Workspace
Create Private Workspace
Add members to Public Workspace
Invite People to company (Into Public Workspace)
Post messages in Workspace
Manager User:
Create, Join or See Public Workspace
Create Private Workspace
Change Workspace Settings
Add members to Public Workspace
Add members to Private Workspace
Invite People to company (Into Public Workspace)
Invite People to company (Into Private Workspace)
Post messages in Workspace
Remove messages in Workspace
Delete Workspace
Remove User from Workspace
Promote/Demote User Roles
Deactivate User’s Account
Administrator User:
An admin user can do everything a Manager User can, and they can:
Delete User’s account
Import tasks and messages from other platforms
https://vimeo.com/713945003
Heycollab plays nice with other platforms.
If you wish to import your tasks or messages from Trello, Asana, Slack, Clickup, Monday and more you can do so in just a few clicks.
To get started, open the main menu, select import and click on the platform you wish to bring data over from. Click import and Heycollab will import all of your tasks, comments, subtasks, images, custom tags and more.
Import data to Heycollab from other platformsSelect where you wish to import data from.
Once the import is complete you will receive a notification e-mail and all the data you imported will be organized in a folder across workspaces.
Heycollab confirmation email that your data was imported successfully.
Organizing Tasks and Columns
How to Organize Tasks and Columns
Keep your Tasks organized in labeled Columns.
The three columns that are easiest to begin with are To Do, Doing, and Done.
You can create additional columns and move them around the Workspace board.
Click the “+ New Column” on the far right of the Workspace window to create and name a new Column. Or you can hover over the name of a current column and click the “…” icon.
Add an Active Task to a Column
Create a task from the top or bottom of the column. Creating at each direction puts it in the appropriate order.
Simply click the “+” and “+ New Task” icon on either the top or the bottom of the column.
Move a task by hovering and then clicking and dragging. You can move a column the same way.
You can delete a column or task by clicking the “…” icon and select delete.
Or Tasks can also be removed from a column by marking them Complete. Hover over a task and click Complete, and then it disappears from the Active view.
To view all complete tasks, hover over the Column and select Active or Done to see the relevant Tasks.
You can always mark a Task as Incomplete to make it appear in the Active view again.
Find Tasks by Searching
Get to the tasks you need quickly using filtering by clicking the Search Icon.
Type a specific Keyword to bring up the related Task.
Type a specific Keyword to bring up the related Task.
You can also filter by specific team member by clicking on the team Profile icons in the top left hand corner.
Select the user and only their tasks will appear in your view.
Use Different Views to Organize your Tasks
Use the different views at the top center of the Workspace window to better visualize your team’s workflow.
The List view shows a condensed full collection of tasks.
The Calendar view helps to understand your daily and weekly schedule.
While the Timeline view puts your whole team’s workflow into perspective.
The Board view is the default view showing all the Task cards.
Messages
Create messages to tasks, comment on files, view read receipts, save messages to your saved items and more.
Communication is key to collaboration, and Messages are a great way to stay in sync with your team.
Writing a Message
Find your Workspace in the left hand column and click the center Chat icon.
In the below grey window type your message.
To attach task link, click on checkmark icon.
To add a video link select the video icon.
To create a document select the blue add button on the far right off the screen.
To create a new task, select the same blue box with an add icon in it.
To format your message, such as italicize it or make it bold, select command “v” for iMacs and ” ” type between the quotes. Of course you can write the message first and then format it.
Use the “@” symbol to directly mention a team member in the message.
The paper clip icon on the left will allow you to easily select a file from your computer, Dropbox, or Google Drive. (Or you can drag and drop a file directly to attach it too.)
Don’t forget you can include emojis too!
Saving and Viewing Messages
Saving and Viewing Messages
When you’ve been working in your Workspace for awhile there are going to be several messages coming in, and you will need a good system for retrieving the ones you need. Use these steps to help your Messages stay organized.
Viewing and Reading Messages
To read and view your messages click on the chat icon on the left hand column under the Workspace name. Your messages will appear in the center Workspace window.
Each message has additional options that can be applied to that single message.
Add a Reaction (like an emoji.)
Create a Task from the Message
Share the Message
Add Message to Saved Items
Mark Message as Unread
Add a Message to Saved Items
Click the Bookmark icon in the far right corner of a message and it will highlight the icon with the color red.
You can view anything placed in the Saved Items by clicking on the “Saved Items” button on the far left column of the Workspace window. Once the window opens you will be able to see any Messages, Tasks, or Files that you have marked as Saved.
To remove from saved items, just hover over the item wished to be removed and deselect the bookmark icon.
Creating Tasks from Messages
Create a Task from a Message
In several instances we’ve found the need to create a task directly from a message. So, we have made this as easy to do as possible!
When you hover over any Message click the Checkmark icon.
This brings up a Task window with the Message pre-filled into the Details box of the Task.
The Task will also be assigned to the recipient of the Message.
Fill out the rest of the Task information by adding a Task Name, Label, and any Subtasks.
You can select which Column to place the Task at the bottom of the window, then click Create Task.
Attaching Files, Folders, and Images to your Message
Attaching Items to Your Message
Get your team exactly what they need by attaching different items to your Message before sending.
Upload a File
You can easily attach files, folders, or images to your Messages by simply dragging and dropping the file on the message.
Or you can click the paperclip icon to upload.
When attaching multiple files you can rearrange the order as needed by dragging them.
Benefits to Attaching Images
Attaching images allows users to add comments with visual markers that highlight the specific areas of the document which need attention or updates.
You can add a comment before or after you send a message.
All of your team’s comments and feedback will be collected in the comments column on the right.
Using an outside email to send a Message
Outside Email to Send a Message
Collaboration and Communication are essential to Heycollab. So, it is helpful to send a Message or even create a Task from an outside email address.
To do that, you will need to know your Workspace email address.
Click on the “…” icon next to the Workspace name in the left hand column.
Select “Workspace Email” from the dropdown list.
In the window that pops up, there will be two email addresses available to you. One will just send a message from your outside email. The second will create a task from your outside email that is sent.
Formatting text in messages
Heycollab allows you to change the text style across messages, task comments and subtasks.
There are two ways to update the text:
Via the New Doc
Via shortcuts
Add formatting to text via New Doc found in the blue box on the far right side of the screen.
With this new feature, you are able 1. To select the type of the text,
2. Style of text such as bold, italicized, underline etc., 3 Align the text, left, center or right justified. 4. Color of the text 5. Add bullet list or numbered lists 6. Add a task list to the document 7. Add a URL to the document
8. Add a table to your document
9. To format that table you can do it by selecting “…” beside the table icon.
10. And if that is not enough, we also have more items on the plus box, such as toggle list, quote, code, code block, and horizontal line.
It all depends on the your needs. These documents created in heycollab can be exported in pdfs. Also, as you publish these documents, they are saved in the file section of that specific workspace.
2. Add formatting to text via shortcuts
Simply select the text you wish to format and these shortcuts will stylize your text:
Bold by pressing command+b or control+b
Bold more by adding a second layer of asterixes (*) so you would have two at the beginning and two at the end of a text like this **text**
Italicize text by pressing command+i or control+i, or you can simply add _italicized text_ this (_)
If at the beginning of a message you add a line (-) and a space, that message will become a bullet point
NOTE: all the formatting will be visible once you send the message through.
Searching and Filtering Messages
Finding Messages
After working for several weeks the amount of conversations can create a lot of content to sort through. Finding the Message you need can be made easier by Searching, Filtering, and Bookmarking.
Searching for Messages
You can quickly jump to the message you need by searching for specific keywords by clicking the magnifying glass icon in the top right of the window.
Then simply type the keyword or keyword phrase you are hoping to find and the Messages will automatically show the results of any Message that included the keyword.
Filtering Messages
By filtering a Message you are selecting to view only the Messages sent by a certain team member or sent during a certain time frame.
Click the magnifying glass icon in the top right of the window.
Then click the Filter icon in the search bar.
Choose “Member” and select a specific member of the team and only their messages will appear.
Choose “Date” and select a date range and view just the messages sent during that time.
Bookmarking a Message
Hover over any Message and then click the Bookmark icon to send that Message to your Saved Items.
Heycollab allows you and your team to stay connected with team video calling via the web, mac, windows, iOS and Android apps.
To start a call, click the video Icon. Next, click the Join meeting button and heycollab will send out a message with a video call link so others in this workspace may join
Call via heycollab
As you start a call, you will be the moderator of the call, so when others will Ask to Join, you will need to admit them in
Once a call has started, at the bottom nav, you’ll have the option to:
Video calling toolbar
mute yourself or change your microphone settings
start or stop your camera and change the cam settings
Share your screen
use the video chat and polls feature
raise your hand or post a video reaction
Within the participants pane you can invite others to join
Hover over a participants field and click the 3-dot menu to view additional options and add breakout rooms
At the bottom nav the thumbnails icon would allow you to see all viewers in tile view
For more options including subtitles, call recording, video background and more, click the 3-dot menu.
Heycollab call recording including subtitles, call recording, video background and more.
Here’s a little useful tip: You may invite anyone to join your meeting even if they do not have an account with Heycollab
Saving and Viewing Messages
Saving and Viewing Messages
When you’ve been working in your Workspace for awhile there are going to be several messages coming in, and you will need a good system for retrieving the ones you need. Use these steps to help your Messages stay organized.
Viewing and Reading Messages
To read and view your messages click on the chat icon on the left hand column under the Workspace name. Your messages will appear in the center Workspace window.
Each message has additional options that can be applied to that single message.
Add a Reaction (like an emoji.)
Create a Task from the Message
Share the Message
Add Message to Saved Items
Mark Message as Unread
Add a Message to Saved Items
Click the Bookmark icon in the far right corner of a message and it will highlight the icon with the color red.
You can view anything placed in the Saved Items by clicking on the “Saved Items” button on the far left column of the Workspace window. Once the window opens you will be able to see any Messages, Tasks, or Files that you have marked as Saved.
To remove from saved items, just hover over the item wished to be removed and deselect the bookmark icon.
Uploading Files and Creating Folders
Workspace Files
Access your Workspace files by clicking the Folder icon of your Workspace name in the left hand column.
You can see your files in either a list or thumbnail view.
Toggle between them by clicking the icon in the top right of the window.
Adding Files to the Workspace
Add files or folders by clicking the “+” icon in the top right of the window.
You can add hundreds of files in just one upload and all of the files will be immediately accessible to your team.
You can also use the Search box to find files quickly by typing keywords or file names into the Search field.
Organize Files into Folders
Organize your files by creating folders.
Click on the “+” icon in the top right of the window and select Create Folder.
Once in place, you can move files into the appropriate place.
Inside folders you are able to create Sections for your files.
The Sections can allow you to organize your files one level deeper inside the folder.
Share files As Attachments Or Link Per selecting a file, or right clicking- this will bring a dropdown with the following selections:
Share
Move
Copy
Rename
Replace image
download
Add Comment
Delete file
Selecting to share, there are to ways to share and that is the following: 1. Attach to message 2. Copy Link
A Folder Can Have Sub-Sections
Before organizing your images, creating a folder takes precedence and then images can be selected to move to that created folder. Within a folder, the images, documents, video files or other items can be organized in sections.
Create a workspace
Create Your Workspace
Your Heycollab workspace is where people can work together, connect all their tasks, and send the information they need to do their best work. Use the specific steps below to create your workspace and get started with Heycollab.
1. Click the Add Button on the Workspace title.
Click to allow you to name your Workspace.
Follow the instructions on naming the workspace by adding team members, or inviting new team members to this workspace. Settings provide selections to allow your team members to see messages, tasks, and files.
2. Add a Workspace Name.
Name your workspace so that you and your team can easily determine what type of work will be completed here.
3. Add a description.
Include any important details needed or special instructions like login information that the team might be regularly using to complete their work.
4. Select to make the Workspace "Public" or "Private" and add members or invite new users to the workspace.
This governs who is able to see and join into the Workspace. If this step is skipped- later the administrator of this workspace can add members or invite new users.
5. Ready to Create Workspace!
You are now ready to start adding Tasks and inviting your team to the Workspace. If you created a workspace by mistake or decided to delete it later- right-click on the workspace you desire to delete and select “Delete Workspace”.
Once again there are a few things you can do with a workspace: 1. Add to Favorite 2. Move the workspace 3. Workspace Settings- change the settings of the workspace 4. Change notifications 5. Workspace E-mail 6. View the Timesheet 7. Export Timesheet 8. Export Conversation 9. Delete Workspace
In order to delete a workspace, there are 2 ways to do so, one is from the dropdown as you hover over the workspace and right click; the second is from the far right side on top, selecting the more icon- 3 dots and that will also give the user the ability to delete a workspace.
Hope this helped you learn more about how to become an efficient team!
Viewing Time Reports
Viewing the Time Reports
Time Reports is a collection of all the work that has been timed on the tasks in a Workspace.
These Time Reports are helpful to keep track of your work through specific descriptions included on each entry.
As an Admin you are able to view Time Reports for all the team members in a Workspace.
Accessing Time Reports
You can access the Time Report Log by clicking the pencil icon when you hover over the timer on a Task card. (Or you can access it by right clicking on a Task card.)
Once the Time Report Log window opens you will see a list of all the tracked work sessions for a Task.
Each of these sessions can be edited.
You can manually adjust the time worked or the description of the work.
Add a Session Manually
If needed you can also enter a session manually by clicking the large blue button at the top of the window.
When clicked, a pop up window will allow you to select the date and time worked.
First click on the date you started the work.
Then click again on the date you ended the work. (If the work was completed on the same day, you will need to click the day twice)
Then enter the time you started and ended the work. Make sure to also enter “AM” or “PM” correctly.
Then click the button that says “OK” to submit that session.
View and Manage Your Team
View and Manage Your Team.
An Administrator in a Workspace has access to the My Team window.
The Dashboard on this window shows a summary of all team members in the Workspace.
You can Filter this entire section by searching for a specific team member in the search bar in the top right corner. Or choose a specific time frame in the drop down menu on the top far right of the window.
The Workload graph gives a helpful visual graph of activity for your team members.
You can hover over a profile picture to reveal the teammate’s name, or hover over the bar graph to see specific task counts they are working on.
Each teammate has a profile card with even more of their work details in one location.
You can utilize labels on Tasks to help group types of work and see which team members are working on which Tasks.
Specific reports can help you see how your team members are working and what they have been working on.
When a team members work is shown, there will be four summary icons at the top: Tasks, Hours, Messages, and Comments.
Accessing Files and Folders in the Sidebar
Files in the About Sidebar
Get a quick overview of your Files in the About Sidebar by clicking the “Files” button.
Remember: to click the small blue “?” icon to get a help video reviewing this specific Files area.
Use this visibility into your Files to make workflow easier, instead of changing your entire Workspace window, you can view your Messages or Tasks in the main window and your Files in the Sidebar.
To save time you can upload hundreds of files at once by clicking the “Add Files” button.
Organize them into folders if desired by clicking “New Folder”.
When you hover over a Folder, click the “…” icon to upload files directly into the folder or rename the folder.
Click “Attach to Message” to immediately attach the Folder to a message to send out.
When working with files, hovering over a file shows important data (like file size and upload date) below the name of the file.
To the right of the name you can click the bookmark icon to add the file to your Saved Items.
Additional File Options
Click the “…” icon to the right of the file name to Share, Move, or Copy the file.
You can Share the file and it will attach it to a Message or just Copy the Link.
To Move the file you would need to first select the Workspace and then the Root Directory or a Folder you want the file to be stored in.
Select Copy to duplicate the file and choose where you want it to be stored in the same way.
Click “Add a Comment” to open the file and type your Comment in the right hand column. (A visual marker will be added to the area related to your remarks.)
If needed you can always click the “…” icon and select Delete to remove a file or folder.
Viewing Team Members Work
Viewing Team Members Work
Only Admins in a Workspace have access to the Work window which shows visibility into the work of other team members.
Access this Dashboard by clicking My Team on the left hand column.
The Dashboard shows a summary of all team members in the Workspace.
The Workload graph at the top gives a visual of activity for your team members
Hover over their profile picture to reveal their name.
Hover over the bar to see specific task counts they are working on.
Or view their profile card below to see even more of a team member’s work details.
The labels displayed are tracked by the labels assigned to a task.
Click each drop down to see which specific tasks they are working on which have that label.
Or choose a specific time frame in the drop down menu on the top far right of the window.
The top row of the Work window also allows you to select My Work to see your activity or select a specific team member from the drop down to see their activity.
When a team members work is shown, there will be four summary icons at the top:
Use these videos to help you get started on your journey with HeyCollab.
Welcome and Overview to Heycollab
Welcome to Heycollab
Overview of Heycollab
Create a Workspace Video Tutorial
Create Your Workspace
Workspaces, messages, Tasks and files are the building blocks of Heycollab.
To create a workspace, Click the “+” button.Give your workspace a name and in the description field include important details to share. Select if it should be Private or Public and click create Workspace. You are now ready to add your team-members, create Tasks, send messages and share files to keep work going and keep everyone on track.
Invite Your Team Video Tutorial
How to Invite Your Team
Maximizing the power of your Workspace begins with adding in your team members.
In order to add a person to a workspace, they first need to be invited to your team. To invite people to your team, simply click the add people button, then select invite people. Type in the user’s email address and select the Workspace you want them to join. They will receive an email with an invite link. After filling out the brief sign up form your team member will join your Workspace.
Now you can start setting up Tasks, send messages, share files and collaborate together.
Note: You can only assign Tasks to members of your Workspace.
How to Join a Team Video Tutorial
How to Join a Team
If you’ve been invited to a team in heycollab, follow these simple steps to join:
Step One
Open the e-mail invite and click the Join Now button (if you have not received an invite, check your junk-mail folder).
Step Two
Clicking on the Join now button should bring up this page, if it does not, make sure you are not logged in to heycollab. If you are, simply log out, open this e-mail and click the Join Now button.
Step Three
Once you filled out the form and submitted, you should be directed to Heycollab. Now you can start collaborating with your team.
Finding Your Notifications Video Tutorial
Finding Notifications
HeyCollab uses notifications as a central way to keep you updated on any new messages, task assignments or task comments. See your Notifications in the top left corner. There is a separate count for task and message notifications. Click on the “New” panel name to preview all your Notifications. By default the most recent notifications received will be at the top. Click the drop down arrow to filter through other options. Click the … icon in the top right of the panel to mark all notifications read or delete them. And use the same … icon on individual notifications to just make those changes to that notification. All Notifications that are unread will have a blue background, and one’s you’ve seen will have a white background. There are three icons used to visually identify: Messages, Task Comments, and Tasks. Click on any icon on the side of the notification to open more details. You may reply directly from the notifications panel by clicking the reply icon.
Another visual cue that displays is a white dot next to the name of any -Workspace that has a pending Notification. A number will also appear in the icon for Messages or Tasks in the Workspace to show how many notifications are waiting for your review.
Task Board Video Tutorials
Different Views to See Tasks
Different Views to See Tasks
Heycollab allows you to view your tasks in board view, list, calendar and timeline Each view has it’s own advantages and based on your preference heycollab will remember the view set by you across workspaces The board and list view will allow you to move tasks and columns or lists around and setup quick parameters by simply hovering over a task In the calendar view, you’ll need to open a task in order to setup these parameters and you do this simply by clicking on the calendar event Finally, in timeline view, you can drag the ends of a task to change the date range or double click on it to open it.
Organizing Tasks and Columns
Organizing Tasks and Columns
Create a task from the top or bottom of the column. Creating at each direction puts it in the appropriate order (top or bottom) Move a task by dragging it around the board…same with a column. If you want to create a new column, click on new column and give it a name. If you want to add a column, between columns, click on … and choose Add New Column You can also delete a column or task the same way by clicking the “…” and select delete. To complete a task hover over the task, click the 3-dot menu and select Complete task To view all complete tasks, Hover over the Column and select Active or Done to see the relevant Tasks. You can always mark a Task as Incomplete to make it Active again.
Task Due Dates and Labels
Task Due Dates and Labels
Get your tasks completed on specific time frames by clicking the Calendar icon at the bottom of the Task Card. If you have a specific due date then select the day on the calendar and double click. If you need to select a date range then click once on the start date and again on the end date. You can even choose a specific time you need a task completed The Calendar and Timeline view are two easy ways to visualize these due dates. The Calendar view helps make your daily or weekly tasks, and the Timeline view helps see the bigger picture of all the tasks your team is working on. Changing the task label will change the visible color on both of these views. Hover over the bottom of the Task Card and click the Tag icon. Choose from one of our pre-set labels or click Create Label at the bottom to create a custom one. You can add more than one label to any task.
Creating Tasks and Managing Subtasks
Creating Tasks and Managing Subtasks
Create a Subtask within the Task Window. Click the green “+” icon to add a Subtask. Type in all the information for the subtask in the text field Include any Titles, descriptions, or lists. You can format the text by adding Bold or Italics (Cntrl/Cmd B or I) and make bulleted lists by using a dash before any new line. Attach files and folders to this subtask and arrange their order and add visual comments to images shared. Hit the green check when you are finished, and if you need to make any edits hover over the subtask and click the pencil icon. You can now assign a team member by hovering over the subtask and clicking the “+” icon to select the team member. You are able to do similar functions that are also available on a Task like assigning a due date and copying the subtask link.
Searching and Filtering Tasks
Searching and Filtering Tasks
Try filtering by clicking the Search Icon. Type a specific Keyword to bring up the related task. Click the filter icon within search for more ways to filter your tasks. Filter by label, Due date, bookmarked and My tasks You can also filter by specific team member. To do so, simply click on the team -Profile icons in the top left hand corner and only their tasks will appear.
Track Time on a Task
Track Time on a Task
The time worked on a particular task is displayed at the bottom of the Task card. To start tracking your time, hover over a task-card and click the play button and the Timer will start tracking in the Task. The timer will also show at the bottom left hand corner. You can always click the timer and it will show you the Task you are currently tracking. When you are ready to stop the timer hit the Stop button and it will allow you to enter a brief description of what you worked on during that time period. To learn more about time-tracking, see our walkthrough videos within the time-tracking section below
Using Links for Tasks or Subtasks
Using Links for Tasks or Subtasks
You may find it useful to send someone a link to a task or subtask directly. Do this by clicking the Link icon when you hover over the task name. You’ve now copied the hyperlink for this task, and you can send it to a team member by writing a message and pasting the link. The hyperlink will appear in a short name like, “T28”. If you had copied a Subtask link the short name would appear like, “ST29”. When your team member clicks on the link the task will immediately open in a window. Remember that you can share Task links across Workspaces too! If you are in the messaging section, you can access the tasks assigned to you in the about sidebar. You can copy the task link directly from here, so you don’t have to leave the messaging section
Assigning Tasks or Subtasks
Assigning Tasks or Subtasks
You can assign the right people in your team to a task by clicking the “+” icon to bring up a list of the team that are part of your Workspace. Multiple people can be assigned to a task. Select them one at a time to add them. You can assign Subtasks to team members in the same way. If you need to move a task to a different Workspace Click the “…” icon when you hover the task name, Select Move task and choose your new Workspace and then which column to place the task in. If you need to duplicate a task then click the “…” icon and select Duplicate Task.
Adding Feedback to Tasks
Adding Feedback to Tasks
Providing feedback on a subtask is done through adding comments or reactions. To add a Reaction, hover over the subtask and click the emoji icon. Select the right reaction to add and it will appear below the Subtask. The Comment section is on the far right of the Task window. It can be used like you were creating a Message. Add any feedback or link specific subtasks in the comment to draw attention to the specific work being mentioned. You can also mention a team member in the comment using the “@” symbol. Mentioning a member will send out an e-mail notification to that member.
Customizing Task Boards
Customizing Task Boards
If you’d like to customize your task and set a specific image to the task cover, open the task and add an image as an attachment. Upload the image from your computer or choose from a shared image in the Workspace. When you see the image appear in the task window, hover over it and click the icon on the far right to select “Make Cover”. You can also customize the background of your Workspace by clicking the artist palette icon in the bottom left of the Workspace screen. You can select from solid colors or images. This can even be uniquely set for each Workspace view.
Using Task Board Templates
Using Task Board Templates
You can save a task-board as a template and you can save as many templates as you wish to be used across workspaces. To do this click the “…” icon in the top right of the Workspace window. Select Board Template > Save Board Template from the dropdown list, and name your Template. To apply templates, click the “…” icon in the top right of the new Workspace window and select Board Template. Choose your Template name from the dropdown list and the template will be applied to your current board.
Messages Video Tutorials
Creating, Editing, and Sending Messages
Creating, Editing, and Sending Messages
Bring clear communication to your Workspace by using Messages. Click the Chat icon on the left side-bar to get started in the Messages window and type your message in the top green input box. To add formatting, select the text you wish to format, click the “…” and select bold or italics. Use the “@” symbol to directly mention a team member in the message, doing so will send out an e-mail and in-app notification. Once the message is sent, hover over the message to reveal more options. If you need to quickly edit your message click the pencil icon, and click the “…” if you need to delete the message entirely. Add reactions by clicking the emoji icon. Finally, make sure to save the most important messages by clicking the Bookmark icon.
Message Notifications and Sending Direct Messages
Message Notifications and Sending Direct Messages
When you need to mark a message as unread, click the circle to the left of the team members picture. And if you want a read-receipt of who viewed the message, check for the team members icon at the bottom right corner of the message when you hover over the message. Clicking on a team member’s profile image here will bring up their Profile window that gives additional ways to communicate with them directly. You can even send a message to your workspace from your external email! Click the “…” by your Workspace name in the left hand column. Select Workspace Email. Copy the e-mail address and send your e-mail to this address. The copy of your email will be received as a message while the attachments of your e-mail will be attached to the message.
Learn more ways to utilize the Message feature in the next video!
Creating a Task from a Message and using Visual Comments
Creating a Task from a Message and using Visual Comments
In several instances we found the need to create a task from a message, simply click the checkmark icon and the task window will pop up. You can then create, assign, and label the task as needed.
You can easily attach files, folders, or images to your Messages. To attach several files to your message, simply drag and drop the files on the message. Or you can click the paperclip icon to upload. When attaching multiple files you can rearrange the order as needed by dragging them.
To upload a folder that you’ve created in the files section, click the paper-clip icon, select shared files and select the folder you wish to attach.
Attaching images allows users to add comments with visual markers that highlight the specific areas of the document which need attention or updates. You can add a comment before or after you send a message. All of your team’s comments and feedback will be collected in the comments column on the right.
Finally, you can quickly jump to the message you need by searching for specific keywords by clicking the magnifying glass icon. Type the word you are hoping to find and click Enter. Or you can filter messages! Select a specific member of the team and only their messages will appear or select a date range and view just the messages sent during that time.
About Sidebar Video Tutorials
Accessing Team Member Information
Accessing Team Member Information
To get an overview of the details in a workspace use the About Sidebar. Access it by clicking on the info icon in the top right corner. Minimize the About Sidebar by clicking the info icon again. When the sidebar opens you’ll see a blue ? icon which provides access to a Help video walk through. Click on the Members header to expand the list of members that are in this workspace. Click on the Profile Card to view their email, phone, and location. You can remove a Member by clicking the “x” icon to the right of their name. Or you can add a Member by clicking the “Add members button”.
Note: If a member of your team does not show in this list, you need to send them an invite so they can join the team, before they may join this workspace.
Accessing Workspace Descriptions
Accessing Workspace Descriptions
The next section is the Description area. This is a space that provides the overall details needed for this Workspace. You can add login credentials, a shared Zoom room link, or other important data for the team.
Viewing Your Notifications
Viewing Your Notifications
The Notification area holds the settings to control how you will get updates about this particular Workspace. Select “Every New Message” to be alerted each time there is a message sent in the Workspace. Select “@ Mentions” to be alerted only when someone mentions your name in a message or task-comment. When you select “Nothing” notifications will still come through, however there will be no sound.
Utilizing the Activity Log
Utilizing the Activity Log
The Activity Log area will show a detailed list of every action members of this workspace. perform. Only admins are able to view logs from all members of a workspace This is a helpful audit to see if someone send a message, created a task, completed a task, deleted or moved items etc.
Creating Private Tasks
Creating Private Tasks
Get a quick overview of your Tasks in the About Sidebar by clicking the “My Tasks” tab. Remember to click the small blue ? icon to get a help video reviewing this specific Task area. At the top of the list are your Private Tasks. These are only visible to you and no one else on the team. Use these to create Notes for calls, to do lists, or other personal work.
Beneath the Private Tasks are the public tasks. The tasks that show in this area of the About Sidebar are the tasks assigned to you that every team-member of this workspace is able to see. If needed, you can also drag a Private Task down into the bottom sections and it will make it a publicly visible task. Use this area to quickly locate the tasks requiring your attention, because it may be more difficult to locate them just by looking at the Taskboard area. Adding a task in the About Sidebar area will automatically add it in the Task board and it will be assigned to you. Complete any task in the About Sidebar area by clicking the checkbox to the left of the task.
Working with Your Files
Working with Your Files
Get a quick overview of your Files and Folders in the About Sidebar by clicking the “Files” button. Remember to click the small blue ? icon to get a help video reviewing this specific Files area. Use this visibility into your Files to make workflow easier, instead of changing your entire Workspace window, you can view your messages or tasks and have your Files sidebar open. Upload hundreds of files at once by clicking the “Add Files” button. Organize them into folders if desired by clicking “New Folder”. When you hover over a Folder, click the … icon to upload files directly into the folder or rename the folder. Click “Add to Message” to immediately attach the Folder to a message to share with others.
When you hover over a file important data will appear below the name. File size and upload date will be revealed. To the right of the name you can click the bookmark icon to add the file to your Saved Items. Click the … icon to the right of the file name to Share, Move, or Copy the file. You can Share the file and it will attach it to a Message or just Copy the Link. To Move the file you would need to first select the Workspace and then the Root Directory or a Folder you want the file to be stored in. Select Copy to duplicate the file and choose where you want it to be stored in the same way.
Click “Add a Comment” to open the file and type your Comment in the right hand column. A visual marker will be added to the area related to your remarks. Use Comments together with Replacing an Image to keep track of updated changes. When a file has been changed and updated according to the Comment, choose Replace an Image and any completed Comments will remain with the new file!
If needed you can always click the … icon and select Delete to remove a file or folder.
Tracking Your Time Tutorials
How to Track Your Time
How to Track Your Time
Heycollab allows your team to track their time spent working. Anywhere you have a Task you will be able to track the time spent on that task. Simply hover over any Task and click the “Play” icon. This will start the timer which can be tracked directly on the Task or in the bottom left of the Workspace window. The Timer will stay visible no matter which Workplace view you move into. The title of the Task you are tracking will display below that Timer, and you can click the Timer to bring up the Task window. When you are finished simply click the “Stop” icon on either Timer interface. A pop up window will allow you to quickly add a description of what you worked on during that period.
Editing Time Entries
Editing Time Entries
You can edit your time description or time entries by clicking the “Pencil” icon or by viewing the Time Report Log. The Time Log Report window shows you who has worked on this specific Task. It details which team member did the work, what date and time range they worked, and the description of the work they completed. You can also manually enter a time range by adjusting the time range.
Manually Entering Time Entries
Manually Entering Time Entries
Adding time-entry manually is super easy. Open the View time report menu and Click the “Add Session Manually” button to enter any work that was not timed yet. Choose the date or date range that was worked. Then select the time range that was worked. As you add more timed work the Time Log Report will section out the display in week long increments, providing a total for each week.
Task and Workspace Time Reports
Task and Workspace Time Reports
Heycollab allows you to view reports for individual tasks, Workspaces, or team-wide. You can see a Time Report of one task by clicking the 3-dot icon on a task and selecting View time report. To view the timesheet of an entire workspace, In the Task Board view of the Workspace click the “…” icon in the top right corner of the window, and Select “View Workspace Timesheet”. A Time Log Report window will open revealing all of the work that has been recorded across Tasks in this Workspace. If you need to view any of the tasks more closely, each name is a hyperlink which opens the Task window directly. To add any additional Descriptions, just click on the description to make it editable on the Time Log Report. In a similar way you can view the tracked time you’ve spent working across all Workspaces. Click your Profile picture in the bottom left hand corner of the Workspace window. Select “View Company Timesheet”. Then a Time Log Report window will open revealing all of the work that has been recorded across each of the Workspaces for the company. Click on “My Work” in the top left hand column to see a quick total of your hours worked across Workspaces.
Exporting Time Reports
Exporting Time Reports
Export any Time Log Report into a .csv file. You can do this on a task level by opening the View time report menu and click on the Export CSV button To export at a workspace level, open the workspace timesheet and click the “Export CSV” button. Lastly to export a time report log of your entire team, click on the profile icon, select team-wide time-sheet and click on “Export Csv”.
My Work and Files Video Tutorials
Creating and Organizing Folders Video Tutorial
Creating and Organizing Folders Video Tutorial
Access your Workspace files by clicking the Folder icon of your Workspace name in the left hand column. You can see your files in either a list or thumbnail view. Toggle between them by clicking the icon in the top right of the window. To find files quickly try typing keywords or file names in the Search field. Add files or folders by clicking the “+” icon in the top right of the window. You can add hundreds of files in just one upload and all of the files will be immediately accessible to your team. Organize your files by creating folders. Once in place, you can move files into the appropriate place.
You can also access your files from the About Sidebar. The files will display in a list view and provide another way to add files or folders while keeping your current work also visible. Any file that has a comment will have a number bubble on top of the file thumbnail. A pink number means the comment is incomplete. A green number mees the comment has been completed.
Each file or folder can be selected by clicking the check box in the top left of the thumbnail. This will allow you to take four actions: Share, Copy, Move, or Delete the item. Select the action you want by clicking the button at the top of the Files window. Selecting Share will immediately open a Message with the item attached. Duplicate a File or Folder by clicking Copy. If you need to Rename that copied item click the … icon in the top right of the thumbnail and select Rename. Choose Move to put an item in the appropriate folder, or to move a folder to a different Workspace. Each Folder thumbnail will display a number on the folder which shows how many files are currently stored inside. Remove an item completely by choosing Delete. You can select multiple files and folders when applying any of these actions.
The List view of the Files window makes additional details visible. You can quickly locate how many comments have been made, the size of the file, and when it was uploaded. When you hover over an item click the Bookmark icon on the far right to add it to your Saved Items.
Utilizing the Work and My Work Sections
Utilizing Work and My Work Sections
Admins in a Workspace have access to the Work window. The Dashboard shows a summary of all team members in the Workspace. Filter this by searching for a specific team member in the search bar. Or choose a specific time frame in the drop down menu on the top far right of the window. The Workload graph gives a visual of activity for your team members. Hover over their profile picture to reveal their name. Hover over the bar to see specific task counts they are working on. Or view their profile card below to see even more of a team member’s work details. The labels displayed are tracked by the labels assigned to a task. Click each drop down to see which specific tasks they are working on which have that label.
The top row of the Work window also allows you to select My Work to see your activity or select a specific team member from the drop down to see their activity. When a team members work is shown, there will be four summary icons at the top: Tasks Completed, Hours Worked, Messages Sent, and Comments Posted.
From the Dashboard screen you can create tasks across all Workspaces by clicking the “New Task” button at the top. The window allows you to choose your task name, add a description, and create subtasks. Choose the specific Workspace for your task in the drop down Depending on which Workspace is chosen will allow you to assign certain team members to the task.
The My Work window allows you to see an overall summary of your activity in the Workspace When your work is shown, there will be four summary icons at the top: Tasks Completed, Hours Worked, Messages Sent, and Comments Posted. The top section is “Tasks Assigned to Me” and is a collection of your work. This previews important details like: due dates, tracked time, labels, and Workspace. Click on the Workspace on the far right to jump directly into that Task board.
Organize your window by creating a List. Click the “New List” button at the top row of the window, and the list will be added to the bottom of the display window. Click on the name to edit and type your own name for the list. To re-order a list you can click and drag it in any order under the “Tasks Assigned to Me” list. Simply drag any Task in the window into any list you create to organize your work.
Adding to Saved Items Video Tutorial
Adding to Saved Items
In the left hand column of the Workspace select Saved Items from the top List. Click the blue ? icon in the top right of the Saved Items window to view a Help video for this section. There are three things you can add to Saved Items: Messages, Tasks, and Files. To add a Message go to any message and hover over it to reveal the Bookmark icon to the right. If you click the Bookmark icon again it will unselect and remove it from the Saved Items area. In the same way when you hover over a Task in either the Board or List view it will show you the Bookmark icon you can click to add the Task to the Saved Items area. Files can be added to Saved Items by going to the Files section in the Workspace or by looking at the Files in the About Sidebar. Hover over the file name and select the Bookmark icon. Remember that even your Private Tasks in the About Sidebar can also be added to your Saved Items and will display in the Task column of your Saved Items window.
Invite Your Team Video Tutorial
How to Invite Your Team
Maximizing the power of your Workspace begins with adding in your team members.
In order to add a person to a workspace, they first need to be invited to your team. To invite people to your team, simply click the add people button, then select invite people. Type in the user’s email address and select the Workspace you want them to join. They will receive an email with an invite link. After filling out the brief sign up form your team member will join your Workspace.
Now you can start setting up Tasks, send messages, share files and collaborate together.
Note: You can only assign Tasks to members of your Workspace.
Bring clear communication to your Workspace by using Messages. Click the Chat icon on the left side-bar to get started in the Messages window and type your message in the top green input box. To add formatting, select the text you wish to format, click the “…” and select bold or italics. Use the “@” symbol to directly mention a team member in the message, doing so will send out an e-mail and in-app notification. Once the message is sent, hover over the message to reveal more options. If you need to quickly edit your message click the pencil icon, and click the “…” if you need to delete the message entirely. Add reactions by clicking the emoji icon. Finally, make sure to save the most important messages by clicking the Bookmark icon.
Message Notifications and Sending Direct Messages
Message Notifications and Sending Direct Messages
When you need to mark a message as unread, click the circle to the left of the team members picture. And if you want a read-receipt of who viewed the message, check for the team members icon at the bottom right corner of the message when you hover over the message. Clicking on a team member’s profile image here will bring up their Profile window that gives additional ways to communicate with them directly. You can even send a message to your workspace from your external email! Click the “…” by your Workspace name in the left hand column. Select Workspace Email. Copy the e-mail address and send your e-mail to this address. The copy of your email will be received as a message while the attachments of your e-mail will be attached to the message.
Learn more ways to utilize the Message feature in the next video!
Creating a Task from a Message and using Visual Comments
Creating a Task from a Message and using Visual Comments
In several instances we found the need to create a task from a message, simply click the checkmark icon and the task window will pop up. You can then create, assign, and label the task as needed.
You can easily attach files, folders, or images to your Messages. To attach several files to your message, simply drag and drop the files on the message. Or you can click the paperclip icon to upload. When attaching multiple files you can rearrange the order as needed by dragging them.
To upload a folder that you’ve created in the files section, click the paper-clip icon, select shared files and select the folder you wish to attach.
Attaching images allows users to add comments with visual markers that highlight the specific areas of the document which need attention or updates. You can add a comment before or after you send a message. All of your team’s comments and feedback will be collected in the comments column on the right.
Finally, you can quickly jump to the message you need by searching for specific keywords by clicking the magnifying glass icon. Type the word you are hoping to find and click Enter. Or you can filter messages! Select a specific member of the team and only their messages will appear or select a date range and view just the messages sent during that time.
Adding to Saved Items Video Tutorial
Adding to Saved Items
In the left hand column of the Workspace select Saved Items from the top List. Click the blue ? icon in the top right of the Saved Items window to view a Help video for this section. There are three things you can add to Saved Items: Messages, Tasks, and Files. To add a Message go to any message and hover over it to reveal the Bookmark icon to the right. If you click the Bookmark icon again it will unselect and remove it from the Saved Items area. In the same way when you hover over a Task in either the Board or List view it will show you the Bookmark icon you can click to add the Task to the Saved Items area. Files can be added to Saved Items by going to the Files section in the Workspace or by looking at the Files in the About Sidebar. Hover over the file name and select the Bookmark icon. Remember that even your Private Tasks in the About Sidebar can also be added to your Saved Items and will display in the Task column of your Saved Items window.
Viewing Your Notifications
Viewing Your Notifications
The Notification area holds the settings to control how you will get updates about this particular Workspace. Select “Every New Message” to be alerted each time there is a message sent in the Workspace. Select “@ Mentions” to be alerted only when someone mentions your name in a message or task-comment. When you select “Nothing” notifications will still come through, however there will be no sound.
Creating a Task from a Message and using Visual Comments
Creating a Task from a Message and using Visual Comments
In several instances we found the need to create a task from a message, simply click the checkmark icon and the task window will pop up. You can then create, assign, and label the task as needed.
You can easily attach files, folders, or images to your Messages. To attach several files to your message, simply drag and drop the files on the message. Or you can click the paperclip icon to upload. When attaching multiple files you can rearrange the order as needed by dragging them.
To upload a folder that you’ve created in the files section, click the paper-clip icon, select shared files and select the folder you wish to attach.
Attaching images allows users to add comments with visual markers that highlight the specific areas of the document which need attention or updates. You can add a comment before or after you send a message. All of your team’s comments and feedback will be collected in the comments column on the right.
Finally, you can quickly jump to the message you need by searching for specific keywords by clicking the magnifying glass icon. Type the word you are hoping to find and click Enter. Or you can filter messages! Select a specific member of the team and only their messages will appear or select a date range and view just the messages sent during that time.
Manually Entering Time Entries
Manually Entering Time Entries
Adding time-entry manually is super easy. Open the View time report menu and Click the “Add Session Manually” button to enter any work that was not timed yet. Choose the date or date range that was worked. Then select the time range that was worked. As you add more timed work the Time Log Report will section out the display in week long increments, providing a total for each week.
Task Due Dates and Labels
Task Due Dates and Labels
Get your tasks completed on specific time frames by clicking the Calendar icon at the bottom of the Task Card. If you have a specific due date then select the day on the calendar and double click. If you need to select a date range then click once on the start date and again on the end date. You can even choose a specific time you need a task completed The Calendar and Timeline view are two easy ways to visualize these due dates. The Calendar view helps make your daily or weekly tasks, and the Timeline view helps see the bigger picture of all the tasks your team is working on. Changing the task label will change the visible color on both of these views. Hover over the bottom of the Task Card and click the Tag icon. Choose from one of our pre-set labels or click Create Label at the bottom to create a custom one. You can add more than one label to any task.
Team Management for Administrators
Team Management for Administrators
An Administrator has several tools available to build, manage, and interact with their team in Heycollab.
The absolute first step is getting your team into your Workspace.
Follow the steps below to invite them:
Invite Your Team to a Workspace.
Maximizing the power of your Workspace begins with adding in your team members. This will allow you to send them direct messages and assign them Tasks specifically.
1. Click “Invite new people”.
In the left hand column click the “Add People” button below the Workspace name.
2. Enter the User’s email address.
Type in the user’s email address and select the Workspace you want them to join.
3. User is sent an email invitation.
They will open the email and click to join.
Once all of your team members are added you can get to work setting up and assigning Tasks!
View and Manage Your Team.
An Administrator in a Workspace has access to the My Team window.
The Dashboard on this window shows a summary of all team members in the Workspace.
You can Filter this entire section by searching for a specific team member in the search bar in the top right corner. Or choose a specific time frame in the drop down menu on the top far right of the window.
The Workload graph gives a helpful visual graph of activity for your team members.
You can hover over a profile picture to reveal the teammate’s name, or hover over the bar graph to see specific task counts they are working on.
Each teammate has a profile card with even more of their work details in one location.
You can utilize labels on Tasks to help group types of work and see which team members are working on which Tasks.
Specific reports can help you see how your team members are working and what they have been working on.
When a team members work is shown, there will be four summary icons at the top: Tasks Completed, Hours Worked, Messages Sent, and Comments Posted.
Managing Your Team in the About Section
You can quickly manage your team and add important details about the Workspace for them to reference in the About Sidebar. You can access the About Sidebar by clicking the blue “i” icon in the top right corner of the Workspace window.
When you select the “About” tab in the Sidebar you will see it divided into 4 areas.
Members
Description
Notifications
Activity Log
Clicking to open the Members area allows you to see the Profile Card of any member by clicking their Name on the list.
The Profile Card will provide you a variety of helpful information like their email, phone, and location.
You can remove a Member by clicking the “x” icon to the right of their name. Or you can add a Member by clicking the “+” icon at the bottom.
If a Team member doesn’t show in the list you would need to first Invite them to the Workspace.
Click the forgot password link on this page (see attached)
Sign in page
Input your e-mail address on this next screen
You’ll receive an e-mail with a 5-digit verification code. You’ll need this code to be able to reset your password. Note: If you have not received an e-mail, check your spam or junk mail. After 60 seconds you will be able to resent the code.
For this last step, simply input your new password and you are now ready to log back in with your new credentials
Using Different Task Views
Different Views to Organize your Tasks
Use the different views at the top center of the Workspace window to better visualize your team’s workflow. Click each of the names to switch the view of the main Workspace window.
The Board view is the default view showing all the Task cards.
The List view shows a condensed full collection of tasks. They are listed in order within a column, and are also grouped by columns. This allows a user to see the most amount of tasks and details in a single view.
The Calendar view helps to understand your daily and weekly schedule. Tasks will be displayed and colored according to any labels assigned to them. This can help provide a visual cue to when tasks are scheduled to be due.
Finally, the Timeline view puts your whole team’s workflow into perspective. Tasks will be also be displayed and colored according to any labels assigned to them. This allows a perspective to understand which tasks are working or overlapping with one another.
Intro for admins
Learn how to manage your team’s workload, export time-sheet reports, customize roles & permissions and more.
The Heycollab workspace is a central place for your team and your work. Here is more information about creating or managing your new workspace. This guide is for you, and we’re glad you’re here!
1. Create a Workspace.
First, head to the Create a Workspace page we’ll walk you through the process through the step by step instructions.
Once you’ve created your workspace, you’ll be the Admin for that space to manage your team and add Tasks.
2. Add a Task.
Choose the column of work on your Task board and add a Task. Follow the instructions on the Add a Task page to make sure you understand all of the important features available to you and your team.
3. Invite your Team.
Get your teammates into your new Workspace so they can start collaborating and can receive all Tasks that are assigned to them. You can make sure they are up to speed with all Heycollab can do by sending them to the Heycollab overview for users page.
View and Manage Your Team
View and Manage Your Team.
An Administrator in a Workspace has access to the My Team window.
The Dashboard on this window shows a summary of all team members in the Workspace.
You can Filter this entire section by searching for a specific team member in the search bar in the top right corner. Or choose a specific time frame in the drop down menu on the top far right of the window.
The Workload graph gives a helpful visual graph of activity for your team members.
You can hover over a profile picture to reveal the teammate’s name, or hover over the bar graph to see specific task counts they are working on.
Each teammate has a profile card with even more of their work details in one location.
You can utilize labels on Tasks to help group types of work and see which team members are working on which Tasks.
Specific reports can help you see how your team members are working and what they have been working on.
When a team members work is shown, there will be four summary icons at the top: Tasks, Hours, Messages, and Comments.
Creating Tasks from Messages
Create a Task from a Message
In several instances we’ve found the need to create a task directly from a message. So, we have made this as easy to do as possible!
When you hover over any Message click the Checkmark icon.
This brings up a Task window with the Message pre-filled into the Details box of the Task.
The Task will also be assigned to the recipient of the Message.
Fill out the rest of the Task information by adding a Task Name, Label, and any Subtasks.
You can select which Column to place the Task at the bottom of the window, then click Create Task.
Saved items overview
Saved Items Overview
Heycollab allows you to gather and save all your important Files, Messages, and Tasks in one place. This allows for a quick way to get to the information that matters to you most when you are trying to complete your work related goals.
To access your Saved Items, look in the left hand column of the Workspace and select “Saved Items” from the top List.
You can add three types of items to Saved Items. They are: Messages, Tasks, and Files.
How Can You Add Items to Saved Items?
To add a Message go to any message and hover over it to reveal the Bookmark icon to the right.
If you click the Bookmark icon again it will unselect and remove it from the Saved Items area.
In the same way when you hover over a Task in either the Board or List view it will show you the Bookmark icon you can click to add the Task to the Saved Items area.
Files can be added to Saved Items by going to the Files section in the Workspace or by looking at the Files in the About Sidebar. Hover over the file name and select the Bookmark icon.
BONUS TIP: Even your Private Tasks in the About Sidebar can also be added to your Saved Items and will display in the Task column of your Saved Items window.
Exporting Time Reports
Exporting Time Reports
Time Report Logs are available for individual users, and entire team in a Workspace, or for all Workspaces combined!
Any Time Report can be exported into a .csv file for your records.
Exporting Time Reports
In the Task Board view of the Workspace click the “…” icon in the top right corner of the window.
Select “View Workspace Timesheet”.
Then a Time Log Report window will open revealing all of the work that has been recorded across each of the Tasks in the Workspace.
If you need to view any of the tasks more closely, each name is a hyperlink which opens the Task window directly when clicked.
Click “Export CSV” in the top right corner of the window and Save the file to your computer.
Multiple Workspace Time Reports
In a similar way you can view the tracked time you’ve spent working across multiple Workspaces.
Click your Profile picture in the bottom left hand corner of the Workspace window.
Select “View team-wide Timesheet”
Then a Time Log Report window will open revealing all of the work that has been recorded across each of the Workspaces for the company.
Remember: Another way to see a quick total of your time worked is in the My Work section.
Working with Files
Working with Files
Each file or folder can be selected by clicking the check box in the top left of the thumbnail. This will allow you to take four actions:
Share
Copy
Move
Delete
Select the action you want by clicking the button at the top of the Files window.
Selecting “Share” will immediately open a Message with the item attached.
Duplicate a File or Folder by clicking Copy.
Choose Move to put an item in the appropriate folder, or to move a folder to a different Workspace. (Each Folder thumbnail will display a number on the folder which shows how many files are currently stored inside.)
Remove an item completely by choosing Delete.
Remember: You can select multiple files and folders when applying any of these actions.
Additional options are available by clicking the “…” icon to the right of a file or folder. This will allow you to take these actions:
Share
Move
Copy
Rename
Replace image
Download
Add comment
Delete File
The main action which is different in this section is Renaming a file or folder.
Using the List View
The List view of the Files window makes additional details visible.
You can quickly locate how many comments have been made, the size of the file, and when it was uploaded.
When you hover over an item click the Bookmark icon on the far right to add it to your Saved Items.
Viewing Private and Public Tasks in the Sidebar
Tasks in the About Sidebar
Get a quick overview of your Tasks in the About Sidebar by clicking the “Tasks” button.
Remember: to click the small blue “?” icon to get a help video reviewing this specific Task area.
Private Tasks
At the top of the list are your Private Tasks.
These are only visible to you and no one else on the team.
Use these to create Notes for calls, to do lists, or other personal work.
Create these tasks using the same window and utilizing features like time tracking or labels as you would in a public task.
Public Tasks
Beneath the Private Tasks are the “To Do” and “Doing” columns, and any other columns manually created will also be visible here too.
The tasks that show in this area of the About Sidebar are the tasks assigned to you. (If needed, you can also drag a Private Task down into the bottom sections and it will make it a publicly visible task.)
Use this area to quickly locate the tasks requiring your attention, because it may be more difficult to locate them just by looking at the Board View of Tasks.
Adding a task in the About Sidebar area will automatically add it in the main Task board and it will be assigned to you.
Complete any task in the About Sidebar area by clicking the checkbox to the left of the task.
About sidebar
Add members to a workspace, add description, change notifications, view activity log, my tasks and quick-view files.
When working with several team members it can be helpful to have an overview of the details in your Workspace.
Use the About Sidebar to get that summary!
Open the About Sidebar
Access the Sidebar by clicking on the Blue “i” icon in the top right corner of the Workspace window. (Just click the same “i” icon to minimize the Sidebar from view.)
When the Sidebar opens there is a small blue “?” icon to the right of the top buttons which provides access to a Help video tutorial to learn more about using this area.
The About Section
When you select the “About” tab in the Sidebar you will see it divided into 4 areas.
Members
Description
Notifications
Activity Log
Clicking to open the Members area allows you to see the Profile Card of any member by clicking their Name on the list.
The Profile Card will provide you a variety of helpful information like their email, phone, and location.
You can remove a Member by clicking the “x” icon to the right of their name.
Or you can add a Member by clicking the “+” icon at the bottom.
If a Team member doesn’t show in the list. You would need to first Invite them to the Workspace.
The Description Section
The next section is the Description area.
This is a space that provides the overall details needed for this Workspace.
Some ideas to help you know how to best utilize this area are: adding login credentials, a shared Zoom room link, or other important data for the team.
The Notification Section
This area gives you some control over how you would prefer to be notified of messages and mentions in the Workspace.
The options are:
Every New Message
Just @ mentions
Nothing
The Activity Log Section
This section shows you all of the actions and edits that you preformed in the Workspace.
It shows a description of the action that was taken, and a time/date stamp of when it happened.
A link is also provided to directly access the Message, Task, or File changed.
Accessing Files and Folders in the Sidebar
Files in the About Sidebar
Get a quick overview of your Files in the About Sidebar by clicking the “Files” button.
Remember: to click the small blue “?” icon to get a help video reviewing this specific Files area.
Use this visibility into your Files to make workflow easier, instead of changing your entire Workspace window, you can view your Messages or Tasks in the main window and your Files in the Sidebar.
To save time you can upload hundreds of files at once by clicking the “Add Files” button.
Organize them into folders if desired by clicking “New Folder”.
When you hover over a Folder, click the “…” icon to upload files directly into the folder or rename the folder.
Click “Attach to Message” to immediately attach the Folder to a message to send out.
When working with files, hovering over a file shows important data (like file size and upload date) below the name of the file.
To the right of the name you can click the bookmark icon to add the file to your Saved Items.
Additional File Options
Click the “…” icon to the right of the file name to Share, Move, or Copy the file.
You can Share the file and it will attach it to a Message or just Copy the Link.
To Move the file you would need to first select the Workspace and then the Root Directory or a Folder you want the file to be stored in.
Select Copy to duplicate the file and choose where you want it to be stored in the same way.
Click “Add a Comment” to open the file and type your Comment in the right hand column. (A visual marker will be added to the area related to your remarks.)
If needed you can always click the “…” icon and select Delete to remove a file or folder.
Viewing Private and Public Tasks in the Sidebar
Tasks in the About Sidebar
Get a quick overview of your Tasks in the About Sidebar by clicking the “Tasks” button.
Remember: to click the small blue “?” icon to get a help video reviewing this specific Task area.
Private Tasks
At the top of the list are your Private Tasks.
These are only visible to you and no one else on the team.
Use these to create Notes for calls, to do lists, or other personal work.
Create these tasks using the same window and utilizing features like time tracking or labels as you would in a public task.
Public Tasks
Beneath the Private Tasks are the “To Do” and “Doing” columns, and any other columns manually created will also be visible here too.
The tasks that show in this area of the About Sidebar are the tasks assigned to you. (If needed, you can also drag a Private Task down into the bottom sections and it will make it a publicly visible task.)
Use this area to quickly locate the tasks requiring your attention, because it may be more difficult to locate them just by looking at the Board View of Tasks.
Adding a task in the About Sidebar area will automatically add it in the main Task board and it will be assigned to you.
Complete any task in the About Sidebar area by clicking the checkbox to the left of the task.
Invite your team
Invite Your Team to Your Workspace
Maximizing the power of your Workspace begins with adding in your team members.
This will allow you to send them direct messages and assign them Tasks specifically.
Follow the steps below to add in your team!
1. Click “Invite new people”.
In the left hand column click the “Invite new people” button below by the Profile image.
2. Enter the User’s email address.
Type in the user’s email address and select the Workspace you want them to join. You can add up to 5 e-mail addresses and copy the link for the invite as well.
Editing and Updating Tasks in the My Work Dashboard
Creating a Task from the My Tasks Dashboard
When you are in the My Task Dashboard screen you can create tasks across all your Workspaces by clicking the “New Task” button at the bottom blue “Plus” icon.
A Task window will open.
The window allows you to choose your task name, add a description, and create Subtasks.
Choose the specific Workspace for your task in the drop down menu in the bottom left corner.
Depending on which Workspace is chosen, it will allow you to assign specific team members to the task.
Joining a Team
How to Join a Team
If you’ve been invited to a team in Heycollab, follow these simple steps to join:
Step 1:
Open the e-mail invite and click the Join Now button (if you have not received an invite, check your junk-mail folder)
Step 2:
Clicking on the Join now button should bring up this page, if it does not, make sure you are not logged in to Heycollab. If you are, simply log out, open this e-mail and click the “Join Now” button.
Step 3:
Once you filled out the form and submitted, you should be directed to heycollab. Now you can start collaborating with your team.
How to Join a Team Video Tutorial
How to Join a Team
If you’ve been invited to a team in heycollab, follow these simple steps to join:
Step One
Open the e-mail invite and click the Join Now button (if you have not received an invite, check your junk-mail folder).
Step Two
Clicking on the Join now button should bring up this page, if it does not, make sure you are not logged in to heycollab. If you are, simply log out, open this e-mail and click the Join Now button.
Step Three
Once you filled out the form and submitted, you should be directed to Heycollab. Now you can start collaborating with your team.
To get an overview of the details in a workspace use the About Sidebar. Access it by clicking on the info icon in the top right corner. Minimize the About Sidebar by clicking the info icon again. When the sidebar opens you’ll see a blue ? icon which provides access to a Help video walk through. Click on the Members header to expand the list of members that are in this workspace. Click on the Profile Card to view their email, phone, and location. You can remove a Member by clicking the “x” icon to the right of their name. Or you can add a Member by clicking the “Add members button”.
Note: If a member of your team does not show in this list, you need to send them an invite so they can join the team, before they may join this workspace.
Accessing Workspace Descriptions
Accessing Workspace Descriptions
The next section is the Description area. This is a space that provides the overall details needed for this Workspace. You can add login credentials, a shared Zoom room link, or other important data for the team.
Viewing Your Notifications
Viewing Your Notifications
The Notification area holds the settings to control how you will get updates about this particular Workspace. Select “Every New Message” to be alerted each time there is a message sent in the Workspace. Select “@ Mentions” to be alerted only when someone mentions your name in a message or task-comment. When you select “Nothing” notifications will still come through, however there will be no sound.
Utilizing the Activity Log
Utilizing the Activity Log
The Activity Log area will show a detailed list of every action members of this workspace. perform. Only admins are able to view logs from all members of a workspace This is a helpful audit to see if someone send a message, created a task, completed a task, deleted or moved items etc.
Creating Private Tasks
Creating Private Tasks
Get a quick overview of your Tasks in the About Sidebar by clicking the “My Tasks” tab. Remember to click the small blue ? icon to get a help video reviewing this specific Task area. At the top of the list are your Private Tasks. These are only visible to you and no one else on the team. Use these to create Notes for calls, to do lists, or other personal work.
Beneath the Private Tasks are the public tasks. The tasks that show in this area of the About Sidebar are the tasks assigned to you that every team-member of this workspace is able to see. If needed, you can also drag a Private Task down into the bottom sections and it will make it a publicly visible task. Use this area to quickly locate the tasks requiring your attention, because it may be more difficult to locate them just by looking at the Taskboard area. Adding a task in the About Sidebar area will automatically add it in the Task board and it will be assigned to you. Complete any task in the About Sidebar area by clicking the checkbox to the left of the task.
Working with Your Files
Working with Your Files
Get a quick overview of your Files and Folders in the About Sidebar by clicking the “Files” button. Remember to click the small blue ? icon to get a help video reviewing this specific Files area. Use this visibility into your Files to make workflow easier, instead of changing your entire Workspace window, you can view your messages or tasks and have your Files sidebar open. Upload hundreds of files at once by clicking the “Add Files” button. Organize them into folders if desired by clicking “New Folder”. When you hover over a Folder, click the … icon to upload files directly into the folder or rename the folder. Click “Add to Message” to immediately attach the Folder to a message to share with others.
When you hover over a file important data will appear below the name. File size and upload date will be revealed. To the right of the name you can click the bookmark icon to add the file to your Saved Items. Click the … icon to the right of the file name to Share, Move, or Copy the file. You can Share the file and it will attach it to a Message or just Copy the Link. To Move the file you would need to first select the Workspace and then the Root Directory or a Folder you want the file to be stored in. Select Copy to duplicate the file and choose where you want it to be stored in the same way.
Click “Add a Comment” to open the file and type your Comment in the right hand column. A visual marker will be added to the area related to your remarks. Use Comments together with Replacing an Image to keep track of updated changes. When a file has been changed and updated according to the Comment, choose Replace an Image and any completed Comments will remain with the new file!
If needed you can always click the … icon and select Delete to remove a file or folder.
Utilizing the Activity Log
Utilizing the Activity Log
The Activity Log area will show a detailed list of every action members of this workspace. perform. Only admins are able to view logs from all members of a workspace This is a helpful audit to see if someone send a message, created a task, completed a task, deleted or moved items etc.
Tracking my time
Tracking Your Time Overview
In Heycollab, wherever you have a Task you will be able to track the time spent on that work.
This timer is available no matter which view you use to access your Tasks.
Start Tracking your Time:
Simply hover over any Task or Subtask and click the “Play” icon.
This will start the timer which can be viewed directly on the Task or in the bottom left of the Workspace window.
The Timer will stay visible no matter which Workplace view you move into.
The title of the Task you are tracking will display below that Timer, or you can also click the Timer to bring up the Task window directly.
When you are finished simply click the “Stop” icon on either Timer interface.
A pop up window will automatically reveal an area to add a description of what you worked on during that period.
You can edit your descriptions by clicking the “Pencil” icon or by viewing the Time Report Log.
How to Use the Time Report Log
The Time Log Report window shows you who has worked on this specific Task.
It details which team member did the work, what date and time range they worked, and the description of the work they completed.
You can also manually enter a time range by adjusting the time range.
View the Time Report Log by clicking the “…” icon to the right of the Task Name.
Click the “Add Session Manually” button at the top of the Time Log Report window to enter any work that was not timed yet.
Choose the date or date range that was worked.
Then select the time range that was worked.
As you add more timed work the Time Log Report will section out the display in week long increments, providing a total for each week.
Export any Time Log Report into a .csv file by clicking “Export Time Report” in the top right corner of the window.
In a similar way you can view the tracked time you’ve spent working across multiple Workspaces.
Click your Profile picture in the bottom left hand corner of the Workspace window.
Select “View Company Timesheet”
Then a Time Log Report window will open revealing all of the work that has been recorded across each of the Workspaces for the company.
Task and Workspace Time Reports
Task and Workspace Time Reports
Heycollab allows you to view reports for individual tasks, Workspaces, or team-wide. You can see a Time Report of one task by clicking the 3-dot icon on a task and selecting View time report. To view the timesheet of an entire workspace, In the Task Board view of the Workspace click the “…” icon in the top right corner of the window, and Select “View Workspace Timesheet”. A Time Log Report window will open revealing all of the work that has been recorded across Tasks in this Workspace. If you need to view any of the tasks more closely, each name is a hyperlink which opens the Task window directly. To add any additional Descriptions, just click on the description to make it editable on the Time Log Report. In a similar way you can view the tracked time you’ve spent working across all Workspaces. Click your Profile picture in the bottom left hand corner of the Workspace window. Select “View Company Timesheet”. Then a Time Log Report window will open revealing all of the work that has been recorded across each of the Workspaces for the company. Click on “My Work” in the top left hand column to see a quick total of your hours worked across Workspaces.
Creating Tasks and Managing Subtasks
Creating Tasks and Managing Subtasks
Create a Subtask within the Task Window. Click the green “+” icon to add a Subtask. Type in all the information for the subtask in the text field Include any Titles, descriptions, or lists. You can format the text by adding Bold or Italics (Cntrl/Cmd B or I) and make bulleted lists by using a dash before any new line. Attach files and folders to this subtask and arrange their order and add visual comments to images shared. Hit the green check when you are finished, and if you need to make any edits hover over the subtask and click the pencil icon. You can now assign a team member by hovering over the subtask and clicking the “+” icon to select the team member. You are able to do similar functions that are also available on a Task like assigning a due date and copying the subtask link.
Manage Roles and Permissions of Users
Managing Permissions and Roles of Users
Every Workspace has an Administrator assigned and each team member that is invited and joined can be assigned certain roles and permissions.
To view and make changes to a team member, follow these steps:
Step 1: Click on your name in the bottom left hand corner of the window.
Step 2: Click on “Roles and Permissions” from the list.
Step 3: In the Permissions window make any adjustment to the different Roles able to be assigned.
Step 4: Click on “Manage Members” in the left hand column of the window and assign your team members the roles they need.
Add a Comment by clicking the blue “Add Comment” button.
Double click on the exact area of the image you need to make a comment.
A colored marker will be added for future reference.
Notification Indicators
There are two main areas to see Notification indicators in the left hand column of the main Workspace window.
The top left hand corner button that says “New” will reveal an icon and a number to show how many new items are waiting for you.
There is another indicator by the Workspace Name in the middle of the left hand column. A white dot will appear any time there is a notification waiting for you in a Workspace other than the one you currently have open
Once you click on the New button in the top left hand corner the Notifications area of the About Sidebar will open on the right hand column of your screen.
Your notifications will be listed with one of three icons to indicate if it is a message, task, or file. You are able to view, reply, and react right in the column.
Private Tasks in the About Sidebar
There is a time when you might need to create Tasks that are not visible for your team and meant just for you. You can create these tasks in the About Sidebar.
Sections inside Folders
When uploading Files you can organize them into specific Folders. But there are sometimes the need to group your Files into sections within that Folder by clicking the blue button in the top left corner called “Add Section”.
Uploading more than one file at a time.
When you are trying to upload files for your team you can bring several files in one big batch. Just click “Add Files” and then select as many files as you need.
Keyboard Shortcuts
When a task board is open, simply pressing escape on your keyboard will close the dialog box and take you back to the main Workspace view.
Accessing Multiple Workspaces
If you have several teams, you need the ability to keep them in their own unique Workspaces. But in HeyCollab you can quickly switch between a different Workspace in the left hand column by clicking on the name. Just remember to log in to each Workspace first and then you can easily bounce between your teams spaces!
Deleting your account
Once you delete an account, please note that this cannot be undone. Upon the deletion of your account, we delete all of your personal data as well.
To delete your account, follow these steps:
As an admin, open the main menu in the bottom left-hand corner and select billing
From the Billing popup, select Delete your account at the bottom and select Sure
For the last step, select why you are closing your account, give a brief explanation, and click the Close Account button.
Setting Labels for Tasks
Setting Task Labels
Add Labels to a Task in order to help categorize them for better searching and viewing capabilities within a Workspace. A label will display on the left corner of a Task card. Hover over the colored label indicator to display the Label name.
The default labels available are:
In Progress
Pending Review
Ready
Complete
High Priority
You are able to also add in your own Custom label too.
When creating a Custom label you’ll be able to create the name and color of your label.
Add a Label
Open a Task Card and Click the “Set Task Label” icon.
A pop up window will allow you to click one of the default labels or add a Custom Label. You can select multiple labels to apply to your Task.
You can also add a label by hovering over any Task Card without opening the Task.
Hover over the bottom of the Task Card on the Workspace and click the Label icon on the far right.
Select the label from the pop up window.
You can also add a label in the My Work section when you see any task on the list by clicking the Label icon.
Remove a Label
In the Task Card under the Label icon each of your labels will be visible.
Hover over the label you want to remove and click the “x”.
Similarly, anywhere you see a Label you can hover over it and click the “x” to remove it.
Ways to View Labels
The Calendar and Timeline view are two easy ways to visualize your task labels. The Calendar view helps make your daily or weekly tasks, and the Timeline view helps see the bigger picture of all the tasks your team is working on.
Changing the task label will change the visible color on both of these views.
Attaching Files, Folders, and Images to your Message
Attaching Items to Your Message
Get your team exactly what they need by attaching different items to your Message before sending.
Upload a File
You can easily attach files, folders, or images to your Messages by simply dragging and dropping the file on the message.
Or you can click the paperclip icon to upload.
When attaching multiple files you can rearrange the order as needed by dragging them.
Benefits to Attaching Images
Attaching images allows users to add comments with visual markers that highlight the specific areas of the document which need attention or updates.
You can add a comment before or after you send a message.
All of your team’s comments and feedback will be collected in the comments column on the right.
Tracking time
Track your time, view and export time-reports and much more.
In Heycollab, wherever you have a Task you will be able to track the time spent on that work.
How to Start Tracking Time
To start tracking time, simply hover over any Task and click the “Play” icon. This will start the timer which can be viewed directly on the Task or in the bottom left of the Workspace window.
The Timer will stay visible no matter which Workplace view you move into.
The title of the Task you are tracking will display below that Timer, or you can also click the Timer to bring up the Task window directly.
When you are finished simply click the “Stop” icon on either Timer interface.
A pop up window will allow you to quickly add a description of what you worked on during that period.
You can edit your descriptions by clicking the “Pencil” icon or by viewing the Time Report Log.
View the Time Report Log by clicking the “…” icon to the right of the Task Name.
Editing Time Tracked and Descriptions
Time Report Descriptions
After every work session where you track your time, when the timer is stopped a pop up window appears.
This window allows you to enter in a description of your work.
As an Admin you are able to view Time Reports for all the team members in a Workspace.
Accessing Time Reports
You can access the Time Report Log by clicking the pencil icon when you hover over the timer on a Task card. (Or you can access it by right clicking on a Task card.)
Once the Time Report Log window opens you will see a list of all the tracked work sessions for a Task.
Each of these sessions can be edited.
You can manually adjust the time worked or the description of the work.
Add a Session Manually
If needed you can also enter a session manually by clicking the large blue button at the top of the window.
When clicked, a pop up window will allow you to select the date and time worked.
First click on the date you started the work.
Then click again on the date you ended the work. (If the work was completed on the same day, you will need to click the day twice)
Then enter the time you started and ended the work. Make sure to also enter “AM” or “PM” correctly.
Then click the button that says “OK” to submit that session.
Exporting Time Reports
Exporting Time Reports
Time Report Logs are available for individual users, and entire team in a Workspace, or for all Workspaces combined!
Any Time Report can be exported into a .csv file for your records.
Exporting Time Reports
In the Task Board view of the Workspace click the “…” icon in the top right corner of the window.
Select “View Workspace Timesheet”.
Then a Time Log Report window will open revealing all of the work that has been recorded across each of the Tasks in the Workspace.
If you need to view any of the tasks more closely, each name is a hyperlink which opens the Task window directly when clicked.
Click “Export CSV” in the top right corner of the window and Save the file to your computer.
Multiple Workspace Time Reports
In a similar way you can view the tracked time you’ve spent working across multiple Workspaces.
Click your Profile picture in the bottom left hand corner of the Workspace window.
Select “View team-wide Timesheet”
Then a Time Log Report window will open revealing all of the work that has been recorded across each of the Workspaces for the company.
Remember: Another way to see a quick total of your time worked is in the My Work section.
Finding Your Notifications Video Tutorial
Finding Notifications
HeyCollab uses notifications as a central way to keep you updated on any new messages, task assignments or task comments. See your Notifications in the top left corner. There is a separate count for task and message notifications. Click on the “New” panel name to preview all your Notifications. By default the most recent notifications received will be at the top. Click the drop down arrow to filter through other options. Click the … icon in the top right of the panel to mark all notifications read or delete them. And use the same … icon on individual notifications to just make those changes to that notification. All Notifications that are unread will have a blue background, and one’s you’ve seen will have a white background. There are three icons used to visually identify: Messages, Task Comments, and Tasks. Click on any icon on the side of the notification to open more details. You may reply directly from the notifications panel by clicking the reply icon.
Another visual cue that displays is a white dot next to the name of any -Workspace that has a pending Notification. A number will also appear in the icon for Messages or Tasks in the Workspace to show how many notifications are waiting for your review.
Creating Private Tasks
Creating Private Tasks
Get a quick overview of your Tasks in the About Sidebar by clicking the “My Tasks” tab. Remember to click the small blue ? icon to get a help video reviewing this specific Task area. At the top of the list are your Private Tasks. These are only visible to you and no one else on the team. Use these to create Notes for calls, to do lists, or other personal work.
Beneath the Private Tasks are the public tasks. The tasks that show in this area of the About Sidebar are the tasks assigned to you that every team-member of this workspace is able to see. If needed, you can also drag a Private Task down into the bottom sections and it will make it a publicly visible task. Use this area to quickly locate the tasks requiring your attention, because it may be more difficult to locate them just by looking at the Taskboard area. Adding a task in the About Sidebar area will automatically add it in the Task board and it will be assigned to you. Complete any task in the About Sidebar area by clicking the checkbox to the left of the task.
Heycollab allows your team to track their time spent working. Anywhere you have a Task you will be able to track the time spent on that task. Simply hover over any Task and click the “Play” icon. This will start the timer which can be tracked directly on the Task or in the bottom left of the Workspace window. The Timer will stay visible no matter which Workplace view you move into. The title of the Task you are tracking will display below that Timer, and you can click the Timer to bring up the Task window. When you are finished simply click the “Stop” icon on either Timer interface. A pop up window will allow you to quickly add a description of what you worked on during that period.
Editing Time Entries
Editing Time Entries
You can edit your time description or time entries by clicking the “Pencil” icon or by viewing the Time Report Log. The Time Log Report window shows you who has worked on this specific Task. It details which team member did the work, what date and time range they worked, and the description of the work they completed. You can also manually enter a time range by adjusting the time range.
Manually Entering Time Entries
Manually Entering Time Entries
Adding time-entry manually is super easy. Open the View time report menu and Click the “Add Session Manually” button to enter any work that was not timed yet. Choose the date or date range that was worked. Then select the time range that was worked. As you add more timed work the Time Log Report will section out the display in week long increments, providing a total for each week.
Task and Workspace Time Reports
Task and Workspace Time Reports
Heycollab allows you to view reports for individual tasks, Workspaces, or team-wide. You can see a Time Report of one task by clicking the 3-dot icon on a task and selecting View time report. To view the timesheet of an entire workspace, In the Task Board view of the Workspace click the “…” icon in the top right corner of the window, and Select “View Workspace Timesheet”. A Time Log Report window will open revealing all of the work that has been recorded across Tasks in this Workspace. If you need to view any of the tasks more closely, each name is a hyperlink which opens the Task window directly. To add any additional Descriptions, just click on the description to make it editable on the Time Log Report. In a similar way you can view the tracked time you’ve spent working across all Workspaces. Click your Profile picture in the bottom left hand corner of the Workspace window. Select “View Company Timesheet”. Then a Time Log Report window will open revealing all of the work that has been recorded across each of the Workspaces for the company. Click on “My Work” in the top left hand column to see a quick total of your hours worked across Workspaces.
Exporting Time Reports
Exporting Time Reports
Export any Time Log Report into a .csv file. You can do this on a task level by opening the View time report menu and click on the Export CSV button To export at a workspace level, open the workspace timesheet and click the “Export CSV” button. Lastly to export a time report log of your entire team, click on the profile icon, select team-wide time-sheet and click on “Export Csv”.
Exporting Time Reports
Exporting Time Reports
Export any Time Log Report into a .csv file. You can do this on a task level by opening the View time report menu and click on the Export CSV button To export at a workspace level, open the workspace timesheet and click the “Export CSV” button. Lastly to export a time report log of your entire team, click on the profile icon, select team-wide time-sheet and click on “Export Csv”.
Searching and Filtering Tasks
Searching and Filtering Tasks
Try filtering by clicking the Search Icon. Type a specific Keyword to bring up the related task. Click the filter icon within search for more ways to filter your tasks. Filter by label, Due date, bookmarked and My tasks You can also filter by specific team member. To do so, simply click on the team -Profile icons in the top left hand corner and only their tasks will appear.
Manage Members
Managing Team Members
Each Workspace can assign specific team members with access to view certain areas or to complete certain actions.
The full list of what can be assigned to a Member user:
Create, Join or See Public Workspace
Create Private Workspace
Add members to Public Workspace
Invite People to company (Into Public Workspace)
Post messages in Workspace
Manager User:
Create, Join or See Public Workspace
Create Private Workspace
Change Workspace Settings
Add members to Public Workspace
Add members to Private Workspace
Invite People to company (Into Public Workspace)
Invite People to company (Into Private Workspace)
Post messages in Workspace
Remove messages in Workspace
Delete Workspace
Remove User from Workspace
Promote/Demote User Roles
Deactivate User’s Account
Administrator User:
An admin user can do everything a Manager User can, and they can:
Delete User’s account
Tracking Your Time Worked on a Task
Tracking Time on a Task
You are able to keep track of the hours spent on each Task you have created for your team. The time will track sessions individually allowing descriptions to be included so it is easy to identify what was done in that time frame.
The timer is located on each Task in several places for your convenience. You can access the timer on the Task card in the Board view of the Workspace. You can also start the timer by clicking and opening the Task card.
Once started the timer will run in the Task and you can also see a Timer in the bottom left corner of the Workspace window. This larger Timer will display the task being currently tracked.
When you are finished with a timed work session, press stop on the timer icon. A pop up window will appear allowing you to add any details or a description of your work. These details can be edited or changed by viewing the Time Report for the Task.
Communication is key to collaboration, and Messages are a great way to reach out.
Heycollab’s focus is making messages an easy and direct part of the interface workflow experience.
How to Write and Send a Message:
1. Find your Workspace in the left hand column and click the center Chat icon.
2. In the below grey window type your message.
3. Attach any files by clicking the “paper clip” icon on the left. You can select from Dropbox, Google Drive or files uploaded from your computer. (Or you can drag and drop a file directly to attach it too.)
4. Directly mention a team member by clicking the “…” on the right and then select the “@” icon from the dropdown. (you can add some simple formatting or insert an emoji here too.)
5. Click the blue paper airplane icon when you are finished and ready to send.
Files and folders
Create folders & sub-sections, add files, search, view and share.
Access your Workspace files by clicking the Folder icon of your Workspace name in the left hand column.
You can see your files in either a list or thumbnail view.
Toggle between them by clicking the icon in the top right of the window.
Adding Files to the Workspace
Add files or folders by clicking the “+” icon in the top right of the window.
You can add hundreds of files in just one upload and all of the files will be immediately accessible to your team.
You can also use the Search box to find files quickly by typing keywords or file names into the Search field.
Organize Files into Folders
Organize your files by creating folders.
Click on the “+” icon in the top right of the window and select Create Folder.
Once in place, you can move files into the appropriate place.
Inside folders you are able to create Sections for your files.
The Sections can allow you to organize your files one level deeper inside the folder.
Share files As Attachments Or Link Per selecting a file, or right clicking- this will bring a dropdown with the following selections:
Share
Move
Copy
Rename
Replace image
download
Add Comment
Delete file
Selecting to share, there are to ways to share and that is the following: 1. Attach to message 2. Copy Link
A Folder Can Have Sub-Sections
Before organizing your images, creating a folder takes precedence and then images can be selected to move to that created folder. Within a folder, the images, documents, video files or other items can be organized in sections.
Working with Files
Working with Files
Each file or folder can be selected by clicking the check box in the top left of the thumbnail. This will allow you to take four actions:
Share
Copy
Move
Delete
Select the action you want by clicking the button at the top of the Files window.
Selecting “Share” will immediately open a Message with the item attached.
Duplicate a File or Folder by clicking Copy.
Choose Move to put an item in the appropriate folder, or to move a folder to a different Workspace. (Each Folder thumbnail will display a number on the folder which shows how many files are currently stored inside.)
Remove an item completely by choosing Delete.
Remember: You can select multiple files and folders when applying any of these actions.
Additional options are available by clicking the “…” icon to the right of a file or folder. This will allow you to take these actions:
Share
Move
Copy
Rename
Replace image
Download
Add comment
Delete File
The main action which is different in this section is Renaming a file or folder.
Using the List View
The List view of the Files window makes additional details visible.
You can quickly locate how many comments have been made, the size of the file, and when it was uploaded.
When you hover over an item click the Bookmark icon on the far right to add it to your Saved Items.
Access your Workspace files by clicking the Folder icon of your Workspace name in the left hand column. You can see your files in either a list or thumbnail view. Toggle between them by clicking the icon in the top right of the window. To find files quickly try typing keywords or file names in the Search field. Add files or folders by clicking the “+” icon in the top right of the window. You can add hundreds of files in just one upload and all of the files will be immediately accessible to your team. Organize your files by creating folders. Once in place, you can move files into the appropriate place.
You can also access your files from the About Sidebar. The files will display in a list view and provide another way to add files or folders while keeping your current work also visible. Any file that has a comment will have a number bubble on top of the file thumbnail. A pink number means the comment is incomplete. A green number mees the comment has been completed.
Each file or folder can be selected by clicking the check box in the top left of the thumbnail. This will allow you to take four actions: Share, Copy, Move, or Delete the item. Select the action you want by clicking the button at the top of the Files window. Selecting Share will immediately open a Message with the item attached. Duplicate a File or Folder by clicking Copy. If you need to Rename that copied item click the … icon in the top right of the thumbnail and select Rename. Choose Move to put an item in the appropriate folder, or to move a folder to a different Workspace. Each Folder thumbnail will display a number on the folder which shows how many files are currently stored inside. Remove an item completely by choosing Delete. You can select multiple files and folders when applying any of these actions.
The List view of the Files window makes additional details visible. You can quickly locate how many comments have been made, the size of the file, and when it was uploaded. When you hover over an item click the Bookmark icon on the far right to add it to your Saved Items.
Utilizing the Work and My Work Sections
Utilizing Work and My Work Sections
Admins in a Workspace have access to the Work window. The Dashboard shows a summary of all team members in the Workspace. Filter this by searching for a specific team member in the search bar. Or choose a specific time frame in the drop down menu on the top far right of the window. The Workload graph gives a visual of activity for your team members. Hover over their profile picture to reveal their name. Hover over the bar to see specific task counts they are working on. Or view their profile card below to see even more of a team member’s work details. The labels displayed are tracked by the labels assigned to a task. Click each drop down to see which specific tasks they are working on which have that label.
The top row of the Work window also allows you to select My Work to see your activity or select a specific team member from the drop down to see their activity. When a team members work is shown, there will be four summary icons at the top: Tasks Completed, Hours Worked, Messages Sent, and Comments Posted.
From the Dashboard screen you can create tasks across all Workspaces by clicking the “New Task” button at the top. The window allows you to choose your task name, add a description, and create subtasks. Choose the specific Workspace for your task in the drop down Depending on which Workspace is chosen will allow you to assign certain team members to the task.
The My Work window allows you to see an overall summary of your activity in the Workspace When your work is shown, there will be four summary icons at the top: Tasks Completed, Hours Worked, Messages Sent, and Comments Posted. The top section is “Tasks Assigned to Me” and is a collection of your work. This previews important details like: due dates, tracked time, labels, and Workspace. Click on the Workspace on the far right to jump directly into that Task board.
Organize your window by creating a List. Click the “New List” button at the top row of the window, and the list will be added to the bottom of the display window. Click on the name to edit and type your own name for the list. To re-order a list you can click and drag it in any order under the “Tasks Assigned to Me” list. Simply drag any Task in the window into any list you create to organize your work.
Adding to Saved Items Video Tutorial
Adding to Saved Items
In the left hand column of the Workspace select Saved Items from the top List. Click the blue ? icon in the top right of the Saved Items window to view a Help video for this section. There are three things you can add to Saved Items: Messages, Tasks, and Files. To add a Message go to any message and hover over it to reveal the Bookmark icon to the right. If you click the Bookmark icon again it will unselect and remove it from the Saved Items area. In the same way when you hover over a Task in either the Board or List view it will show you the Bookmark icon you can click to add the Task to the Saved Items area. Files can be added to Saved Items by going to the Files section in the Workspace or by looking at the Files in the About Sidebar. Hover over the file name and select the Bookmark icon. Remember that even your Private Tasks in the About Sidebar can also be added to your Saved Items and will display in the Task column of your Saved Items window.
Working with Your Files
Working with Your Files
Get a quick overview of your Files and Folders in the About Sidebar by clicking the “Files” button. Remember to click the small blue ? icon to get a help video reviewing this specific Files area. Use this visibility into your Files to make workflow easier, instead of changing your entire Workspace window, you can view your messages or tasks and have your Files sidebar open. Upload hundreds of files at once by clicking the “Add Files” button. Organize them into folders if desired by clicking “New Folder”. When you hover over a Folder, click the … icon to upload files directly into the folder or rename the folder. Click “Add to Message” to immediately attach the Folder to a message to share with others.
When you hover over a file important data will appear below the name. File size and upload date will be revealed. To the right of the name you can click the bookmark icon to add the file to your Saved Items. Click the … icon to the right of the file name to Share, Move, or Copy the file. You can Share the file and it will attach it to a Message or just Copy the Link. To Move the file you would need to first select the Workspace and then the Root Directory or a Folder you want the file to be stored in. Select Copy to duplicate the file and choose where you want it to be stored in the same way.
Click “Add a Comment” to open the file and type your Comment in the right hand column. A visual marker will be added to the area related to your remarks. Use Comments together with Replacing an Image to keep track of updated changes. When a file has been changed and updated according to the Comment, choose Replace an Image and any completed Comments will remain with the new file!
If needed you can always click the … icon and select Delete to remove a file or folder.
Track Time on a Task
Track Time on a Task
The time worked on a particular task is displayed at the bottom of the Task card. To start tracking your time, hover over a task-card and click the play button and the Timer will start tracking in the Task. The timer will also show at the bottom left hand corner. You can always click the timer and it will show you the Task you are currently tracking. When you are ready to stop the timer hit the Stop button and it will allow you to enter a brief description of what you worked on during that time period. To learn more about time-tracking, see our walkthrough videos within the time-tracking section below
Using an outside email to send a Message
Outside Email to Send a Message
Collaboration and Communication are essential to Heycollab. So, it is helpful to send a Message or even create a Task from an outside email address.
To do that, you will need to know your Workspace email address.
Click on the “…” icon next to the Workspace name in the left hand column.
Select “Workspace Email” from the dropdown list.
In the window that pops up, there will be two email addresses available to you. One will just send a message from your outside email. The second will create a task from your outside email that is sent.
Adding Subtasks to a Task
Creating Subtasks in a Task
Adding a Subtask allows you to break out larger Tasks into manageable sections for completing the project.
Create a Subtask within the Task Window
Click blue button ” Add ” in the Sub-task section to add a Subtask.
Type in all the information for the Subtask in the text field.
Include any Titles, descriptions, or lists.
You can format the text by adding Bold or Italics (Cntrl/Cmd B or I) and make bulleted lists by using a dash before any new line.
Hit the green check when you are finished.
If you need to make any edits hover over the subtask and click the pencil icon.
Remember: You are able to do similar functions that are also available on a Task like assigning a due date, copying a Subtask link, and tracking time too!
Give Feedback on a Subtask
Providing feedback on a Subtask is done through adding Comments or Reactions.
To add a Reaction, hover over the Subtask and click the emoji icon on the left.
Select the right reaction to add and it will appear below the Subtask.
The Comment section is on the far right of the Task window.
It can be used like you were creating a Message.
Add any feedback or link specific Subtasks in the comment to draw attention to the specific work being mentioned.
You can also mention a team member in the comment using the “@” symbol.
“Open subtask” it refers to a child subtask where a subtask can have one subtask to itself and it will be shown as a tree line in the box- see the image below.
Assign team members to a subtask- again this feature is displayed on the far right of the subtask as you hover over the subtask.
Set the due date option is available for the subtask.
Create custom fields to tasks by clicking or selecting custom fields.
Setup & Administration
Learn how to set up heycollab. From signing up, to setting up your team, resetting your password, and more.
Click the forgot password link on this page (see attached)
Sign in page
Input your e-mail address on this next screen
You’ll receive an e-mail with a 5-digit verification code. You’ll need this code to be able to reset your password. Note: If you have not received an e-mail, check your spam or junk mail. After 60 seconds you will be able to resent the code.
For this last step, simply input your new password and you are now ready to log back in with your new credentials
Deleting your account
Once you delete an account, please note that this cannot be undone. Upon the deletion of your account, we delete all of your personal data as well.
To delete your account, follow these steps:
As an admin, open the main menu in the bottom left-hand corner and select billing
From the Billing popup, select Delete your account at the bottom and select Sure
For the last step, select why you are closing your account, give a brief explanation, and click the Close Account button.
Work & My work
As an admin, view all your team’s work in a dashboard layout, assign tasks from on central location and prioritize work. As a member view all tasks assigned to you in one neat place.
The My Tasks window allows you to see an overall summary of your activity in the Workspace on an easy to use Dashboard.
Your work is shown and organized in four categories displayed in separate icons at the top of the window.
The four categories are:
Tasks Completed
Hours Worked
Messages Sent
Comments Posted
The main section is called “Tasks Assigned to Me” and is an overall collection of your work.
Your work is shown in a list and previews important details like:
Assigned to
Due dates
Tracked time
Subtasks
Tags
Workspace
Anytime there is hyperlink it will take your directly to that section. As an example, if you click on the Workspace on the far right, it will take you directly into that Taskboard.
Organize Your Window by Creating a List.
Click the “New List” button at the bottom right Add button of the window.
The new list will be added to the bottom of the display window for you to edit.
Click on the name to edit and type your own name for the list.
The new list will be added to the bottom of the display window for you to edit.
Click on the name to edit and type your own name for the list.
Viewing Team Members Work
Viewing Team Members Work
Only Admins in a Workspace have access to the Work window which shows visibility into the work of other team members.
Access this Dashboard by clicking My Team on the left hand column.
The Dashboard shows a summary of all team members in the Workspace.
The Workload graph at the top gives a visual of activity for your team members
Hover over their profile picture to reveal their name.
Hover over the bar to see specific task counts they are working on.
Or view their profile card below to see even more of a team member’s work details.
The labels displayed are tracked by the labels assigned to a task.
Click each drop down to see which specific tasks they are working on which have that label.
Or choose a specific time frame in the drop down menu on the top far right of the window.
The top row of the Work window also allows you to select My Work to see your activity or select a specific team member from the drop down to see their activity.
When a team members work is shown, there will be four summary icons at the top:
Tasks Completed
Hours Worked
Messages Sent
Comments Posted
Editing and Updating Tasks in the My Work Dashboard
Creating a Task from the My Tasks Dashboard
When you are in the My Task Dashboard screen you can create tasks across all your Workspaces by clicking the “New Task” button at the bottom blue “Plus” icon.
A Task window will open.
The window allows you to choose your task name, add a description, and create Subtasks.
Choose the specific Workspace for your task in the drop down menu in the bottom left corner.
Depending on which Workspace is chosen, it will allow you to assign specific team members to the task.
Using Links for Tasks or Subtasks
Using Links for Tasks or Subtasks
You may find it useful to send someone a link to a task or subtask directly. Do this by clicking the Link icon when you hover over the task name. You’ve now copied the hyperlink for this task, and you can send it to a team member by writing a message and pasting the link. The hyperlink will appear in a short name like, “T28”. If you had copied a Subtask link the short name would appear like, “ST29”. When your team member clicks on the link the task will immediately open in a window. Remember that you can share Task links across Workspaces too! If you are in the messaging section, you can access the tasks assigned to you in the about sidebar. You can copy the task link directly from here, so you don’t have to leave the messaging section
Formatting text in messages
Heycollab allows you to change the text style across messages, task comments and subtasks.
There are two ways to update the text:
Via the New Doc
Via shortcuts
Add formatting to text via New Doc found in the blue box on the far right side of the screen.
With this new feature, you are able 1. To select the type of the text,
2. Style of text such as bold, italicized, underline etc., 3 Align the text, left, center or right justified. 4. Color of the text 5. Add bullet list or numbered lists 6. Add a task list to the document 7. Add a URL to the document
8. Add a table to your document
9. To format that table you can do it by selecting “…” beside the table icon.
10. And if that is not enough, we also have more items on the plus box, such as toggle list, quote, code, code block, and horizontal line.
It all depends on the your needs. These documents created in heycollab can be exported in pdfs. Also, as you publish these documents, they are saved in the file section of that specific workspace.
2. Add formatting to text via shortcuts
Simply select the text you wish to format and these shortcuts will stylize your text:
Bold by pressing command+b or control+b
Bold more by adding a second layer of asterixes (*) so you would have two at the beginning and two at the end of a text like this **text**
Italicize text by pressing command+i or control+i, or you can simply add _italicized text_ this (_)
If at the beginning of a message you add a line (-) and a space, that message will become a bullet point
NOTE: all the formatting will be visible once you send the message through.
Searching and Filtering Tasks
How to Find Tasks
Get to the tasks you need quickly using these tips:
1. Searching for Tasks
Try searching your Workspace by clicking the Search Icon.
Type a specific Keyword to bring up the related Tasks.
2. Filter Tasks
You can also filter by specific team member by clicking on the team Profile icons in the top left hand corner.
Select the user and only their tasks will appear in your view.
3. Workspace Views
Using a different Workspace view can help you see your team’s tasks in a new way.
Select your view at the top center to better visualize your team’s workflow.
The Board view is the default and shows all the Tasks in their cards.
The List view shows a condensed full collection of tasks listed out and categorized.
The Calendar view helps to understand your tasks through your daily and weekly schedule.
While the Timeline view puts your whole team’s workflow into perspective.
Administration
Learn about dashboards and administrators, reporting and team management.
An Administrator can use the My Work Dashboard to keep up to date on all of their team member’s progress.
The Dashboard gives quick visual insight and access to deeper data details if needed.
Viewing Team Members Work
Only Admins in a Workspace have access to the My Team window which shows visibility into the work of other team members.
Access this Dashboard by clicking My Team on the left hand column.
The Dashboard shows a summary of all team members in the Workspace.
The Workload graph at the top gives a visual of activity for your team members
Hover over their profile picture to reveal their name.
Hover over the bar to see specific task counts they are working on.
Or view their profile card below to see even more of a team member’s work details.
The labels displayed are tracked by the labels assigned to a task.
Click each drop down to see which specific tasks they are working on which have that label.
Filter this by searching for a specific team member in the search bar.
Or choose a specific time frame in the drop down menu on the top far right of the window.
The top row of the Work window also allows you to select My Work to see your activity or select a specific team member from the drop down to see their activity.
When a team members work is shown, there will be four summary icons at the top:
Tasks Completed
Hours Worked
Messages Sent
Comments Posted
Reporting for Administrators
Viewing Team Reports
Administrators need the ability to see what work is being completed across individual team members and entire Workspaces. Heycollab offers reporting insights for both of these needs.
You are able to view some of the top level data in Dashboards, but you can export Time Reports for more detailed data.
Time Reports Summary
Time Reports is a collection of all the work that has been timed on the tasks in a Workspace.
These Time Reports are helpful to keep track of your work through specific descriptions included on each entry.
Time Reports can be tracked across any Workspace for all individual team members.
As an Admin you are able to view Time Reports for all the team members in a Workspace.
Any Time Report can be exported into a .csv file for your records!
Viewing Time Reports
You can access the Time Report Log by clicking the pencil icon when you hover over the timer on a Task card. Or you can access it by clicking the “…” icon on a Task card.
Once the Time Report Log window opens you will see a list of all the tracked work sessions for a Task.
The Time Report organizes the work by week.
In the header of each group will be the date of the week on the left and a total of the time worked on the right.
Each of these sessions can be edited.
You can manually adjust the time worked or the description of the work.
Exporting Time Reports
In the Task Board view of the Workspace click the “…” icon in the top right corner of the window.
Select “View Workspace Timesheet”.
Then a Time Log Report window will open revealing all of the work that has been recorded across each of the Tasks in the Workspace.
If you need to view any of the tasks more closely, each name is a hyperlink which opens the Task window directly when clicked.
Click “Export CSV” in the top right corner of the window and Save the file to your computer.
Multiple Workspace Time Reports
In a similar way you can view the tracked time you’ve spent working across multiple Workspaces.
Click your Profile picture in the bottom left hand corner of the Workspace window.
Select “View Company Timesheet”
Then a Time Log Report window will open revealing all of the work that has been recorded across each of the Workspaces for the company.
Remember: Another way to see a quick total of your time worked is in the My Work section.
Team Management for Administrators
Team Management for Administrators
An Administrator has several tools available to build, manage, and interact with their team in Heycollab.
The absolute first step is getting your team into your Workspace.
Follow the steps below to invite them:
Invite Your Team to a Workspace.
Maximizing the power of your Workspace begins with adding in your team members. This will allow you to send them direct messages and assign them Tasks specifically.
1. Click “Invite new people”.
In the left hand column click the “Add People” button below the Workspace name.
2. Enter the User’s email address.
Type in the user’s email address and select the Workspace you want them to join.
3. User is sent an email invitation.
They will open the email and click to join.
Once all of your team members are added you can get to work setting up and assigning Tasks!
View and Manage Your Team.
An Administrator in a Workspace has access to the My Team window.
The Dashboard on this window shows a summary of all team members in the Workspace.
You can Filter this entire section by searching for a specific team member in the search bar in the top right corner. Or choose a specific time frame in the drop down menu on the top far right of the window.
The Workload graph gives a helpful visual graph of activity for your team members.
You can hover over a profile picture to reveal the teammate’s name, or hover over the bar graph to see specific task counts they are working on.
Each teammate has a profile card with even more of their work details in one location.
You can utilize labels on Tasks to help group types of work and see which team members are working on which Tasks.
Specific reports can help you see how your team members are working and what they have been working on.
When a team members work is shown, there will be four summary icons at the top: Tasks Completed, Hours Worked, Messages Sent, and Comments Posted.
Managing Your Team in the About Section
You can quickly manage your team and add important details about the Workspace for them to reference in the About Sidebar. You can access the About Sidebar by clicking the blue “i” icon in the top right corner of the Workspace window.
When you select the “About” tab in the Sidebar you will see it divided into 4 areas.
Members
Description
Notifications
Activity Log
Clicking to open the Members area allows you to see the Profile Card of any member by clicking their Name on the list.
The Profile Card will provide you a variety of helpful information like their email, phone, and location.
You can remove a Member by clicking the “x” icon to the right of their name. Or you can add a Member by clicking the “+” icon at the bottom.
If a Team member doesn’t show in the list you would need to first Invite them to the Workspace.
Manage Roles and Permissions of Users
Managing Permissions and Roles of Users
Every Workspace has an Administrator assigned and each team member that is invited and joined can be assigned certain roles and permissions.
To view and make changes to a team member, follow these steps:
Step 1: Click on your name in the bottom left hand corner of the window.
Step 2: Click on “Roles and Permissions” from the list.
Step 3: In the Permissions window make any adjustment to the different Roles able to be assigned.
Step 4: Click on “Manage Members” in the left hand column of the window and assign your team members the roles they need.
Manage Members
Managing Team Members
Each Workspace can assign specific team members with access to view certain areas or to complete certain actions.
The full list of what can be assigned to a Member user:
Create, Join or See Public Workspace
Create Private Workspace
Add members to Public Workspace
Invite People to company (Into Public Workspace)
Post messages in Workspace
Manager User:
Create, Join or See Public Workspace
Create Private Workspace
Change Workspace Settings
Add members to Public Workspace
Add members to Private Workspace
Invite People to company (Into Public Workspace)
Invite People to company (Into Private Workspace)
Post messages in Workspace
Remove messages in Workspace
Delete Workspace
Remove User from Workspace
Promote/Demote User Roles
Deactivate User’s Account
Administrator User:
An admin user can do everything a Manager User can, and they can:
Delete User’s account
Import tasks and messages from other platforms
https://vimeo.com/713945003
Heycollab plays nice with other platforms.
If you wish to import your tasks or messages from Trello, Asana, Slack, Clickup, Monday and more you can do so in just a few clicks.
To get started, open the main menu, select import and click on the platform you wish to bring data over from. Click import and Heycollab will import all of your tasks, comments, subtasks, images, custom tags and more.
Import data to Heycollab from other platformsSelect where you wish to import data from.
Once the import is complete you will receive a notification e-mail and all the data you imported will be organized in a folder across workspaces.
Heycollab confirmation email that your data was imported successfully.
Searching and Filtering Messages
Finding Messages
After working for several weeks the amount of conversations can create a lot of content to sort through. Finding the Message you need can be made easier by Searching, Filtering, and Bookmarking.
Searching for Messages
You can quickly jump to the message you need by searching for specific keywords by clicking the magnifying glass icon in the top right of the window.
Then simply type the keyword or keyword phrase you are hoping to find and the Messages will automatically show the results of any Message that included the keyword.
Filtering Messages
By filtering a Message you are selecting to view only the Messages sent by a certain team member or sent during a certain time frame.
Click the magnifying glass icon in the top right of the window.
Then click the Filter icon in the search bar.
Choose “Member” and select a specific member of the team and only their messages will appear.
Choose “Date” and select a date range and view just the messages sent during that time.
Bookmarking a Message
Hover over any Message and then click the Bookmark icon to send that Message to your Saved Items.
You can assign the right people in your team to a task by clicking the “+” icon to bring up a list of the team that are part of your Workspace. Multiple people can be assigned to a task. Select them one at a time to add them. You can assign Subtasks to team members in the same way. If you need to move a task to a different Workspace Click the “…” icon when you hover the task name, Select Move task and choose your new Workspace and then which column to place the task in. If you need to duplicate a task then click the “…” icon and select Duplicate Task.
Video calling
Heycollab allows you and your team to stay connected with team video calling via the web, mac, windows, iOS and Android apps.
To start a call, click the video Icon. Next, click the Join meeting button and heycollab will send out a message with a video call link so others in this workspace may join
Call via heycollab
As you start a call, you will be the moderator of the call, so when others will Ask to Join, you will need to admit them in
Once a call has started, at the bottom nav, you’ll have the option to:
Video calling toolbar
mute yourself or change your microphone settings
start or stop your camera and change the cam settings
Share your screen
use the video chat and polls feature
raise your hand or post a video reaction
Within the participants pane you can invite others to join
Hover over a participants field and click the 3-dot menu to view additional options and add breakout rooms
At the bottom nav the thumbnails icon would allow you to see all viewers in tile view
For more options including subtitles, call recording, video background and more, click the 3-dot menu.
Heycollab call recording including subtitles, call recording, video background and more.
Here’s a little useful tip: You may invite anyone to join your meeting even if they do not have an account with Heycollab
Import tasks and messages from other platforms
https://vimeo.com/713945003
Heycollab plays nice with other platforms.
If you wish to import your tasks or messages from Trello, Asana, Slack, Clickup, Monday and more you can do so in just a few clicks.
To get started, open the main menu, select import and click on the platform you wish to bring data over from. Click import and Heycollab will import all of your tasks, comments, subtasks, images, custom tags and more.
Import data to Heycollab from other platformsSelect where you wish to import data from.
Once the import is complete you will receive a notification e-mail and all the data you imported will be organized in a folder across workspaces.
Heycollab confirmation email that your data was imported successfully.
Assigning Tasks to Your Team
How to Assign a Task
You can assign a team member by hovering over the Task and clicking the “+” icon to select the team member.
Or when you open a Task card click the “Assign Task” button in the top left corner.
Multiple team members can be assigned to a Task one at a time.
Remember: You can assign a Subtask the same way.
Send a Task Link
You may find it useful to send someone a link to a task directly.
Do this by clicking the Link icon when you hover over the task name.
You’ve now copied the hyperlink for this task, and you can send it to a team member by writing a Message and pasting the link.
The hyperlink will appear in a short name like, “T28”.
If you had copied a Subtask link the short name would appear like, “ST29”.
When your team member clicks on the link the task will immediately open in a window.
Remember: that you can share Task links across a Workspace too!
Assigning a Task to Members of a Different Workspace
If you need to move a task to a completely different team on another Workspace.
Click the “…” icon when you hover the task name.
Select Move task and choose your new Workspace and then which column to place the task.
Remember: If you need to duplicate a task then click the “…” icon and select Duplicate Task.
Adding Feedback to Tasks
Adding Feedback to Tasks
Providing feedback on a subtask is done through adding comments or reactions. To add a Reaction, hover over the subtask and click the emoji icon. Select the right reaction to add and it will appear below the Subtask. The Comment section is on the far right of the Task window. It can be used like you were creating a Message. Add any feedback or link specific subtasks in the comment to draw attention to the specific work being mentioned. You can also mention a team member in the comment using the “@” symbol. Mentioning a member will send out an e-mail notification to that member.
Formatting Your Tasks and Workspace
Formatting Your Tasks and Workspace
It might be helpful to customize your Task cards or even your Workspace to help identify them faster.
Follow these steps to make these formatting changes:
Changing the Look of a Task Card Cover
To customize your task and set a specific image to the task cover, open the task and add an attachment.
Scroll below the Description box and click Add Attachment.
You can select from these options:
Your Computer
Shared File
Dropbox
Google Drive
Upload the image from your selected source.
When the image appears in the task window, hover over it and click the icon on the far right to select “Make Cover”.
Your image will display on the Task card in the Workspace Board view.
Changing the Look of Your Workspace
You can also customize your entire Workspace by clicking the artist palette icon in the bottom left of the Workspace screen.
You can select from a choice of solid colors or images.
This custom format can even be uniquely set for each Workspace view.
Saving a Board Template
When your design is finalized you can save it as a Board Template.
Start by clicking the “…” icon in the top right of the Workspace window.
Select Board Template > Save Board Template from the drop down list, and name your Template.
To use the template in a different Workspace, click the “…” icon in the top right of the new Workspace window and select Board Template.
Choose your Template name from the drop down list and it will load!
Customizing Task Boards
Customizing Task Boards
If you’d like to customize your task and set a specific image to the task cover, open the task and add an image as an attachment. Upload the image from your computer or choose from a shared image in the Workspace. When you see the image appear in the task window, hover over it and click the icon on the far right to select “Make Cover”. You can also customize the background of your Workspace by clicking the artist palette icon in the bottom left of the Workspace screen. You can select from solid colors or images. This can even be uniquely set for each Workspace view.
Creating Task Comments and Feedback
Give Feedback on a Task or Subtask
Providing feedback on a Task or Subtask is done through adding comments or reactions.
Add a Comment
The Comment section is on the far right of the Task window.
Add any feedback or link specific Subtasks in the comment to draw attention to the specific work being mentioned. You can also mention a team member in the comment using the “@” symbol.
Add a Reaction
You can add a Reaction only to a Task Comment that was made or a Subtask.
To add a Reaction, hover over the Task Comment or Subtask and click the emoji icon on the left.
Using Task Board Templates
Using Task Board Templates
You can save a task-board as a template and you can save as many templates as you wish to be used across workspaces. To do this click the “…” icon in the top right of the Workspace window. Select Board Template > Save Board Template from the dropdown list, and name your Template. To apply templates, click the “…” icon in the top right of the new Workspace window and select Board Template. Choose your Template name from the dropdown list and the template will be applied to your current board.
Using Taskboard Templates
Taskboard Templates
Changing the Look of Your Workspace
You can also customize your entire Workspace by clicking the artist palette icon in the bottom left of the Workspace screen.
You can select from a choice of solid colors or images.
This custom format can even be uniquely set for each Workspace view.
Saving a Board Template
When your design is finalized you can save it as a Board Template by clicking the “…” icon in the top right of the Workspace window.
Select Board Template > Save Board Template from the drop down list, and name your Template.
To use the template in a different Workspace, click the “…” icon in the top right of the new Workspace window and select Board Template.
Choose your Template name from the drop down list and it will load!
Create a task from a Message
Create a Task from a Message
You are able to create a Task quickly right from your Messages! This can help save a lot of time and keep you productive within the same Messages window.
Whenever you have a Message that you want to turn into a Task just hover over the message and in the top right will be a white bubble. Click the “checkmark” icon.
Once that has been clicked, a new Task window will open. The message will be included in the Description of the Task automatically.
You would just need to name the Task, select a due date, and assign it to the appropriate Team member.
Custom fields
Custom fields expand the functionality of your tasks by allowing you to add new field types and custom data to your Heycollab tasks.
https://vimeo.com/719406868
Heycollab custom fields
To get started, open a task and click the custom field button.
Heycollab custom fields.
You can either start with one of the suggested fields or create a new one.
Let’s add a priority custom field from the suggested fields.
Notice in the task dialog that now I have a new section labeled custom fields that will show this new property listed here.
I can click on this property and set it’s available values.
To show this field on the face of the task-card, open custom fields, click on priority and at the bottom check show field on task-card
Now, notice how this field shows on the task card.
Each field you create, will be available to use across all tasks you create within this workspace.
Now, let’s create a brand new field. Say we have a product that we want to launch and need to know in which phase of production this product is.
We can create a new field called Product status, select dropdown as the type and create its properties to be: Not started, In progress, In production and Ready to ship. We can also add color for each of these states.
Let’s show this on the task-card and create it.
You can create various types of custom fields like Checkboxes, dates, numbers and free text.
You can show these custom fields in your list view and customize the columns you wish to see. Just click on the fields button and select which columns you wish to show here.